- SAP Community
- Products and Technology
- Spend Management
- Spend Management Blogs by Members
- Add custom button to Shopping Cart
Spend Management Blogs by Members
Check out community member blog posts about spend management and SAP Ariba, SAP Fieldglass, and SAP Concur solutions. Post or comment about your experiences.
Turn on suggestions
Auto-suggest helps you quickly narrow down your search results by suggesting possible matches as you type.
Showing results for
RicardoRomero_1
Active Contributor
Options
- Subscribe to RSS Feed
- Mark as New
- Mark as Read
- Bookmark
- Subscribe
- Printer Friendly Page
- Report Inappropriate Content
03-17-2012
11:01 AM
In this document we will see how to add a custom button to the Shopping Cart and the code for this button in order to call to a custom component for show some data.
This can be applied also to other documents like PO, CTR, etc.
Creating the custom Component
Goto se80 and create a new component called ZZ_SC_EXTRA_INFO:


Retrieve the SC guid:
We need to know the guid of the shopping cart in order to obtain some data we want to show.
First we’re going to create a node in component controller to store that guid:

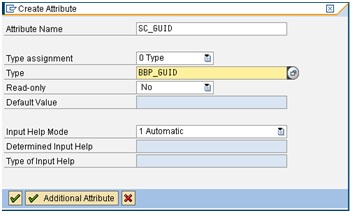
 Create also an attribute:

Ok, now we need to fill this attribute, first we need to map the context node in our window, so go to the window and drag and drop the node:
 Now we’re going to create a parameter in the plug that will start the application, so go to the Inbound Plugs Tab and enter in the method HANDLEDEFAULT doing double click in the plug.
Create the parameter:

Now we’re going to use the code wizard
in order to set the value of that guid to our context node:

DATA: lo_nd_zz_sc_guid TYPEREFTO if_wd_context_node,

 lo_el_zz_sc_guid TYPEREFTO if_wd_context_element,

 ls_zz_sc_guid TYPE wd_this->element_zz_sc_guid.


 lo_nd_zz_sc_guid = wd_context->get_child_node( name = wd_this->wdctx_zz_sc_guid ).

 lo_el_zz_sc_guid = lo_nd_zz_sc_guid->get_element( ).

 *   Set the parameter value to the context node;

 ls_zz_sc_guid-sc_guid = zz_sc_guid.

 lo_el_zz_sc_guid->set_static_attributes(

 EXPORTING

 static_attributes = ls_zz_sc_guid ).
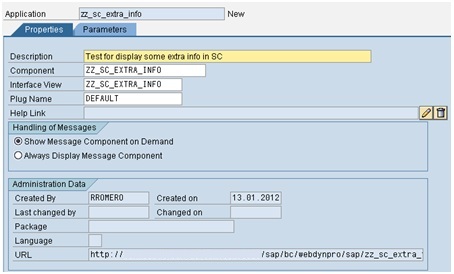
We need also to create a webdynpro application:


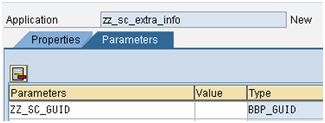
Add the GUID as parameter using the matchcode in Parameters Tab:
 Now, you have the guid of your shopping cart and you can display the extra info you want in the main view, but I leave this part from your side.
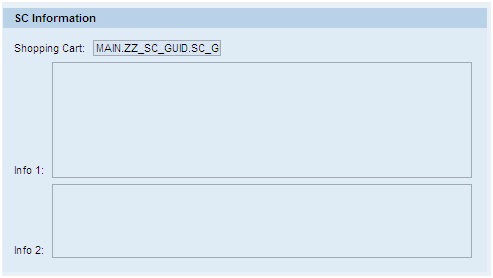
In my case I’ve created a simple WDA adding two “text edit” to retrieve some data from a custom table, but if you want you can create a complex component for add some extra functionality to your solution.

Adding the button to SC
Define a custom action
Go to SPRO to the following path:
SAP Supplier Relationship Management -> SRM Server -> Cross-Application Basic Settings -> Extensions and Field Control (Personalization) -> Define and Assign Actions

We need to first define the action:

Then we need to assign that action to the SC:
Choose the set type ‘05’ for header and the object type BUS2121 for shopping cart.

Next step is active this action in the following path:
 Active the action for the mode ‘Display’ for the Shopping Cart. You must set to X the checkbox PDO Action Enabled.
At this point you can also specify a dynamic class and method for control the visualization of the button dynamically. In this example this is not necessary, but if you want to create one, you only need to go to tx SE24 and create a class with the super class /SAPSRM/CL_PDO_DYN_MDA_HD and a method with the following parameters:
 Within the parameter CS_METADA you have a field called ACTION_ENABLED, you need to set it to X to display the button or set to SPACE to hide the button.
Changing the component configuration.
At this point the button is not displayed in the Shopping Cart yet. Why?
You need to change also the component configuration. Go to the portal and create a new SC. With the right button of the mouse choose “More Field Help”:

And here you have the component name, the view and the component configuration:

Go to that component in se80, open the folder called “Component Configurations” and find the Configuration ID:

Push the button “Start Configurator” and an internet browser will be opened: (Display configuration in new versions)

Choose Other Functions -> Enhance . Create a custom enhacement point
Click in the button called “Extensibility 1”:
 Ok, we need to change the data of this button with the data of our button, like this:
We need to mark “Enabled” and put the name of our action in the field “FPM Event ID”. Also we need to set the Visibility to 'Visible' and fill other fields like Explanation, etc…
Push “Save” and now you should see our button in SC. Create a new one and try. Remember that we add the button only for Display mode, if you want to see the button in Edit mode you need to add another entry by customizing or leave empty the field Process Mode for display it in all the cases.

Adding some code to the button
Ok, now we need to add some code to our button. As we saw the webdynpro component is FPM_OIF_COMPONENT and the view CNR_VIEW. So, let’s go to that component and view.
In “Actions” tab we can see there is an action called “BUTTON_PRESSED”:

Ok, we need to create an enhancement point in order to add a post-exit for the method “ONACTIONBUTTON_PRESSED”. So, use the button
 and create a new one.
Now we need to use the button to create a Post-Exit in the method ONACTIONBUTTON_PRESSED:
 For this part we need to check the standard code of that method and copying some parts and adding other custom parts the code could be:
DATA: lv_id TYPE string,

       lv_event_id TYPE fpm_event_id.


 DATA: lo_nd_oif_application TYPEREFTO if_wd_context_node,

 lo_nd_variant TYPEREFTO if_wd_context_node,

 lo_nd_toolbar TYPEREFTO if_wd_context_node,

 lo_nd_button TYPEREFTO if_wd_context_node,

 lo_el_button TYPEREFTO if_wd_context_element,

 lo_nd_other_functions TYPEREFTO if_wd_context_node.


 DATA: lv_substring TYPE string,

 lv_substring_i TYPEi,

 lv_node_name TYPE string,

 lv_position TYPE string,

 lv_length TYPEi,

 lv_seq TYPEi.


 DATA: lv_boid      TYPE bbp_guid.


 DATA:lt_keys TYPESTANDARDTABLEOF string,

 lv_key LIKELINEOF lt_keys.


 TYPES:BEGINOF y_parameters,

 name TYPE string,

 valueTYPE string,

 ENDOF y_parameters.

 DATA: lt_parameters TYPESTANDARDTABLEOF y_parameters,

 ls_parameter LIKELINEOF lt_parameters.


 * Obtain parameters;

 DATA: lo_fpm TYPEREFTO if_fpm.

 lo_fpm = cl_fpm_factory=>get_instance( ).

 lo_fpm->raise_event_by_id( lv_event_id ).

 lt_keys = lo_fpm->mo_app_parameter->get_keys( ).

 LOOPAT lt_keys INTO lv_key.

 ls_parameter-name = lv_key.

 lo_fpm->mo_app_parameter->get_value(

 EXPORTING  iv_key = lv_key

 IMPORTING  ev_value = ls_parameter-value  ).

 INSERT ls_parameter INTOTABLE lt_parameters.

 ENDLOOP.


 lv_id = wdevent->get_string( 'ID' ).

 lo_nd_oif_application = wd_context->get_child_node( name = wd_this->wdctx_oif_application ).

 lo_nd_variant = lo_nd_oif_application->get_child_node( name = wd_this->wdctx_variant ).

 lo_nd_toolbar = lo_nd_variant->get_child_node( name = wd_this->wdctx_toolbar ).

 lo_nd_other_functions = lo_nd_toolbar->get_child_node( name = wd_this->wdctx_other_functions ).

 lv_substring = lv_id.


 lv_length = STRLEN( lv_id ).

 lv_seq = lv_length - 3.

 IF lv_id+lv_seq = '_CP'.

 lv_substring = lv_substring(lv_seq).

 lv_id = lv_substring.

 ENDIF.

 WHILE lv_substring CS'_'.

 lv_position = sy-fdpos + 1.

 lv_substring = lv_substring+lv_position.

 ENDWHILE.

 IF lv_substring CO'1234567890'.

 lv_substring_i = lv_substring.

 ENDIF.


 * item action

 IF lv_id CS'_item'.


 ELSE.

 * header action

 IF lv_id CA '0123456789'.

 lv_position = sy-fdpos - 1.

 lv_node_name = lv_id(lv_position).

 IF lv_id CS 'OTHER_FUNCTIONS'.

 lo_nd_button = lo_nd_other_functions->get_child_node( name = wd_this->wdctx_button ).

 lo_nd_button->set_lead_selection_index( index = lv_substring_i ).

 lo_el_button = lo_nd_button->get_element(  ).

 TRY.

 lo_el_button->get_attribute(

 EXPORTING

 name =  `EVENT_ID`

 IMPORTING

 value = lv_event_id ).

 CATCH cx_wd_context.

 ENDTRY.


 *       Read the guid of the SC:

 READ TABLE lt_parameters INTO ls_parameter WITH KEY name = 'SAPSRM_BOID'.

 lv_boid = ls_parameter-value.


 *       Leave the method if it isn't a custom action

 IF lv_event_id(1) NE 'ZZ'.

 RETURN.

 ENDIF.

  *       Action triggered;

 CASE lv_event_id.

 WHEN 'ZZ_SC_EXTRA_INFO'.

 "We need to put here our code for the button...


 ENDCASE.

  ENDIF.

 ENDIF.

 ENDIF.
We need to add the code within the CASE statement. For call our custom webdynpro we use the classes CL_WD_UTILITIES and IF_WD_WINDOW_MANAGER:
DATA: lv_url TYPE string,

 d_url(255) TYPEc,

 lv_app_name TYPE string,

 host TYPE string,

 port TYPE string,

 out_protocol TYPE string,

 in_parameters TYPE tihttpnvp,

 wa_params LIKELINEOF in_parameters,

 lv_iview TYPE string,

 gf_value_old TYPE /sapsrm/char512,

 gf_clength TYPE int2.

 DATA:  lo_window_manager TYPEREFTO if_wd_window_manager,

 lo_api_component  TYPEREFTO if_wd_component,

 lo_window         TYPEREFTO if_wd_window.


 *   Use the WD application created and pass a value to the parameter SC_GUID:

 wa_params-name = 'ZZ_SC_GUID'.

 wa_params-value = lv_boid.

 APPEND wa_params TO in_parameters.

 lv_app_name = 'ZZ_SC_EXTRA_INFO'.


 CALLMETHOD cl_http_server=>if_http_server~get_location

 IMPORTING

 host         = host

 port         = port

 out_protocol = out_protocol.


 CALLMETHOD cl_wd_utilities=>construct_wd_url

 EXPORTING

 application_name = lv_app_name

 in_host          = host

 in_port          = port

 in_protocol      = out_protocol

 in_parameters    = in_parameters

 namespace        = 'sap'

 IMPORTING

 out_absolute_url = lv_url.


 lo_api_component  = wd_comp_controller->wd_get_api( ).

 lo_window_manager = lo_api_component->get_window_manager( ).


 CALLMETHOD lo_window_manager->create_external_window

 EXPORTING

 url    = lv_url

 RECEIVING

 window = lo_window.

 lo_window->open( ).
And now you can use the button for display the custom webdynpro you want:

- SAP Managed Tags:
- SAP Supplier Relationship Management
26 Comments
You must be a registered user to add a comment. If you've already registered, sign in. Otherwise, register and sign in.
Labels in this area
Related Content
- Configuring and Testing REST APIs with SAP Fieldglass - Part 3 - Downloads in Spend Management Blogs by SAP
- Configuring and Testing REST APIs with SAP Fieldglass - Part 2 - Uploads in Spend Management Blogs by SAP
- Overview of Custom Routing in Spend Management Blogs by Members
- Set up of note panel for Catalog home page in SAP Ariba in Spend Management Blogs by SAP
- How to disable delete button on shopping cart lines for which there is a PO line created in Spend Management Q&A