
- SAP Community
- Products and Technology
- Additional Blogs by SAP
- Using an ABAP Web Service Client Proxy – Part Two ...
Additional Blogs by SAP
Turn on suggestions
Auto-suggest helps you quickly narrow down your search results by suggesting possible matches as you type.
Showing results for
Former Member
Options
- Subscribe to RSS Feed
- Mark as New
- Mark as Read
- Bookmark
- Subscribe
- Printer Friendly Page
- Report Inappropriate Content
01-19-2012
12:30 AM
Greetings to my fellow SAP colleagues! We are ready for Part Two of our three part series on using an ABAP Web Service Client Proxy. Thanks to all of you for the great feedback and questions related to Part One ( Calling an External Web Service from an ECC 6.0 system WITHOUT using NetWeaver PI) and I'm glad you were able to get so much out of it.
In Part Two of our series, we pick up right where we left off and take a look at the client proxy that was developed. In Part Three, we will look at taking a function module and exposing it as a web service (look for Part Three in the January February timeframe).

FIGURE 1
As you can see above in Figure 1, we have the ABAP Web Service Client generated and ready to be used. I have expanded the relevant nodes for your convienence and study (look to the left in Figure 1).
What the proxy represents is a collection of transportable objects (i.e., Domains, Data Elements, Structures, and Table Types located under the "Proxy Dictionary Types" node and an ABAP Wrapper Class located under the "Client Proxies" node) that all together represent everything you need to both call the web service (the wrapper class) and to represent every import output parameter of that call (the various dictionary types).

FIGURE 2
In Figure 2 above (look over to the right this time), we see the name of the ABAP Wrapper Class (the figure calls it a Proxy-Class). This is an ABAP Class that can pulled up by entering the name (ZFLIGHTPROXYCO_Z_BAPI_SFLIGHT in this case) directly using the ABAP Class Builder (transaction code se24) or as we will do in this case just double clicking on the name which will take us directly there.

FIGURE 3
In Figure 3 above we see how the class is designed. As class designs go this one is fairly simple. The two methods that will need to be called are the "CONSTRUCTOR" method and the "SFLIGHT_GETLIST" method (we will see momentarily how these methods are called). Before we see the code to call these two methods let's take a moment to explore the parameters of each one. Double Click on the "CONSTRUCTOR" method first.

FIGURE 4
By double clicking on the "CONSTRUCTOR" method we get to Figure 4 above. The method has a single parameter namely "LOGICAL_PORT_NAME". A logical port is a configuration concept that we're going to have to create that specifies where the web service is actually located so that when the web service is called (remember web services are executed using an http request http response mechanism), the call will be sent to that location. The logical port is created using transaction code "lpconfig". Open up a new session (use the menu path System > New Session) and type this transaction code in the transaction code field.

FIGURE 5
To create our logical port, we type in the name of the proxy class (you can use F4 help to find it) and your own freely defined logical port name ("DEFAULT" in this case). You can create any name you wish *but* we will have to remember this name because we will see it again when we write the code. If a web service can be called from different locations (i.e., one server located in one DMZ for internal based clients and another server in another DMZ for external clients) then you can create multiple logical ports for your proxy class. If this is the case don't forget to specify one of them as the default as shown in Figure 5 above.
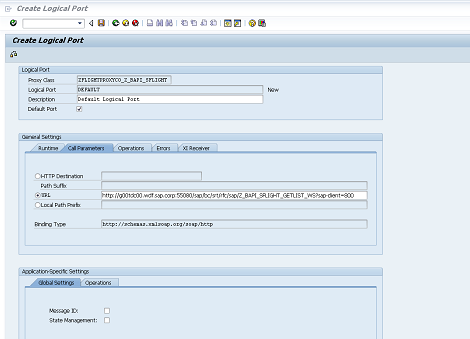
FIGURE 6
In Figure 6 above, we see the remainder of the configuration parameters that need to be filled out. The one that we will use in this case is "URL". This URL is obtained from the WSDL file and can be pasted in as was done above. Once this has been done we can return to our previous session and explore the parameters of the “SFLIGHT_GETLIST” method.
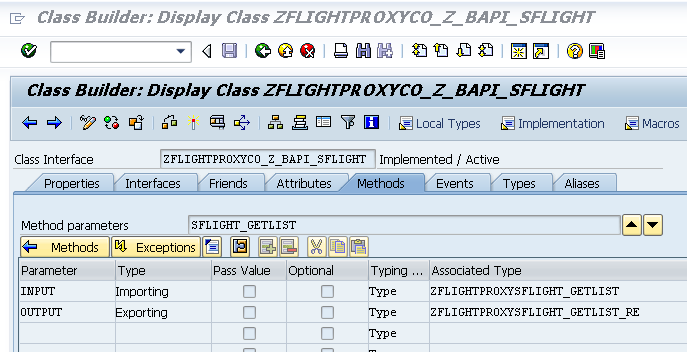
FIGURE 7
Here in Figure 7 above, the two parameters of this method are “INPUT” and “OUTPUT” both of which are based off of dictionary types created when the client proxy was generated. Now we are ready to write the code.

FIGURE 8
The code itself is fairly straightforward. We'll go through it piece by piece so that you understand exactly what needs to be coded. First we need a program to get started. Any type of program ( i.e., Type M, function module, etc. ) will do. The most common type of program used by developers are Web Dynpro programs or BSP programs due to the fact both are web enabled type of programs. But to reiterate any type of program will do as the code is just a series of standard ABAP statements. In our case a Type 1 (Executable) program will be used (ZWEBSERVICE_TEST).
To get started drag the name of the client proxy (on the left in Figure 8 above) onto the coding area (on the right). The wizard will generate all the statements between lines 11 and 30. We can now replace all of the X's with our preferred name.

FIGURE 9
Here in Figure 9, all of the X's have been replaced with our preferred name which is "proxy". In addition two new statements have been added on lines 12 and 13 (output and input respectively). Also on line 16, the "logical_port_name" parameter has been assigned using the value "DEFAULT" (refer back to figure 5).
Now let's take a more indepth look at this code. Line 11 creates a variable based off of the proxy wrapper class (refer back to figure 3). Lines 12 and 13 create variables to specify the input parameters of the web service call and to receive the output parameters of the web service call (the result). They are both based off of Data Dictionary structures created when the client proxy was generated.
Line 16 contains the code to create an instance based off of the proxy wrapper class and to assignthat newly created instance to our proxy variable. An appropriate catch block exists just in case something goes wrong. If something does go wrong, go back to transaction code "lpconfig" and double check your entries.
Line 21 contains the instance method call (again with a catch block) exporting the input parameters of the webservice and importing the export parameters of the web service. In effect, you and the web service are talking to one another so your export is the web services import and vice versa. The final thing we need to do is to supply import data for the call and extract export data from the call.

FIGURE 10
Here in Figure 10 on lines 19 - 20 we move some sample data into the fields of the input structure.

FIGURE 11
Here in Figure 11 we do the same on lines 22 - 23. After the call is made on line 35, we create a variable to operate as an explicit work are for the internal table containing the exported data records of the web service call and on lines 37 - 41 we do a standard loop through that internal table into our work area and we write out a few fields. Since this is a Type 1 program when the loop is finished we will see the resulting list as the loop is the last construct in the program to be executed.
And that's it! In our final blog in our three part series we will look at how to create a web service from a function module. Until then, enjoy.
We offer a wide variety of courses through SAP Training dealing with Web Services and other technical topics. Be sure to check out the entire NetWeaver training curriculum online at https://training.sap.com. You can also contact our Customer Interaction Center at 1-888-777-1727 or email them at education.northamerica@sap.com.
3 Comments
Related Content