
- SAP Community
- Products and Technology
- Additional Blogs by Members
- Caboodle - Part 11 - Explorer 4 Install, SSO & Tes...
Additional Blogs by Members
Turn on suggestions
Auto-suggest helps you quickly narrow down your search results by suggesting possible matches as you type.
Showing results for
glen_spalding
Participant
Options
- Subscribe to RSS Feed
- Mark as New
- Mark as Read
- Bookmark
- Subscribe
- Printer Friendly Page
- Report Inappropriate Content
08-24-2011
7:34 PM
Continuing from my last blog, Caboodle - Part 10 - Dashboard Install
Note: This is not an easy one and rather a biggie
In this blog, I have download and installed the new BI Explorer 4.0, and from what I can see, there is only a 64bit version, currently on SP2 Patch 3. It's quite a biggie, due to the testing and problems encountered.
To make testing more interesting, I utilize the NSP BW System I created, and use SAP Authentication. There is a good amount of preparation as the data in BW needs to be created, a user is required to be imported into BO, and then there are the various objects in BO, e.g. connections, universes, that are required, before we can create a space in Explorer.
Explorer 4.0 will only be able to see the new .unx Universes. You cannot convert a previous OLAP (SAP BW) .uni Universe to a .unx.
No installation key is required.
Prerequisites are BOBJ4, and Flash Player >= 10.1.
Here is the structure of the blog
- Download
- Install
- Post Install
- Testing
- SAP BW Content Demo
- BEx Query Designer
- SAP Authentication
- User / Role Setup
- Information Design Tool
- Repository Resource
- Relational Connection
- Data Foundation
- Business Layer
- Universe
- Explorer
Download
For a clean install, you can find the download from the SMP
Software Downloads->BusinessObjects Downloads->Browse the SAP BusinessObjects Portfolio->Installation and Upgrade->SBOP EXPLORER->SBOP EXPLORER 4.0->Installation and Upgrade

For an upgrade to SP2 or patches, you can find the appropriate download here, at the SMP
Software Downloads->BusinessObjects Downloads->Browse the SAP BusinessObjects Portfolio->Support Packages and Patches->SBOP EXPLORER->SBOP EXPLORER 4.0->Comprised Software Component Versions->SBOP EXPLORER 4.0->Windows Server on x64 64bit

Install
I heard to stay away from Patches, as they are not fully tested like Service Packs. They say you should only upgrade to a Patch if it fixes a precise problem for you. I have yet to qualify this, so I would be interested in hearing from you about this.
So here, I am just installing SP2.
Make sure your BOBJ environment is up and running.
After extracting the compressed file, I noticed there were two directories. I looked into each directory, and saw they were identical, so I believe one is a duplicate and there by error.

I navigated to the first, found, and ran the "setup.exe" as "Run as administrator".

Off it goes
I kept the default "English" setup language

"OK"
Prerequisites are ok. Funny how it does mention anything about Flash ?

"Next"

"Next"
License stuff

"Next"
The "Destination folder" is greyed out, as we have a BOBJ installation on the system where Explorer is to be installed.

"Next"
I kept the default Language Pack

"Next"
All the Features are selected by default

"Next"
Now to give it the CMS. Only confusing item here is the "CMS Name", actually means the CMS Server. I decided to give it the Fully Qualified Domain name (FQDN). You must also know what the CMS Port is configuration to. By Default, it would be 6400.

"Next"
It found my one and only SIA
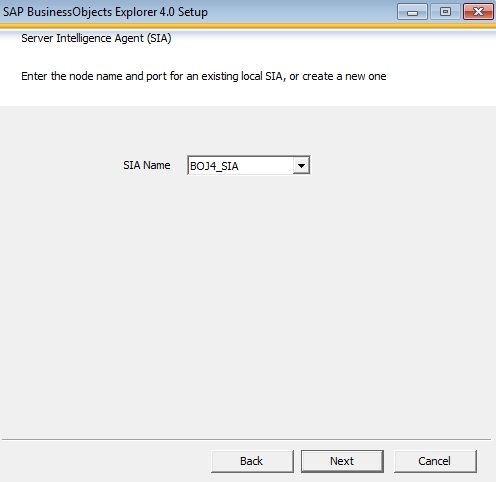
"Next"
Now ready for installation

"Next"
Installation commences


"Finish"
A look at Windows Control Panel->Programs and Features, reveals Explorer. Interesting to note the version 14.0.0 does not represent the installed version. A look inside the ProductId.txt file of Explorer, and contains
BuildVersion=14.0.2.364.
So not sure what is going on there

There is nothing to be seen in Windows Program Menus.
In the SIA this is what you should see

But, on a couple of occasions, I did not get any Explorer Servers present. This is a known phenomenon, with other installations. This is fixed later by manually adding them in the CMC.
I thought I would check the Explorer URL
http://localhost:8080/explorer/

This not really a surprise as I had no visible Servers.
I thought I would log on to the CMC to check to see if the Servers were visible in there.

It seems that the Explorer install has taken out my CMC WebApp.
I tried with the WACS version of the CMC

and I got the log on screen. I proceeded through to the CMC->Servers

and above, just confirms that no Explorer Servers were installed.
I thought I would try my luck and see if a WACS Explorer Web deployment occurred

No such luck.
To summarize...
The Explorer installation, did not install the four Explorer Servers it should have, and it took out my CMC WebApp.
So, first things first; fix the CMC.
I tried to manually re-deploy the CMC WebApp, which did actually get me in, but when it came to "SAP Authentication" later, the "Role Import" page gave me a browser 500 error.
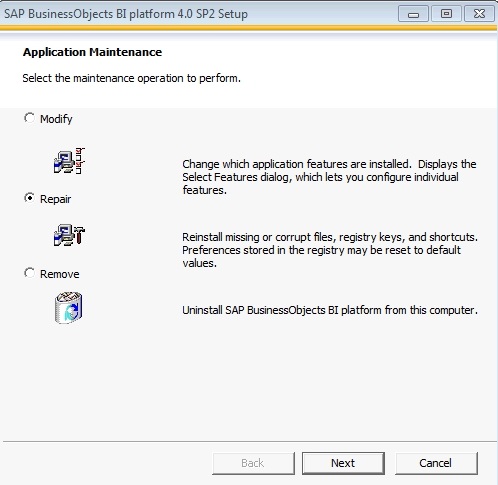
So after much battling an installation repair of the "SAP BusinessObjects BI Platform 4.0" in Windows Control Panel->Programs and Features->Uninstall/Change, did the trick. So would be better to simply do this now.
In a pre-existing development/live environment, I would hate to do this, and suggest a backup of all "web.xml", "properties" and any other customization files.
After a complete VM reboot, it did the trick

Now I have the CMC back, on to fix the missing Explorer Servers. I found that they can be added manually. So here's how.
Navigate to CMC->Servers->Manage->New->New Server

In the "Server Category", find "Explorer Services", and under the "Select Service", I started with the first "Explorer Exploration Service".

The Service was added on the right hand side, already for me

I kept it as is

For my Server to appear

I did these steps for the remaining three

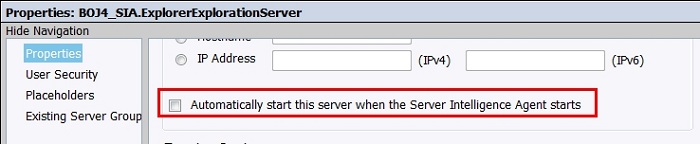
I took a look at the properties, of the first, because I did not want the Server to start automatically, as my VM was limited with RAM. This was the default.
Now to enable and start. I selected the first "Exploration Server"
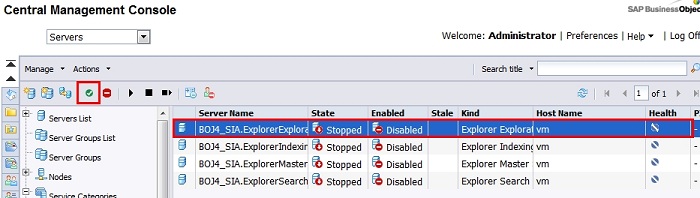
and clicked on the "Enable" icon

I selected it again

and clicked on the "Start" icon. It started up
![]()
soon, up and running

I did these steps for the remaining three other Servers

Finally, the Explorer Servers where in my SIA, up and running

To make sure all was well, I performed a re-boot of the VM, after a little while, all managed to work.
On to the Post Install now.
Post Install
Once the SAP BusinessObjects Explorer installation is complete, the installation documentation says you need to configure the following, however, they do have default values, so there is no need in my case, to do anything.
Set Index directory (where indexes will be stored)
default value - "C:/Program Files (x86)/SAP BusinessObjects/SAP BusinessObjects Enterprise XI 4.0/Data/Polestar/index"
Set the session timeout
default value - 300,000 milliseconds (5 minutes)
Set the Java Virtual Machine (JVM) heap size for each Explorer server
default value - 1 GB
See the Explorer Administration Guide for more details.
Testing
Just to make sure, something appears I started Explorer.
There is no actual icon from which you can launch Explorer, so the following URL is necessary. It is case sensitive!
http://localhost:8080/explorer/

and here it is

Now it's down to managing "Spaces" for full operation.
To manage Spaces, a Universe is needed. Not just any old Universe, rather the new .unx type. This will be created in the Information Design Tool (IDT).
To support the SAP Authentication a little config will need to be performed between BW and BOBJ.
And then there's the data. For this, I lever some SAP BW Content used for demos.
So, I start from the ground up.
SAP BW Content Demo
Replacing the older SAP Demo Flights Model, is ItelO. It serves better for BOBJ.
In searching for how to activate this content, I found this good blog from Dr. Matthias Sessler, which you can follow, as I did.
Here's some pictures of my results.
RSFC

RSA1
RSRT

BEx Query Designer
Enabling external access for Query "0D_FC_NW_C01_Q0001", for which I would use to base my Universe over

User / Role Setup
Let me state that the following User/Role setup is purely for my development environment. There are proper guidelines for how to do this in a production environment.
So, to log on to BOBJ with a SAP User, The User must be imported into the BOBJ environment. BOBJ will use a SAP User for connecting to the SAP System, to import Roles.
SAP BW - BOBJ SAP User
In the BW System, using transaction SU01, I created a System User "BOBJ_REMOTE", and gave it "SAP_ALL", and "SAP_NEW" Profiles.


My SAP User - BCUSER
Next, is to setup which Users will want to use SAP Authentication. Users are imported via SAP Roles, which are also imported into BOBJ as Groups.
User "BCUSER" is whom I wish to use for SAP Authentication.
In the SAP BW System, I created a new Role "ZBOBJ_ACCESS", and assigned user "BCUSER", using transaction PFCG. The Role has no authorizations, or menus. It is just used to assign and manage User access to BOBJ. This Role will be imported into BOBJ as a Group, in which any Users assigned will also be imported.

BOBJ
Now there are some BOBJ setup steps. So I logged on to the CMC as "Administrator" and navigated to Authentication->SAP->Options
I changed the "Content folder root" to "/", because I don't like deep directory structures and I also changed the "Users" to "Concurrent" to match my temporary license

"Update"
Then to the "Entitlement Systems" to add my BW System details. Notice I user the "BOBJ_REMOTE" user now.

"Update"
and finally the Role "ZBOBJ_ACCESS" import. Find it on the left, and add it to the right.

"Update"
To check the Role and User imported ok, I navigate to Users and Groups->Group List,
![]()
Users and Groups->User List.
![]()
They looked ok.
Note: When assigning Groups to certain security settings in BOBJ, if you ever needed to re-load the SAP Role, (remove and add), all BOBJ assignments made would disappear, and would have to be re-created. To this end, creating a local native group, then assign your SAP Group to that group for inheritance, and make any BOBJ security settings to the native group, will mean, that in the case of an SAP Group re-load, only the assignment to the local group will be lost, which can easily be re-assigned after the re-load. I hope this makes sense.
To make my life easier in the Caboodle environment, I also assigned the new local group to the group "Administrators". That way, I can do anything with my SAP User "BCUSER"

SAP Authentication
To use the SAP User, we now need to setup the SAP Authentication.
As you can see below, out of the box, SAP Authentication is not available for Explorer.

The "default.settings.properties" file for Explorer, found here
c:Program Files (x86)SAP BusinessObjectsTomcat6webappsexplorerWEB-INFclasses
needs modifying. Everything enclosed in the red box, was changed

I restarted BOBJ and Tomcat. Now SAP Authentication for Explorer is available, and now to log on to the CMC with "BCUSER"

Notice the SAP User

So that's all good
And now to test to logging into Explorer with the SAP User.
Notice user "NSP~002/BCUSER", which is our SAP user, then I took a look at "Manage Spaces"

Naturally there is nothing there, apart from the directory structures.

Do not forget, we can only see .unx Universes here, or the lack of. So it's on to create a "Space".
Information Design Tool
Now, it's on the Information Design Tool (IDT) to create a Universe for Explorer to use. Not having done this before, I searched the net and found this useful blog, I downloaded "how to create connections in BI 4".
I had my NSP, BOBJ, and Explorer Servers all up and running.
Before I followed the blog, I started up the IDT and created my "Repository Resource" (my BOBJ Environment).
So to the Client Tools, and start the Information Design Tool.

Repository Resource
I added my BOBJ Environment as the "Repository Resources", by "Insert Session" from the "plus" icon.

At the logon prompt, I added my BOBJ Environment FQDN "vm.gingle.com", and chose to use my SAP User "BCUSER", selecting SAP Authentication. I chose this method because I wanted to use SAP Authentication SSO later. I would not be able to test SSO with the BOBJ Administrator, as the user does not exist in SAP.

"OK"

Local Project
Now this is where I start with downloaded instructions "how to create connections in BI 4", from Section 3 on Page 7, "Create a relational multisource connection on SAP BW 7.x".
I created a "Local Project" for my objects.

I gave the project a name, "Caboodle", then "Finish".

Relational Connection
I continued to "Insert Relational Connection"

I gave my new Connector a "Relational Source" name, "BW Actuals"

"Next"
From the Driver selection, I chose the "SAP NetWeaver BW" node, and the Java Connector beneath.

"Next"
I gave the Connection, by BW details, and chose "Use single sign on". Then performed a "Test Connection"
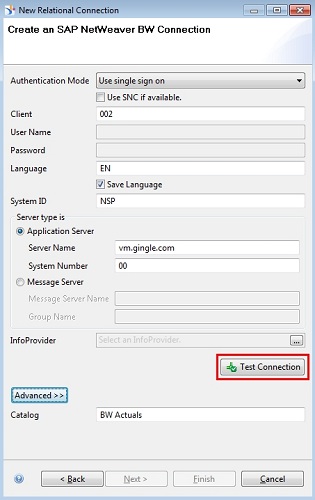
I firstly received a time out error. I tried again, to receive a "... is already used for a running server" error.

I think the error occurred due to me trying the Connection Test, for a second time, because of the initial test time out.
If you do get the "Test Failed" error, I would recommend, closing down the IDT, shut down BOBJ and SAP, and restart the NSP.
I did all this, and re done the necessary steps to get to the same place, and after another "Test Connection", I got a successful result.

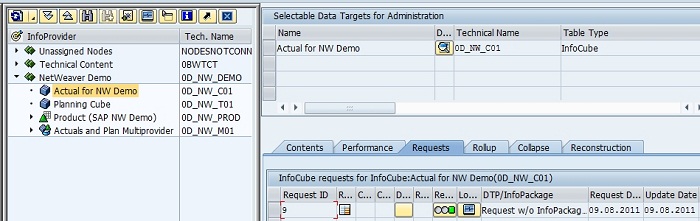
Next, I selected the "InfoProvider" button
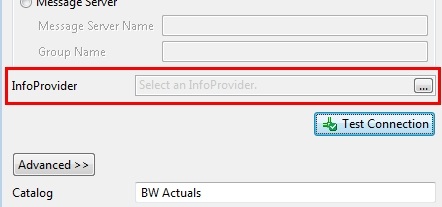
and chose the Cube "ID0_NW_C01", which is my "Actuals"

"Ok"
and it continued to build the Connection

then "Finish"
After the success prompt

I chose "Yes" to create the shortcut.
Success to that

and "Close"
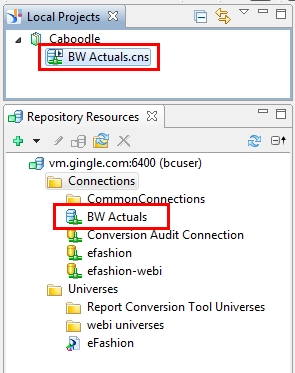
So that's the "Relational Connection" done
Data Foundation
Next, is to create the "Data Foundation"

I gave it a name, "BW Actuals", then "Next"
For BW access, I believe a "Multisource-Enable" Foundation Type is necessary.

"Next"
User Authentication was present, so I left as is

"Next"
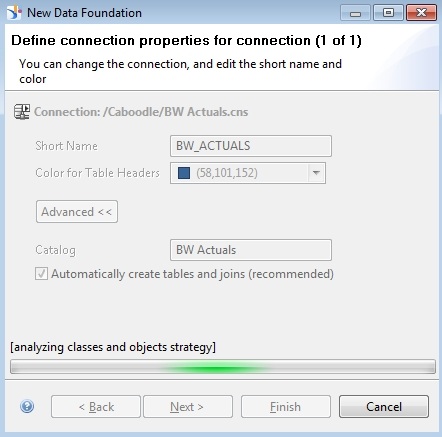
I selected my Connection

"Next"
I left the properties for the Connection as is

"Finish"
Off it went to build the Foundation
My local Project now also contains the Foundation object


Make sure the Foundation is Saved.
Business Layer
Now for the Business Layer. This will be published to create the . unx Universe.

I selected the "Relational Data Source" entry

"Next"
I gave it the name "BW Actuals", then "Next"
I selected the "Data Foundation" button, to select my "BW Actuals" Data Foundation created earlier.

"OK"
I left all as is

"Finish"
and now present is my Local Project. Note, this is only a local Business Layer right now.


That's the Business Layer done.
Universe
Now to publish the Business Layer to a Universe, which is what Explorer will see.
I selected the Business Layer, and right clicked to access the "Publish", then "To a Repository". As it is the BOBJ Environment we will be sending this to.

I thought I would select all the objects and perform a "Check Integrity"

"Next"
Off it went

A little while after, I was returned to the "Check Integrity" results. As you can see, there are many warnings, but no errors.

"Next"
I chose to publish the Universe to the top node

"Finish"
A successful prompt returned

The Universe is now visible on the BOBJ Server.
A final look at all the objects in the IDT.
The "eFashion" Universe is delivered with BOBJ as a sample. But you can see from the icon, it is not the new type Universe, as is "BW Actuals"

So that's all with the IDT, and can now be closed.
Explorer
Now to open up Explorer and use the new .unx Universe created above, "BW Actuals".
I logged in using the http://localhost:8080/explorer URL, using the following parameters

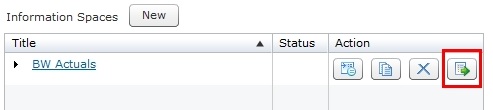
Then to "Manage Spaces", and I could finally see my Universe.

I selected the Universe, then pressed "New".
I gave it a Name

"OK"
I selected the Measures one by one and dragged them over to the right, to be included in the Space.

I also dragged all the Dimensions to the right to include.

I then performed a validate, by pressing the "Validate" button.
All was well there

and my "BW Actuals" Space now present
Before it can be used, it needs to be indexed
Off it goes

and successfully done

So now, back to the Home Page, and perform a "Search", on "Actuals"

to Result in one find. No surprise there.
Then I selected the "BW Actuals" link

and here is the final result
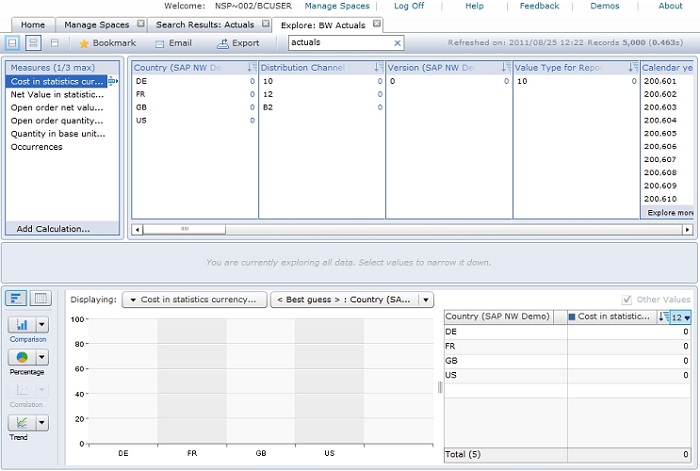
The best guess, did not do too good of a job, so I messed about, oops, I meant explored a little, to get this.

So there you have it, BusinessObjects Explorer, with SAP Authentication
Continue on to my next blog, Caboodle - Part 12 - Analysis for OLAP Config & Test
3 Comments
Related Content
- Getting ready to start using SAP Focused Run in Technology Blogs by SAP
- Enhancing S/4HANA with SAP HANA Cloud Vector Store and GenAI in Technology Blogs by SAP
- Integrating SAP Datasphere with SAP Integrated Business Planning, using SAP CI-DS - Part 3 in Supply Chain Management Blogs by SAP
- Recap — SAP Data Unleashed 2024 in Technology Blogs by Members
- Consuming SAP with SAP Build Apps - Connectivity options for low-code development - part 1 in Technology Blogs by SAP