
- SAP Community
- Products and Technology
- Additional Blogs by Members
- Developing custom Web Dynpro ESS applications usin...
Additional Blogs by Members
Turn on suggestions
Auto-suggest helps you quickly narrow down your search results by suggesting possible matches as you type.
Showing results for
Former Member
Options
- Subscribe to RSS Feed
- Mark as New
- Mark as Read
- Bookmark
- Subscribe
- Printer Friendly Page
- Report Inappropriate Content
05-29-2011
2:37 AM
I was asked to develop couple of reports for country specific tax forms, where the output was required in pdf format. I have been given some standard sap transactions for which I have to show the output of the transactions on the portal. I looked at SDN, came to know about the GRT/RFW frame work, but did not find the implementation details. I have developed couple of applications using this framework in ESS space. Came up with this article so that it can help others.
This article describes how to develop custom Web Dynpro Java ESS applications using Generic Reporting Tool (GRT) / Reporting Framework (RFW).
1 Generic Reporting Tool (GRT)/ Reporting Framework (RFW)
We can use the GRT/RFW to create applications with a minimum of development involved. We can create our own applications (services) on the basis of predefined modules in Employee Self-Service. In particular, we can use it to represent SAP reporting from the back-end system in a portal environment.
With this framework we can easily bring basically any classic report which can expose its content as pdf, html or xml into the self service application framework. I have reused this framework several times already to expose the reports, mainly country-specific tax-related reports on to the Portal.
It has the following advantages for creating an application in the front-end:
- We only have to define and implement the visual application component (Vc) for the application.
- We can reuse particular predefined components such as an iFrame to display PDF or HTML documents.
It has the following advantages for creating an application in the back-end:
- We only have to implement an ABAP class and define the application-specific part of the communication structure.
The framework provides the components required to create applications and exchange data between the SAP back-end and front-end.
It’s based on the floor plan manager (FPM).
Following link provides more information on the GRT
http://help.sap.com/saphelp_erp60_sp/helpdata/en/43/8273990c4458bbe10000000a422035/frameset.htm
Some the applications which use this framework are: Pay slip, Time statement, Total Compensation Statement (TCS), CN Tax forms, IR56B, IF56F, IR56G, IR21, IR8A, IR8E, IR8S, PKB1, PKB4 etc
2 Creating the front end Web Dynpro application
2.1 Create a new DC.
Let’s try to build the application to show the Certificate for LI/NHI Payment in portal. Here we are trying to show the output of standard SAP transaction PC00_M42_LHCE for Taiwan in portal.
Let’s use the existing ESS application for e.g. ess/cn/ytxd as template for the custom ESS application.

2.2 Adding used DC’s:
We have to add the following development components to the Used DC’s list:
- ess/rep(EssWDRepFramework)
- pcui_gp/xssutils(FPMUtils)
- pcui_gp/xssfpm(FloorplanManager)
-Adding ess/rep(EssWDRepFramework) as used DC

-Adding pcui_gp/xssutils(FPMUtils) as used DC.

-Adding pcui_gp/xssfpm(FloorplanManager) as used DC.

-Creating the visual application component: VcLhceSelection


2.3 Add IVAC as the implemented interfaces:
Expand the Component Interface node of each VAC and select Implemented
Interfaces->Context Menu->Add

In the dialog window select IVAC and push OK button.

Push the Finish button on the next dialog window to confirm the window name.

2.4 Add used Web Dynpro Components:
We need to create references to various BLCs to be able to trigger events and display data.
We need to create a reference to the BLC of the FPMUtils DC VcLhceSelection ->Used Web Dynpro Components->Add Used Component
- Enter FcEmployeeServices
- Press the BROWSE … button and select FcEmployeeServices in the dialog window

- Press OK button and then select manual in lifecycle drop down field.

Add the FcRepFramework as used component
– VcLhceSelection >Used Web Dynpro Components->Add Used Component
- Enter FcRfw
- Press the BROWSE… button and select FcRepFramework in the dialog window

- Press OK button and then select manual in lifecycle drop down field.

2.5 Message pool setup
Double-click on message pool and select add the following messages by clicking Add Message.
Message Key | Message Type | Message Text Type | Message Text |
PrevButtonLabel | text | label | Previous Statement |
PrevButtonTooltip | text | messagetext | Previous Statement |
NextButtonLabel | text | label | Next Statement |
NextButtonTooltip | text | messagetext | Next Statement |
ExitButtonLabel | text | label | Exit |
ExitButtonTooltip | text | messagetext | Exit |
PrintButtonLabel | text | label | |
PrintButtonTooltip | text | messagetext | |
OpenOverviewLabel | text | label | Show Overview |
OpenOverviewTooltip | text | messagetext | Show Overview |
CloseOverviewLabel | text | label | Hide Overview |
CloseOverviewTooltip | text | messagetext | Hide Overview |

2.6 Delete the VcLhceSelection Window
We would be using the IVACWindow, so we need to delete the VcLhceSelection window.

2.7 Add the VcLhceSelctionView to the IVACWindow
VcLhceSelction->Windows->IVACWindow->Context menu->Embed
View

– Select Embed existing view
– Select VcLhceSelctionView and push Finish button

2.8 Add the required controllers to the component controller
Add the required controllers to the component controller of the VAC
– FcFrw
– FcEmployeServices

2.9 Copy the methods from the Standard DC
Copy the methods from the Standard DC’s ess/cn/ytxd VcCTXDSelection’s component controller.
Add the following methods and parameters
- assignTable
-applView
-viewTable
-contentTable
-firstTime
- execAction
-actionType
- onInit
-fpm
Copy/Paste all methods to our component controller.

Ignore warning message that source code could not be located!. We will add source code later to the methods.

2.10 Creating the Contexts
Node RfwIfrm: Drag the context node from the FcRfw to the component controller. Bind all the fields.

Copy the CTXD and CtxdLocal nodes from the Standard DC’s ess/cn/ytxd VcCTXDSelection’s component controller. Rename the Node CTXM to LHCE
and rename the CtxmLocal to the LhceLocal

2.11 Add the component controller to the interface controller
Go to the properties tab of interface controller (VcLhceSelection->Component Interface->Interface Controller). Click Add button and select our component controller VcLhceSelection for adding it to the interface controller.

2.12 Adding the context nodes to the view
To pass the data between component controller and view (and also to trigger
events) we need to create context nodes.
Create the data link between the component controller and the VcLhceSelectionView in the diagram view. Then drag and drop all the nodes (LHCE, LhceLocal and RfwIfrm) from VcLhceSelection to the VcLhceSelectionView.

2.13 Adding actions to the VcLhceSelectionView
Let’s add the flowing required actions to the view from the Actions tab of the view.
- OverViewRowSelection
- Sel_ListSelection
- ToggleVisibility

2.14 Define the view elements
Select Layout tab in VcLhceSelectionView and make sure that you have the Outline
& properties view visible in NWDS
Set layout attribute of RootUIElementContainer to GridLayout and width attribute to 100%
Remove the DefaultTextView element.
Add a transparent container for Link fields with flow layout to the RootUIElementContainer
- LinkContainer
Add the following elements to LinkContainer
– Perspectives_Link LinkToAction
Set the following properties to the Perspectives_Link:
enabled : LHCE.VCDATA.LINK_ENABLED
text : LhceLocal.LinkOverviewLabel
tooltip : LhceLocal.LinkOverviewTooltip
onAction : ToggleVisibility
Add a transparent container for Overview fields with grid layout to the RootUIElementContainer
- OverViewContainer
Set the following properties to the OverViewContainer:
layout : Grid layout
visible : LHCE.VCDATA.OVERVIEW_VISIBLE
width : 100%
Add a transparent container Sel_Container with flow layout to the OverViewContainer
layout : flow layout
visible : LHCE.VCDATA.OVERVIEW_VISIBLE
paddingBottom: large
Add the table OverViewTab to the OverViewContainer
Set the following properties to the OverViewTab:
Datasource : LHCE.VCTABLE.TABLE0.CONTENT_TABLE0
onLeadSelect : OverViewRowSelection
paddingTop : medium
Add the header Header_1 to the table OverViewTab

3 Add the code
3.1 Code that has to be added to the Component Controller
Add the fpm as private variable as shown in the image in the coding area between //@@begin others and //@@end.
private IFPM fpm;
Import statements: Organize your imports to include the necessary import statements
- Context menu->Source->Organize Imports
- Ctrl-Shift-O

3.1.1 Method onInit(…)
//@@begin onInit()
String pernr;
this.fpm = fpm;
fpm.attachComponentToUsage(wdComponentAPI.getComponent(),
wdThis.wdGetFcRfwComponentUsage());
fpm.attachComponentToUsage(wdComponentAPI.getComponent(),
wdThis.wdGetFcEmployeeServicesComponentUsage());
fpm.registerContext(wdContext.nodeLHCE());
fpm.registerContext(wdContext.nodeLhceLocal());
fpm.registerContext(wdContext.nodeRfwIfrm());
wdContext.currentRfwIfrmElement().setBprev_Label(wdThis.wdGetAPI().getTextAccessor().getText("PrevButtonLabel"));
wdContext.currentRfwIfrmElement().setBprev_Tooltip(wdThis.wdGetAPI().getTextAccessor().getText("PrevButtonTooltip"));
wdContext.currentRfwIfrmElement().setBnext_Label(wdThis.wdGetAPI().getTextAccessor().getText("NextButtonLabel"));
wdContext.currentRfwIfrmElement().setBnext_Tooltip(wdThis.wdGetAPI().getTextAccessor().getText("NextButtonTooltip"));
wdContext.currentRfwIfrmElement().setBexit_Label(wdThis.wdGetAPI().getTextAccessor().getText("ExitButtonLabel"));
wdContext.currentRfwIfrmElement().setBexit_Tooltip(wdThis.wdGetAPI().getTextAccessor().getText("ExitButtonTooltip"));
wdContext.currentRfwIfrmElement().setBothers_Label(wdThis.wdGetAPI().getTextAccessor().getText("PrintButtonLabel"));
wdContext.currentRfwIfrmElement().setBothers_Tooltip(wdThis.wdGetAPI().getTextAccessor().getText("PrintButtonTooltip"));
pernr = wdThis.wdGetFcEmployeeServicesInterface().getEmployeenumber();
wdThis.wdGetFcRfwInterface().initModel(pernr, "ZXSS_HR_TW_LHCE", wdContext.nodeLHCE());
//@@end
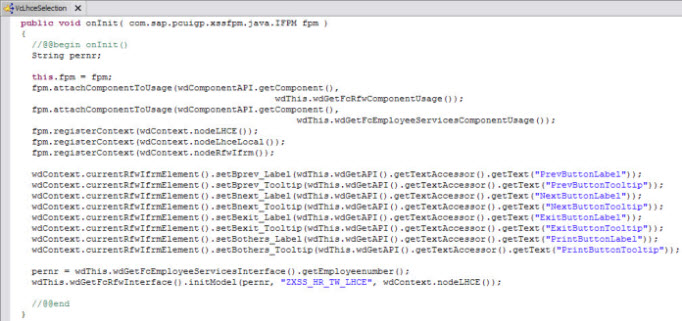
Note: ZXSS_HR_TW_LHCE is the Application ID which we are assigning to this application. This application id would be added to the backend table T7XSS_SER_RFW.
3.1.2 Method assignTable(…) and execAction(…)
public void assignTable( com.sap.tc.webdynpro.progmodel.api.IWDView applView, com.sap.tc.webdynpro.clientserver.uielib.standard.api.IWDTable viewTable, com.sap.tc.webdynpro.progmodel.api.IWDNode contentTable, boolean firstTime )
{
//@@begin assignTable()
wdThis.wdGetFcRfwInterface().assignTable(applView, viewTable, contentTable, firstTime);
//@@end
}
public void execAction( java.lang.String actionType )
{
//@@begin execAction()
wdThis.wdGetFcRfwInterface().execAction(actionType);
//@@end
}
3.2 Code that has to be added to the Interface Controller
Go to the Implementation tab of interface controller (VcLhceSelection->Component Interface->Interface Controller) and update the following methods onInit, onEvent, isDirty and isConsistent with the below code.
public void onInit( com.sap.pcuigp.xssfpm.java.IFPM fpm )
{
//@@begin onInit()
wdThis.wdGetVcLhceSelectionController().onInit(fpm);
//@@end
}
public boolean onEvent( )
{
//@@begin onEvent()
return true;
//@@end
}
public boolean isDirty( )
{
//@@begin isDirty()
return false;
//@@end
}
public boolean isConsistent( )
{
//@@begin isConsistent()
return true;
//@@end
}
3.3 Code that has to be added to the view
Go to the Implementation tab of view VcLhceSelectionView. And add the following code.
3.3.1 Method wdDoModifyView(…)
public static void wdDoModifyView(IPrivateVcLhceSelectionView wdThis, IPrivateVcLhceSelectionView.IContextNode wdContext, com.sap.tc.webdynpro.progmodel.api.IWDView view, boolean firstTime)
{
//@@begin wdDoModifyView
//wdContext.nodeVCTABLE().getNodeInfo().addAttributesFromDataNode();
IWDTable viewTab = (IWDTable) view.getElement("OverViewTab");
wdThis.wdGetVcLhceSelectionController().assignTable(view, viewTab, wdContext.nodeTABLE0(), firstTime);
if (wdContext.currentVCDATAElement().getOVERVIEW_VISIBLE() == WDVisibility.VISIBLE) {
// overview is already shown - enable close
wdContext.nodeCONTENT_TABLE0().setLeadSelection(wdContext.currentVCDATAElement().getSELECTED_TABROW());
wdContext.currentLhceLocalElement().setLinkOverviewLabel(wdThis.wdGetAPI().getComponent().getTextAccessor().getText("CloseOverviewLabel"));
wdContext.currentLhceLocalElement().setLinkOverviewTooltip(wdThis.wdGetAPI().getComponent().getTextAccessor().getText("CloseOverviewLabel"));
} else {
wdContext.nodeCONTENT_TABLE0().setLeadSelection(-1);
wdContext.currentLhceLocalElement().setLinkOverviewLabel(wdThis.wdGetAPI().getComponent().getTextAccessor().getText("OpenOverviewLabel"));
wdContext.currentLhceLocalElement().setLinkOverviewTooltip(wdThis.wdGetAPI().getComponent().getTextAccessor().getText("OpenOverviewLabel"));
}
//@@end
}
3.3.2 Method onActionOverViewRowSelection(…)
public void onActionOverViewRowSelection(com.sap.tc.webdynpro.progmodel.api.IWDCustomEvent wdEvent )
{
//@@begin onActionOverViewRowSelection(ServerEvent)
wdContext.currentVCDATAElement().setSELECTED_TABROW(wdContext.nodeCONTENT_TABLE0().getLeadSelection());
wdThis.wdGetVcLhceSelectionController().execAction(wdContext.currentVCDATAElement().getACTIONID_TABSEL());
//@@end
}
3.3.3 Method onActionSel_ListSelection(…)
public void onActionSel_ListSelection(com.sap.tc.webdynpro.progmodel.api.IWDCustomEvent wdEvent )
{
//@@begin onActionSel_ListSelection(ServerEvent)
wdThis.wdGetVcLhceSelectionController().execAction(wdContext.currentVCDATAElement().getACTIONID_DDSEL());
//@@end
}
3.3.4 Method onActionToggleVisibility(…)
public void onActionToggleVisibility(com.sap.tc.webdynpro.progmodel.api.IWDCustomEvent wdEvent )
{
//@@begin onActionToggleVisibility(ServerEvent)
wdThis.wdGetVcLhceSelectionController().execAction(wdContext.currentVCDATAElement().getACTIONID_LINK());
//@@end
}
4 Creating the back end application
The business logic is realized in the back end.
In the back end system, we only have to create one ABAP class that implements the IF_HRXSS_SER_RFW interface and define the application specific part of the communication structure.
4.1 Creating the ABAP class
We need to create the ABAP class by implementing the IF_HRXSS_SER_RFW interface. IF_HRXSS_SER_RFW is for the ESS Reporting Framework Interface.
Create the class ZCL_HRXSS_TW_LHCE by copying the existing class CL_HRXSS_CN_CTXD. Also copy over the data types, structures, tables defined in the class attributes.
Let’s see the methods in the class and try to understand them.
Method | Description |
PROCESS_ACTION | Process action which is sent by front end |
L_FILL_OVERVIEW_TAB | Fill overview table |
L_NAVIGATION | Processing of Event "Next/Previous Pushbutton" |
L_PRODUCE_FORM | Generate the PDF form |
L_INIT | Process when init |
L_SET_CURRENT_TAXYR | Initialize to Current Tax year |
L_SET_NAVIGATION | Set 'Prev' and 'Next' |
L_TOGGLE_OVERVIEW_VISIBILITY | Show/Hide Overview Table |
L_PROVIDE_OVERVIEWTAB_FIELDCAT | Provide overview table filed catalog |
L_STOP_NAVIGATION | Switch off navigation due to an error that has occurred |
L_PROCESS_TABROW_SELECTED | Processing of Event "Row in Table Selected" |
L_PROCESS_DDBYKEY_SELECTED | Processing of Event "Entry Selected in Dropdown" |
L_FILL_MESSAGE | Fill Message using SY Variables |
L_PROVIDE_OVERVIEW_CONTENT | Fill IT A_IT_FILTERED_TAXYR |
RET_RESULT | Return result |
4.1.1 Method L_PRODUCE_FORM(…)
Here we have to write the custom code/function module to generate the PDF form based on our requirements. Here we need to write the function module for getting the output as xstring. The xstring would be passed to the portal from the framework. In the portal the xstring is converted to url by the used DC ess/rep and gets displayed as PDF in the iFrame. We need to only modify this method.
Some of the possible options for generating the PDF for are:
- Calling the adobe form and converting the output to xstring.
- We can call the SAP Smart forms.
- Call the SAP Scripts.
- Submit the report directly and by importing the pdf data using the memory ids.
- Read and display the PE51 HR forms.
- We can send the output to spool, then reading and converting the spool data to xstring etc.
4.2 Configuring the back end table T7XSS_SER_RFW
The back-end table T7XSS_SER_RFW is used for the assignment between the application ID and the class that implements the interface.
Assign the front-end application id ZXSS_HR_TW_LHCE assigned in the onInit(…) method of the component controller to the ABAP class which we created ZCL_HRXSS_TW_LHCE.
Call up the maintenance view of the T7XSS_SER_RFW table.
Create a new entry for the application. Enter the application ID ZXSS_HR_TW_LHCE and the name of the ABAP class ZCL_HRXSS_TW_LHCE.

4.3 Configuring the view V_T7XSS_GRT_IFR
Go to the SM30 and make an entry in this view to set the dimensions for the iFrame in which we show the PDF. Here we need to specify the application id, height and width for controlling the size of iFrame.
If we don’t add the entry, the frame work will show the iFrame with default height and width which is 1200 x 800.

5 Creating the FPM Configuration
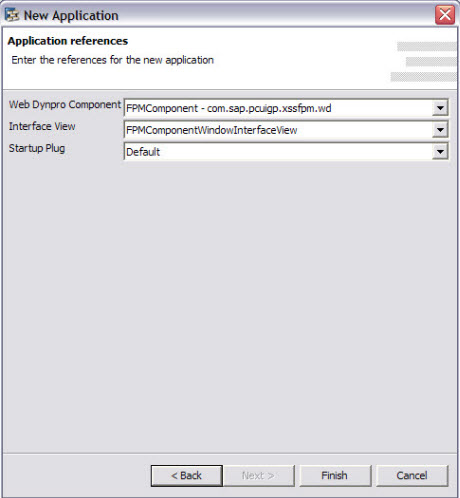
5.1 Creating the Application
Go to the context menu of the Web Dynpro->Applications and select Create Application for creating the application for the project.


Select the existing component and hit Next button.

Select the following FPM options and click the Finish button for the creation of the application.
5.2 Set the application properties
Add the following name value application properties to the newly created Application from the Application Properties tab.
- sap.authentication : true
- sap.expirationTime : 5000
- sap.xss.BaseConfigurationID :
- sap.xss.configurationComponentDC : sap.com/pcui_gp~xssutils
- sap.xss.configurationComponentName: com.sap.pcuigp.xssutils.ccpcd.CcXssPcd
Note: Let’s leave the sap.xss.BaseConfigurationID as blank for now and lets provide the value after creating the FPM application.

5.3 Build and Deploy the DC
Build and deploy the newly created DC by selecting the Development Component->Build… and Development Component->Deploy from the context menu of the DC as shown.
Note: Let’s build and deploy the code for creating the FPM config required. We cannot run the app as we have not created the backend config and the classes/functionality required form the backend.

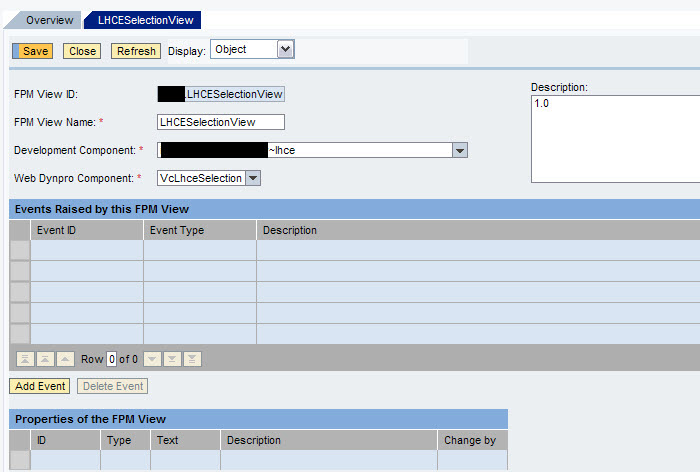
5.4 Creating the FPM view
From the Self-Service Administrator role create the LHCESelectionView FPM view.
In the Development Component, select the newly created lhce DC.
For Web Dynpro Component, select our visual component i.e. VcLhceSelection as sown below.
5.5 Creating the FPM Application
From the Self-Service Administrator role create the LHCE_TW FPM application.
5.5.1 Define Road Map step:
As this application has only one visual component, so we don’t need any road map here, so we can leave the Define Road Map step blank.

5.5.2 Define Perspectives step:
Go to the define perspectives by hitting the Next Step button on the Define Road Map step.
Click the Create button and add the perspective as shown.
Right click on the LHCESelectionView FPM View and add the FPM View to the Perspective, provide the ID and description.
Right click on the VcRfwIFrameView FPM View which is present in the folder Content Provided by SAP->srvconfig->com.sap.pct.erp.srvconfig.ess.employee_self_serivce->Rep->FPM Views and add the FPM View to the Perspective, provide the ID and description as shown.

5.5.3 Define Events Links step:
As we don’t have any events, we can leave this blank. And click finish to create the FPM application.

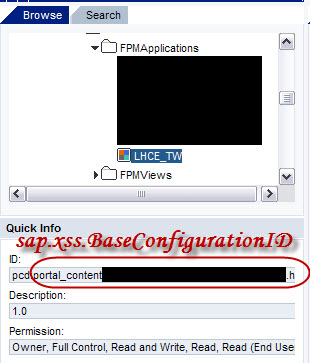
5.6 Set the Base Configuration ID
Copy the pcd location (ID) of the LHCE_TW FPM Application. The pcd location is the Base Configuration ID which we have to set in the Web Dynpro application properties for the property sap.xss.BaseConfigurtaionID.
Build and deploy the DC after setting the base configuration id.
6 Results/Screenshots
After completing all the above steps, let’s run the application to see the output.
6.1 Web Dynpro Output

6.2 The Overview table screen shot

2 Comments
Related Content
- Consuming SAP with SAP Build Apps - Mobile Apps for iOS and Android in Technology Blogs by SAP
- Data Privacy Embedding Model via Core AI in Technology Q&A
- Embracing TypeScript in SAPUI5 Development in Technology Blogs by Members
- Developing & Deploying the UI5 App to Cloud Foundry and Accessing from App-router End-to-End Steps in Technology Blogs by Members
- ABAP Cloud Developer Trial 2022 Available Now in Technology Blogs by SAP