
- SAP Community
- Products and Technology
- Technology
- Technology Blogs by SAP
- Installing the 7.02 ABAP Trial system (NSP) in an ...
Technology Blogs by SAP
Learn how to extend and personalize SAP applications. Follow the SAP technology blog for insights into SAP BTP, ABAP, SAP Analytics Cloud, SAP HANA, and more.
Turn on suggestions
Auto-suggest helps you quickly narrow down your search results by suggesting possible matches as you type.
Showing results for
Former Member
Options
- Subscribe to RSS Feed
- Mark as New
- Mark as Read
- Bookmark
- Subscribe
- Printer Friendly Page
- Report Inappropriate Content
01-02-2011
4:48 AM
We've been an "old-fashioned" SAP shop for a long time now, running R/3 4.7 with just the merest hint of web-based stuff. All of my SAP development experience so far has therefore been with ABAP dynpro, not Java or even Web dynpro. With an upgrade in the planning I wanted to get a jumpstart with this "new" stuff. In addition, we're looking at a change of hardware platform, from Sun/Unix to Windows (the subject of another blog for another time, maybe). Both of these things prompted me to have a go at installing the newly released ABAP 7.02 Trial Version. I've installed earlier versions on my laptop before, so just for a change, and because there was a third thing I wanted to play with too, I decided to install it in an Amazon Web Services EC2 instance.
The first thing to note about installing the 7.02 trial in AWS is that the trial requires Windows Server 2003. Windows Server 2008 is not supported. This somewhat restricts the configuration of the AWS instance you can use. In particular, 1.7GB of RAM is the most you can get in a 32-bit Windows 2003 instance, but the requirements for the 7.02 trial say "at least 2GB RAM (recommended 4-8GB)". Obviously, I ignored this! The resulting system is a bit slow, but it does work. Also, the requirements say you need 50GB disk space during the install, reducing to 36GB permanently. The Windows Server 2003 AWS instance comes with a 35GB root disk, which clearly isn't big enough so you'll need to add more storage. I added a 40GB second disk, into which most of the NSP system was installed. That ended up with 5GB free, and the root disk with 20GB free. I have since discovered a way of enlarging the root disk, which would make this a simpler process - maybe next time.
Costs
A quick word about costs before we get going, just so you know what you are letting yourself in for. All of the costs are listed here. My system is hosted in the EU, with a small standard instance (m1.small) costing $0.12/hour ($1 for an 8 hour day) and $0.11 per GB-month for storage (just over $8/month for the 75GB of storage I'm using for NSP). Remember the instance costs only apply while the instance is running, so remember to stop it when you are not using it! The storage costs apply all the time the storage is provisioned, whether the instance it is attached to is running or not. There are also some charges for data transfer in and out of the instance. Ongoing, this shouldn’t amount to much, but downloading the NSP installers does cost something - about $1.50 or so.These costs aren’t huge, and are OK for occasional use, but if you use the NSP instance every day they will start getting non-trivial.
Creating the AWS instance
Let's get started. First sign up for amazon web services if you haven't already. Then head to the management console and choose the EC2 tab.

Before anything else, at the top of the “Navigation” pane choose the region in which you want everything created. Costs vary between regions so you may want to choose the cheapest, or the nearest one. I went for “EU West”. Now hit the "Launch Instance" button. Here you choose the Amazon Machine Image (AMI) you want to clone to create your machine. These come with various OSs and other software pre-installed. You'll need to go to the "Community AMIs" tab and search for AMI ID ami-6999b21d.

This is a basic Windows Server 2003 image provided by Amazon. Hit “Select” and in the following screen choose instance type m1.small.

In the next screen leave the "Advanced Instance Options" as defaulted.

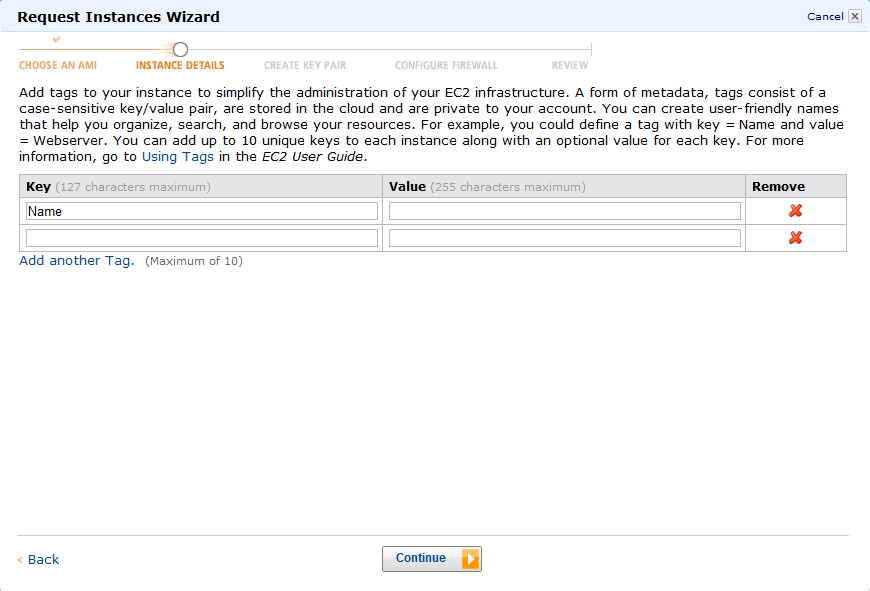
Next, add tags if you want - these are good when managing lots of instances but unnecessary for just a few so i didn't bother.
Next we need a key pair. This is to enable secure communications between your PC and the EC2 instance. You'll need it to retrieve the Windows Administrator password once the instance it up and running. If you don't have one, you'll need to create one. Download the private key and keep it safe for later. You can use this again if, like me, you end up scrapping your first, or subsequent, attempts at all this and start again with a new instance!

Next we allocate a security group. This essentially controls the firewall between the EC2 instance and the outside world. If you run SAPgui and web browsers only on the instance itself, the "quick start" security group, allowing just RDP access, will be fine. If you want to access the NSP system from elsewhere, like the SAPgui installed on your own machine, you'll need to create a new security group containing port 3200. Add port 8000 if you want web access from outside too. You can’t add these ports in the “launch instance” wizard, though - you’ll need to go back and add them later.

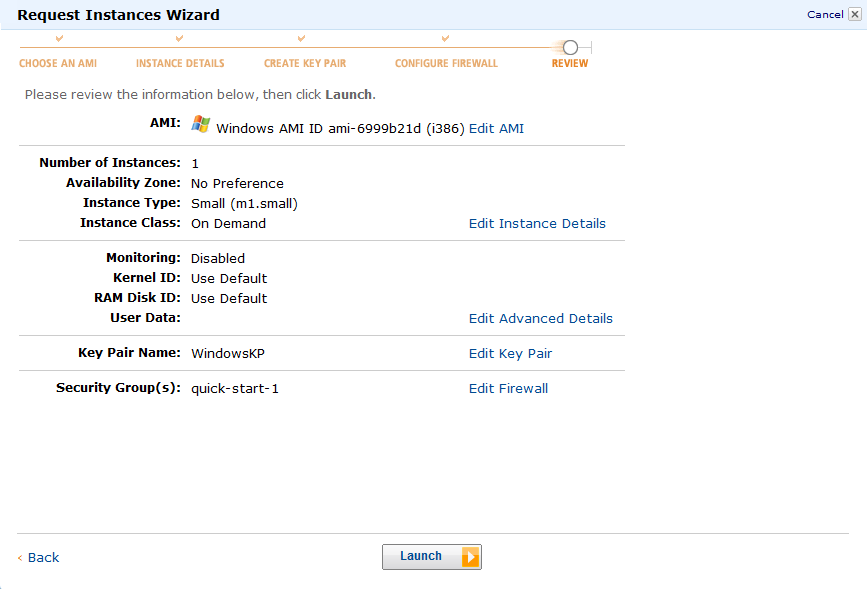
Finally, you are presented with a summary screen of all the settings. If all is OK, hit the "launch" button. Then go and make a coffee or two. At least the first time, the startup process takes a while. Give it 10 minutes at least.
Now we need to connect for the first time. Click on the “Instances” link in the navigation panel of the EC2 tab and your new instance should be listed with status running. Right click on it and select “Connect”. You’ll get a pop-up giving you the hostname to feed to an RDC client, and a link to download a shortcut that will auto-connect. Note that each time you stop and start an instance its hostname changes, so you need to collect the new name from here each time. So, do one or other of these and fire up RDC. Before you can login, though, you need the Administrator password, which has been randomly generated by the instance creation process. Go bank to the AWS console, right click on the instance again, and choose “Get Windows Password”. Here you’ll need to paste in the private key you downloaded previously - open the file in notepad, copy the whole contents, and paste into the dialog. In return you’ll be given the password. Go back to the RDC connection, login as Administrator with the password you’ve just been given, then change it to something more memorable! Personally I also create myself a user, rather than using Administrator all the time. Once you’ve changed the Administrator password, you can’t retrieve it this way any more so don’t forget it.
Next we need to add more storage. We do this by creating an EBS volume and attaching it to the instance, where it appears as an extra drive - the 😧 drive. The NSP installer will put the MaxDB datafiles files and all the NSP instance files (usrsapNSP) on this volume by default. Click the “Volumes” link in the navigation pane of the EC2 tab.

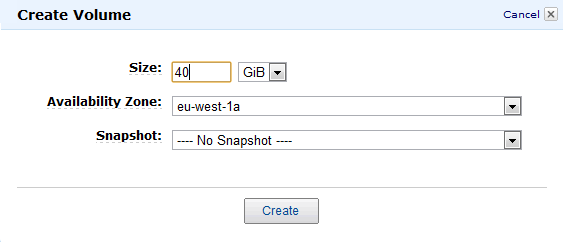
You’ll see the root drive of your instance listed there already. Click the “Create Volume” button to create a new one. You’ll need at least 40GB for the NSP install. Add more if you’re planning on doing anything else with this instance. The availability zone needs to be the same as that of the instance you created. You can see that in the instance properties.
Hit “Create” and the volume will eventually be listed with status “available”. Right click, choose “Attach volume”. If you have just one instance it will default in the “Instances” field, otherwise choose the one you want to attach to, then choose a device name. I went with “xvdf”. This new device will appear in the disk manager of Windows in your AWS instance, where you can format it, assign a drive letter, etc.
Finally, in the instance you need to tweak one EC2 setting. Launch the EC2 settings app (Start->All Programs->EC2ConfigService Settings) and on the “Genetral” tab untick the “Set Computer Name” tickbox. Without this, the Windows hostname changes each time the instance restarts, and that breaks the NSP install.

And that’s it. You now have a Windows 2003 server running in AWS, all ready for an NSP install.
Starting and stopping AWS instances
Before you make the same mistake I did and lose everything, a quick word on starting and stopping instances. There are two ways of stopping a running AWS instance - stop and terminate. If you stop an instance, it stops running but all the storage stays around so you can re-start it where you left off, just like shutting down a real machine. You don’t pay for the instance while it is running, but you do pay for the storage for as long as it exists. Stopping an instance is what you will do most of the time.
If you, instead, terminate an instance, it stops, but then the storage goes away too. There’s no way of getting it back. Don’t do this unless you really don’t want the contents!
Before the NSP install
Start downloading the two NSP install files from SDN. While they are going you’ll need two more things. First, something to unpack the RAR files - I use 7-zip. Secondly you’ll need a Java runtime. The 7.02 instructions say you need version 1.4.2.x or 1.5.x. I used the newest JRE6 from java.com and it worked fine. As the 7.02 trial is an ABAP system, the JRE is only used by the installer, not by the installed NSP instance. If you install any Java-based components alongside NSP, you might need to go for an older version of the JRE.
With 7-zip installed and the NSP files downloaded, go ahead and unpack the RAR files - you only need to unpack part 1 - part 2 is included automatically. Now, finally, you are ready for the install itself.
And that will be the subject of part 2...
- SAP Managed Tags:
- ABAP Development,
- Virtualization
15 Comments
You must be a registered user to add a comment. If you've already registered, sign in. Otherwise, register and sign in.
Labels in this area
-
ABAP CDS Views - CDC (Change Data Capture)
2 -
AI
1 -
Analyze Workload Data
1 -
BTP
1 -
Business and IT Integration
2 -
Business application stu
1 -
Business Technology Platform
1 -
Business Trends
1,661 -
Business Trends
91 -
CAP
1 -
cf
1 -
Cloud Foundry
1 -
Confluent
1 -
Customer COE Basics and Fundamentals
1 -
Customer COE Latest and Greatest
3 -
Customer Data Browser app
1 -
Data Analysis Tool
1 -
data migration
1 -
data transfer
1 -
Datasphere
2 -
Event Information
1,400 -
Event Information
66 -
Expert
1 -
Expert Insights
178 -
Expert Insights
293 -
General
1 -
Google cloud
1 -
Google Next'24
1 -
Kafka
1 -
Life at SAP
784 -
Life at SAP
12 -
Migrate your Data App
1 -
MTA
1 -
Network Performance Analysis
1 -
NodeJS
1 -
PDF
1 -
POC
1 -
Product Updates
4,577 -
Product Updates
336 -
Replication Flow
1 -
RisewithSAP
1 -
SAP BTP
1 -
SAP BTP Cloud Foundry
1 -
SAP Cloud ALM
1 -
SAP Cloud Application Programming Model
1 -
SAP Datasphere
2 -
SAP S4HANA Cloud
1 -
SAP S4HANA Migration Cockpit
1 -
Technology Updates
6,886 -
Technology Updates
415 -
Workload Fluctuations
1
Related Content
- Issue during getting ESG metrics under SCT API instance created under Netherland's datacenter in Technology Q&A
- Easy way to automate and configure the setup of a BTP account and Cloud Foundry using Terraform. in Technology Blogs by Members
- Configure Custom SAP IAS tenant with SAP BTP Kyma runtime environment in Technology Blogs by SAP
- Kyma Integration with SAP Cloud Logging. Part 2: Let's ship some traces in Technology Blogs by SAP
- Usage of Custom Destination Service in BTP, ABAP Environment in Technology Blogs by Members
Top kudoed authors
| User | Count |
|---|---|
| 29 | |
| 21 | |
| 10 | |
| 7 | |
| 7 | |
| 6 | |
| 6 | |
| 5 | |
| 5 | |
| 5 |