Hi all,
Following my previews SAP NetWeaver Portal – Object Based Navigation for Dummies about the basics of Object based Navigation, I would like to share with you today a step-by-step example that will guide you through the process of create a very simple OBN navigation.
Before we start, please note that he screenshots taken in this blog were taken from a specific SAP NetWeaver Portal version and there might be differences in the UI between versions.
Saying this, let's start with our process of creating our working example.
1. Login to your portal with a Content Administrator user and navigate to the Portal Content view. Identify the Business Objects folder within this screen.
2. Right click on the Business Objects folder and create a new folder called SDN Example

3. Right click on the SDN Example folder and select the Import Business Objects option. Manually create a new Business Object called Customer with the System alias CRP (stands for CRM Production -> CRP)

4. A new Business Object called Customer has been created

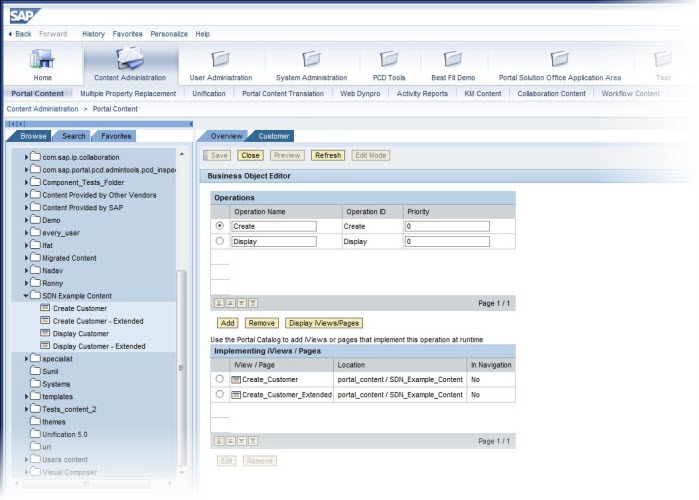
5. Create two new operations (for the Customer business object): Create and Display

6. Create the folder and the following four new iViews under Portal Content à SDN Example Content (note: This is NOT under the Business Objects folder but under the Portal Content folder!)
- Create Customer
- Create Customer - Extended
- Display Customer
- Display Customer - Extended

7. Open the Customer business object and select the Create operation (on the upper table). Add the Create customer iView and Create Customer - Extended iView to the Create operation

8. This is how the screen should look like
9. Create two roles, one for employees and one for managers. For the employees add the iViews Create Customer and Display Customer; for the manager add the iViews Create Customer - extended and Display Customer - extended

10. Create one additional iViewapplication, which will act as the source for the navigation. This iView should contain a button called Create Customer that triggers the following code as the action of the button: EPCM.doObjBasedNavigate(CRP, Customer, "",Create);
The full OBN API's are available here. Add this iView to a new role.
11. We are almost done, now create two users: Employee and Manager; assign the employee's role to the employee user and manager's role to the manager user. In addition assign the new role from section (10) to your user.
That's it, we are done! Now login with each user and click on the Create Customer button. Note that when you are logged in with the employee user the Create Customer iView is launched and when you are logged in with the Manager user, the Create Customer - extended is launched. This is the essence of Object Based Navigation!
You can now repeat the same exercise for the Display operation.
Please keep in mind that this exercise provides the essence of Object Based Navigation, there is much more that you can do which is not presented in this exercise (priorities, parameter passing, parameter mapping, etc.), these topics will be covered in future blogs.
Regard,
Aviad Rivlin
