


- SAP Community
- Products and Technology
- Additional Blogs by Members
- Document Management Solution-KM Usage Part2-Buildi...
Additional Blogs by Members
Turn on suggestions
Auto-suggest helps you quickly narrow down your search results by suggesting possible matches as you type.
Showing results for
Former Member
Options
- Subscribe to RSS Feed
- Mark as New
- Mark as Read
- Bookmark
- Subscribe
- Printer Friendly Page
- Report Inappropriate Content
10-24-2010
1:09 AM
This is with reference to previous blog Document Management Solution-KM usage Document Management Solution-KM usage-Part1 .This blog is conclusive one on our approach and building the solution levearging available KM capability.
We have taken first step to establish a repository framework taking into account department and sub departments and there organization of documents which was on there desktops and central repository basically a team room on a file server. Analysis and structuring exercise revealed for a single department example Information Communication Technology (ICT) the organization looks as depicted below where each department (ICT) has many sub departments such as Infrastructure Operations, Governance PMO, Business Applications etc and each of them classify document as standard procedures, work instruction/SOP, Policies or Manuals.ICT Department also maintain documents calssified as Vission, Mission and Values. AND Standard, Legal Docs.

We have taken into account the need and started to draw a picture of framework as depicted below Ist Level Repository Framework-Departments ,2nd Level Repository Structure-Sub Departments & 3rd Level Repository Structure-Document Classification

This requirement sparked the need of a content management repository and CM repository Manager. A CM repository is used as the main repository for storing documents and folders that are managed by CM called ECD. The CM repository manager is the only repository manager that supports the entire spectrum of standard resource properties, including Description, Read-only, and Hidden.
Steps
Navigate to System Administration àSystem Configuration-Knowledge Management-Content management-Global services-Repository Manager-CM Repository Duplicate the document repository (/documents) and renamed it as ECD
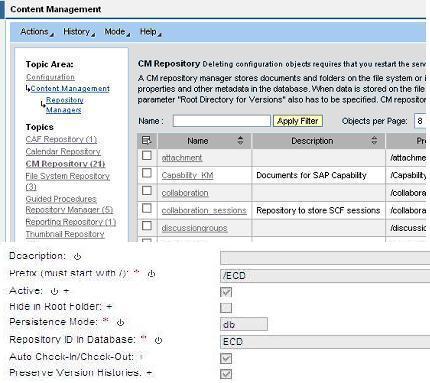
DB Mode is selected for setting up repository manager
All data (documents, folders, and metadata) is stored in the database. Expecting a large number of write requests in CM usage scenario, we set up the CM repository in database mode. Since all documents are stored in the database, this avoids unintentional external manipulation of the data. Another advantage of storing all data in the database is that the procedure for data backup and restore is easy since only the database needs to be backed up. Auto check in and check out is activated-- this parameter is activated, users can access documents without having to check them out and then check they back in. When documents of this type are saved, the system automatically creates a new version. Preserve Version Histories is activated- Specifies whether versions are deleted or retained when the document to which they belong is deleted.
The structure of ECD (Navigate to ECD-Folder-NewFolder) as shown below are maintained as follows

Similarly you can create subfolders below department folder as sub departments followed by Folders specific to requirements such as Policy etc as shown below we have gone ahead to build framework for all departments and sub departments a similar way but very simple way.

The requirement evolved in such a manner that we need to have for each department a Coordinator, author, reviewers and approvers for each document. The coordinator group will have full read and write, author will have read and write permissions, reviewers will have only read permissions and approvers will have only read permissions.QA department will reign supreme as they will be coordinators for entire organization.So we have created user groups in portal and added users to this groups who existed in the organizations Active directory. A simple table was pretty handy dealing with 75 departments and nearly 150 sub departments and roughly about 3000 documents (in *.PPT, *.DOC,*.XLS).
Example Information Communication Technology Department
| Department | Sub Departments | QA (Read/ write) | Coordinators (Read/Write) | Author (Read/Write) | Reviewer (Read) | Approvers (Read) |
Information Communication Technology |
| ECD_QA | ECD_Coordinator_ICT | ECD_Auth_ICT | ECD_REV_ICT | ECD_APPR_ICT |
| Vision, Mission & Values |
|
|
|
|
|
| Standards, Legal Docs |
|
|
|
|
|
| Infrastructure Operations |
|
|
|
|
|
| Governance PMO |
|
|
|
|
|
| Business Applications |
|
|
|
|
|
| Production Systems |
|
|
|
|
|
Permission Inheritance principle as mentioned below is being widely used
Permissions are automatically passed from a folder to the sub-folders and unit objects in it. Unit objects then pass their permissions to their embedded child objects, and so on. To set different permissions for objects within a folder, you need access the objects specifically and modify their permissions, as needed. Permissions are inherited from one object to another according to each object's hierarchical location in the Portal Catalog.
- A folder passes its permissions to its immediate sub-folders, and so on.
- A folder passes its permissions to unit objects contained in it.
- A unit object passes its permissions to embedded objects contained in it.
Permissions are not passed through delta link relationships or other dependency types. Permissions are assigned directly to folders and unit objects displayed in the Portal Catalog.If permissions are not assigned directly to a folder or unit object, then they are inherited from their closest parent or ancestor that has permissions assigned directly to it.You cannot assign permissions to embedded objects that are contained in unit objects (such s iViews in a page or worksets in a role). Unit objects always inherit permissions from their respective unit object.When a folder or object has permissions assigned directly to it, the inheritance of permissions broken between it and its parent. Any subsequent modifications made to the permissions of the parent objects are not passed to its child objects, unless the inheritance is restored.
Permission Level
Owner
Provides all permissions permitted by full control (see below) and also enables the authorized user/group/role to modify the permissions of the object.Provides all permissions permitted by read (see below) and also enables the authorized user/group/role to modify the permissions of the portal component1 or security zone2.
Full Control
Provides all permissions permitted by read/write (next row), and also enables the authorized user/group/role to delete the object.The use of the Cut action in the Portal Catalog requires at least administrator full control permission to an object or folder being cut to the portal clipboard.Not available for portal components and security zones.
Read/Write
Provides all permissions permitted by read and write (next row), and also enables the authorized user/group/role to:
- 1. Add to and remove child objects from a parent object.
- 2. Edit the object properties.
The use of the Paste and Paste as Delta Link actions in the Portal Catalog require at least administrator read/write permission to the destination folder in which an object or folder is being pasted.
Not available for portal components and security zones.
Write
This permission setting is not selectable from Permission Editor. It is relevant only to folders in the Portal Catalog and not to objects in the folder.
The permission level is transparently applied by portal applications at the API level to folders that require it.
Folders with write permissions allow authorized users to create objects in it.
This permission can be used to allow the end user to create and share content. To support this, the Everyone group could be granted write permission to a particular folder intended as a container for all users in the group to share any content they create in it.
Not available for portal components and security zones.
Read
Enables the authorized user/group/role to:
- 1. View the object in the Portal Catalog using the browse and search capabilities.
- 2. Open the object in its respective primary and secondary editors in read-only mode; the object cannot be modified.
- 3. To create instances (delta links and copies) from the object.
- 4. To gain access to and choose templates in the object creation wizards.
The use of the Copy action in the Portal Catalog requires at least administrator read permission to an object or folder being copied to the portal clipboard.
This permission level can be used to prevent portal administrators from editing a particular object, while still allowing them create an instance of the source and use the new instance in any way. For example, if you create a delta link instance of an object with read permission and place it in a folder with read/write permissions, you may fully edit the delta link object. However, if the object is not intended for end users, make sure that the destination folder does not have end user permissions.
Portal components: Enables the authorized user to see and choose portal components in the object creation wizards (typically launched using the New from PAR action in the Portal Catalog).
Security zones: Enables the portal administrator to see the security zone in the Portal Catalog. The permissions of the security zone cannot be edited. Setting Permissions in the Permission EditorNavigate to folder on which you want to set up permission as shown below

Right Click on and select details from the menu displayed above. In the details menu navigate to settings and permissions as shown below:

Permission editors open where you need to select users or group or role as per the requirement and assign the permission as required.

- 1. In the Search for box, enter keywords to search for. You may use the wildcard symbol (*) in the search string. For example: enter ECD *r all users,groups,rolesname is ECD* will be populated
- 2. In the Assign New Permissions area, choose the user, group, or role you want to add.
- 3. Click Add. The user, group, or role is now displayed in the Assigned Permissions area
- 4. choose a permission level from the drop-down list as shown below and assign it to users /groups /roles
In continuation of Document Management Solution-emphasizes that people may need to check and approve documents before they are visible in the portal. The checking of documents can encompass several areas, and different people or departments can carry out different checks. A document can be checked for accuracy of content, language, and style, as well as for the suitability of the layout, and adherence to corporate design guidelines
Process Flow
...When an author creates a document, it receives the status In Progress.The document can only be read by those with write permission for it. If a document has several versions, anyone with read access only can see the version that has most recently been released.
The document is sent for approval as soon as the author has completed it.They do this by choosing Submit for Approval. This starts the workflow. The document receives the status For Approval. At this point, the document is only visible to its authors and to approvers.
The approvers of the first approval step receive a notification in there universal worklist requesting that they approve or reject the document.
As soon as the first step has been approved, the system sends a notification to the approvers of the second step.Approval by any one of the assigned approvers is sufficient for each approval step. This is also true if an approval step is assigned to several people or to a group. The system processes all approval steps sequentially.
As soon as an approver assigned to the final approval step has approved the document, the document receives the status Released.The document is now visible in the portal to all users with read permission. If the document is contained in an indexed data source, the system starts indexing the document at this point. Only then is the document available through the search or in the categories. After the document has been released, the system sends notifications about the document to all subscribed users.
As soon as a document becomes obsolete, you can archive it.The document receives the status Archived. When you archive a document, the physical file remains in the folder, but the document is only visible in the portal to users with write permission. The system removes the document from the index. After this, users can no longer find the document through the search or in the categories.
Rejecting a Document Sent for Approval
If an approver rejects a document, the person who sent the document to be approved receives a notification.The document now has the status Rejected. Approvers can use the Feedback function to inform the author of the reason for the rejection
Terminating the Approval Process
The author of a document can terminate the approval process as long as the document still has the status For Approval. The document receives the status In Progress again. During the approval process, you cannot make any changes to the document. If you edit a document during the approval process, the system terminates the approval process. Authors can submit the document again for approval. However, the document is subject to the entire approval process again. This ensures that the version of the document visible in the portal is the one that all approvers have seen.
Skipping the Approval Process
Anyone who has the service permission Edit Approvers for the folder can skip the approval process. If you choose this function, you publish the document in question immediately without any further checks. You need the service permission Approver Administration (or Full Control) to carry out the following actions. Set up the approval process for a folderYou can activate and deactivate the approval process, determine approval steps, and assign users to the steps. Display all documents irrespective of their release statusYou can also see documents that have not yet been released. Skip the approval processYou can release documents directly without them being approved.
You can define approval workflows for folders. The relevant approval status controls the visibility of documents in these folders. In the various approval steps, the system sends notifications to the approvers. Each notification is sent both by e-mail and in the form of a task in the universal worklist.
Setting up Approval WorkflowNavigate to folder on which approval workflow has to be enabled as shown below
Click on Details Navigate to settings Approval as shown below

Enable Approval services as shown in the following figure

Define approval steps as shown in the following figure as per the requirement
a>Step1 will be default so go to user selection type in ECD* and select user as per groups and click on add approver to step.
b>Adding new Step use Add step and follow the process as described above.
c> Save Approval process.
After configuring the Approval steps navigate to Settings-service permissions and select users to be approver administrator who can set up the approval workflow and also has skip approval privilege .
Test case
The purpose of the test case is to create a document,edit a document,check version of a document when it was first created ,submit the document for approval,approve documents and release documents visible to portal users with read permissions and also to provide mail notification of document release.In Order to establish test scenario we have created a actors in real time this are user groups with with predefined roles and responsibility such as
QA DEPT will check appropriate format of the documents and if required edit documents and submit the document for approval of Business owner.Business owner checks the document for the content and legal guidelines and approves it.Once the document is approved by business owner it goes to business approver who finally approves it for release to QA department.QA department again validates the approval if there is any feedback or any norms undergone any change otherwise approves it for final release

Log in as Coordinator into the portal and create a document Workflow Test (for e.g.) and then click on Details and check versions 1 as shown below

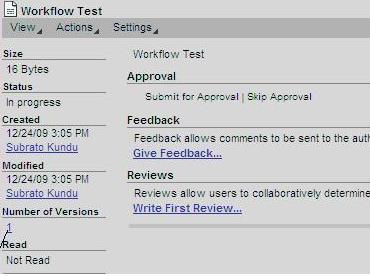

This document will be routed to QA DEPT and this document will not be visible to other users other than approvers and author.
Log in as BP Read a user with read permission for the department and navigates to specific location will not be able to view it only approved and released document will be available to be viewed

Login as QADept and navigate to universal worklist as shown in figure below


Log in as Coordinator portal and approved notifications from QA Dept will be on the universal worklist as shown below. Now coordinator approves it by checking the content and sending a message to next level as shown below and this document is routed to Bus _owner


Log in as Bus _owner and approves the document as shown below and it gets routed to BUS_appr.Log In Bus_Appr and approves the document and it gets finally to QA Dept for approval and Release.

Intermediate check can be done on BPRead user so that document is not visible to user unless QA Dept Approves.

Log In as QA DEPT and finally approve the documents
Log in as BP Read and now the document will be visible to user as it is being released as shown below.

Also email notification has gone to subscribed users

Predefined properties in Portal ensures faster search of documents based on Department, Sub Department and Classification data. Three Predefined properties configured for documents to specify the origin of the document are as follows:
- Departments
- SubDepartment
- Classification
The values for the property Sub Department to vary depending on the value that a user selects in the property Departments. Document Classification Property is independent property. Choose System Administration System Configuration in the portal. Then choose Knowledge Management Content Management in the detailed navigation pane. This screen is the point of access for the configuration steps below. Make sure that the advanced view is activated in the Configuration View. To do so, proceed as follows: To activate the advanced view, choose Mode Advanced option.
Advanced view displays all configuration classes and parameters.

The properties used in this need to be placed in a separate Group because of their usage (describing the origin of documents). Proceed as follows
To create a group, choose Global Services ® Property Metadata ® Groups.
2. Choose New.
3. Specify the parameters.
4. To save your entries, choose OK.
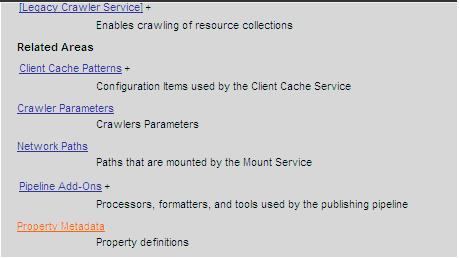

You now create the property Department as the base property .Depending on the value of the department subdepartments will be displayed .1. Choose Global Services ® Property Metadata ® Properties in the Configuration iView

You now create the Property SubDepartmentYou do not define values within this property.It serves as a holder for sub-properties whose possible values are loaded dynamically according to the value of the property DepartmentInstead of properties, the dependencies between the properties are storedin the parameter Additional Metadata. The property renderer multi_dependence.

You now created a sub-property for each value of the base property Department. The values of these sub-properties areater loaded to the value set of the holding property SubDepartment in accordance to the value of the propertyDepartment.

You now create a property called Classification which is independent of other two.

3. Specify the following parameters:

You have to update the elements of the property group all_groups so that the property groupthat you just created is displayed in the Details dialog box. The property group all_groups is usedby the property structure DefaultPropertiesStructure, which is used by default for the displayof the properties in the Details dialog box.
1. You are in the Configuration iView under Global Services ® Property Structures ®
Property Groups.
2. Select the property group all_groups from the table and choose Edit.
3. Enter the property group which you just created, into the parameter Group Items
in addition to the existing entries.
4. To save your entries, choose OK.

Call up the Details dialog box for the document.Choose Settings ® Properties in the Details dialog box for any controlled documents

Standard Procedure
Choose System Administration -> System configuration -> Knowledge Management -> Index Administration
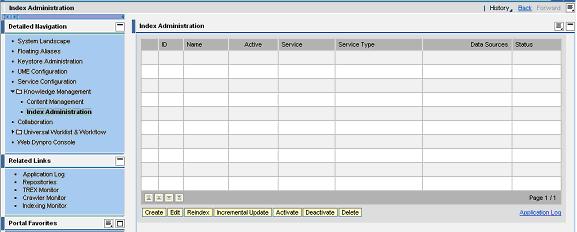
Fill in the following details:
1. ID is a unique identifier for the index.
2. Name - is displayed in search options when this index is used
3. Group - Group to which the index belongs to. To add new group, give the name of the group and choose Add.
4. Crawler Parameter - select standard to use standard crawler. Crawlers index the referenced datasource based on schedules.
5. Schedule - Click Schedule to create crawler schedule

In the context of search index has been created at department Levels .So data source will be all departments under /ControlledDocuments.For an Example creating an index for ICT department is as follows
Click Data source on the left pane of Index Administration page.
- Choose Add

Choose the folder to be indexed and then Choose OK

The index will be created on document and it will be searchable only when document is being released,This concludes some usage of KM in real time scenario hope this couple of blogs clearly demonstrate from requirement gathering ,approach to build a solution from available KM capability.so from Arnie Way"ASTALA Vista" till i see you again
Related Content
- Unable to remove attachment in "Managed Purchase Requsition" Apps in Fiori in Enterprise Resource Planning Q&A
- Latest Updates to the Reimagined Applicant Management Tool in SAP SuccessFactors Recruiting in Human Capital Management Blogs by SAP
- Issues with Deceased status in EC & POC in Human Capital Management Q&A
- SAP Named a Leader in the 2024 Gartner Magic Quadrant for Transportation Management Systems in Supply Chain Management Blogs by SAP
- ISAE 3000 for SAP S/4HANA Cloud Public Edition - Evaluation of the Authorization Role Concept in Enterprise Resource Planning Blogs by SAP