Previous blog, The Full Monty - Part 3 - License & Profiles
After spending hours trying to find out why a particular process was failing, I finally found out it was the CMD.exe command of Windows 7, not being able to support UNC paths. e.g. \pcsapmnt. Microsoft have recognized this, and posted a KB article, however, I had to use a different node, than documented. Anyway, the solution is in here, so I will now commence the next stages ...
The standard NSP installation is delivered with the following settings for the Transport Management System (TMS). You can view this by running transaction STMS->Overview->Systems.

If you try to perform a check, you will get an error message. Various settings need changing, and adding, so it is possible to import and export transports.
Double click the NSP entry, to view the settings. As you will be able to see, under the "Transport Tool" tab, the entries for TRANSDIR, & DBHOST, are set to point to "pwdf3101", and in the "Communication" tab, so is the "Target Host".


Both automatically generated RFC ABAP Connections in SM59, are also pointing to the same "PWDF3101" Target Host destination.

See under the "Technical Settings" tab.

For us to be able to successfully import transports, we will need to correct this.
First, run SM59, and delete both TMSADM@NSP.DOMAIN_NSP & TMSSUP@NSP.DOMAIN_NSP entries.
Run STMS->Overview->Systems. Double click the NSP entry, and enter "Change" mode.
Modify the two lines accordingly under the "Transport Tool" tab, to point to your host.
You can identify your host by going to Windows, Start, right click My Computer -> Properties, and see "Computer name"

Use host name, in my case "pc", to replace "pwdf3101"

Also, change the "Target Host" RFC Address, under the "Communication" tab

Upon saving your settings, you will get the following error

This is expected, so just ignore it, as we will fix it up now.
At the System Overview screen, select the NSP system and go to Extras->Generate RFC Destinations.

You should now be able to successfully perform a TMS connection test.
STMS->System Overview->Select the NSP system

SAP System->Check->Connection Test F5

Message at the bottom of the screen

Now, try SAP System->Check->Transport Directory

and now the Transport Tool
SAP System->Check->Transport Tool

Notice the last entry "Offline Call"
This is the bugger that gave me 40 hours of hell, of which I finally managed to find a fix.
Do this, and be VERY CAREFUL
In Windows, Start->Run "Regedit"

Navigate to the HKEY_LOCAL_MACHINE node, and not HKEY_CURRENT_USER, as Microsoft suggest. Then follow the path to the "Command Processor"
SOFTWARE
Microsoft
Command Processor
Right Click on the right window, select New -> DWORD (32-bit) Value

Name the new entry "DisableUNCCheck" and give it a Hex value of 1, as below

Your final entry should look like this

For more information look here http://support.microsoft.com/kb/156276
No need to restart, just try the Transport Tool Again
SAP System->Check->Transport Directory, and it should look like this

Now we can update the configuration
SAP System->Update Configuration

All you get is this, to click "Yes"

Not even a message at the end
Finally, distribute and activate the settings to all systems
Extras->Distribute and Activate Configuration

Again, no messages indicating success or otherwise. So, "no news is good news".
We are done, and STMS transport system should be up and running, ready for Imports, as well as Exports
For the ultimate test, we can create an object (a Package, in this case), and export it. Then, check the files it created at the OS level.
Logon to client 000 as bcuser, and run transaction SE80 - Object Navigator.
Select the "Repository Browser", and in the drop down, choose "Package". Type in a custom Package name, in my case "ZGS" then press enter. You will be prompted to create the package object object.

After some compiles, you will be prompted for a description, add one, and press the Create button. It will now want to put the Package object into a Transport Request.

You may be presented with an existing Transport Request, as it links the User with any existing Transport Request, and, as this Request is delivered in the NSP system, you will be offered it. We can use it or we can create our own.

Don't forget, we have already created the Package object. What are doing here, now, is creating a Transport Request to place the Package object in. I'm going to create a new Transport Request. Press the Create button, and on the next screen, give it a description, then Save.

After the new Transport Request has been created, you are now offered to use it, so confirm this, by pressing the "tick". Make a note of the Number: NSPK900119. The Object is now in the Transport Request.

Go to transaction SE09, and press enter upon the first screen. You will see your Transport Request, and any others.

To get the Package out of the system, we need to export it. To do this, expand your Transport Request node, and you should see, what is called a Transport Task, below.

Select it, then press the Lorry button. A tick appears beside it.
Do the same for the Transport Request. Select it, and press the Lorry button. The next screen shows the Request being released.
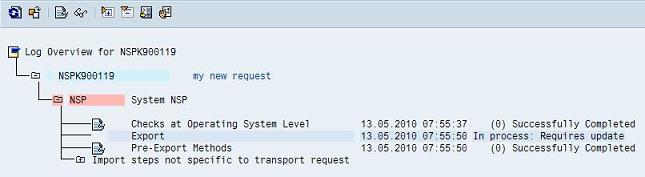
After a couple of seconds, press the Refresh button, and you should see the following screen, indicating that the Request has been successfully release.

Now we can go take a look at the OS file structure for the created files.
In Windows, navigate to the c:usrsap ranscofiles directory. You should see a file called something like K900119.NSP. In the c:usrsap ransdata directory, there will be another file called something like R900119.NSP. Together, these files are used to import whatever objects have been added to the Transport Request, under a similar process, as performed above.
Now we know for sure, our Transport System works for Exporting objects.
Continue to my next blog...
The Full Monty - Part 5 - HTTPS & Sapcrypto
