h2. The Purpose of this Blog The purpose of this blog is to describe an interoperable scenario between SAP Services Registry in SAP NetWeaver PI 7.1.1 and the Microsoft UDDI Services 9.0. I am exploring this scenario as a prototype work to evaluate if it is possible to use Microsoft UDDI Server as the company-wide UDDI repository that can work with SAP. The procedure described in this blog primarily follows the procedure outlined in the SAP article “{code:html}HOW TO SET UP AN INTEROPERABLE SCENARIO WITH SAP NETWEAVER SERVICES REGISTRY AND HP SOA GOVERNANCE S...{code}”.h2. Configure the Microsoft UDDI Services 9.0 h3. Configuration for HTTP Basic Authentication The {code:html}Firefox Poster Extension{code} was used to post the requests.  h2. Configuring the SAP NetWeaver Services Registry h3. Configure the UDDI Destination Template This is done following the procedure described in this SAP Help page (http://help.sap.com/saphelp_nwpi711/helpdata/en/47/d390edb8fc3c83e10000000a42189c/content.htm). 1. Start Netweaver Administrator and go to SOA Management->Technical Configuration-> Destination Template Management
  2. Select the UDDI_Destination entry in the list and click on the Edit button
  3. Put in the URL address of the sap.xml installed in the Microsoft UDDI Server
  4. Select HTTP Authentication from the Dropdown, select the User ID/Password (Basic) radio button, and put in the user ID/password
  5. Click on the Save button to save the configuration h3. Configure the Service Registry for Basic Authentication 1. Within Netweaver Administrator, go to SOA Management -> Application and Scenario Communication-> Single Service Administration
  2. Search “ServicesRegisterySi” by “Service WSDL Port Type” in the Service Definitions tab
  3. Select “ServicesRegistrySi” and select Configuration Tab
  4. Select the Service Endpoint “ServicesRegistrySiPort” and edit the security configurations by clicking the edit button. Check the UserIdPassword check box under HTTP authentication and save the changes
  h3. Configure the UDDI Destination Service 1. Within Netweaver Administrator, go to SOA Management -> Application and Scenario Communication-> Single Service Administration -> Consumer Proxies and search “DestinationSi” service proxy by WSDL Port Type
  2. Go to the Configuration Tab and create a logical port (there is a button labeled “New”)
  3. Select “Enter Manually” and Next 4. Enter a logical port name, set as default, and enter a valid URL for the third party service’s registry wsdl (i.e. http://microsoft_uddi_server:port/uddi/sap.xml (http://microsoft_uddi_server:port/uddi/sap.xml)). Next.
  5. Select HTTP Authentication, User ID/Password (Basic), and enter a valid user ID/password for login to the Microsoft UDDI server. Finish and save the new logical port.
  h2. Testing to see if this configuration works h3. Publish a web service from the SAP Service Registry user interface 1. Open the SAP Service Registry in a browser window and go to Service Definitions->Publish
  2. Enter the WSDL URL of a service to be published and click the Next button
 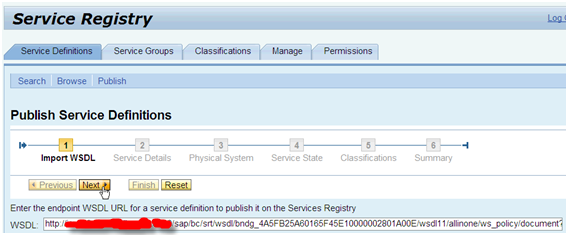 3. Put in the service related data and click on Next
  4. Put in the system data and click on Next
  5. Select a state of the service and click on Next
  6. Classify the service and click on Next
  7. Do a final review and click on Finish
  8. The service is successfully published
 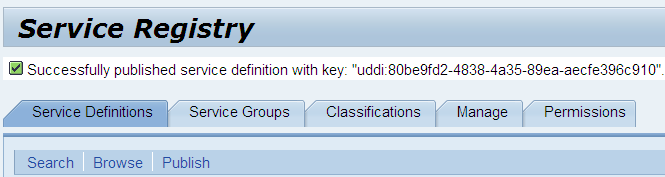 9. Searchfor the service in SAP Service Registry to verify

 10. Search for the service in Microsoft UDDI Server to verify


 The lifecycle status is also published
  The documentation URL is also published
  h3. Publish an Enterprise Service from an ECC System to the Microsoft UDDI Server 1. Through the WSPARAM transaction code, check that the ECC system has been configured to connect to the SAP Service Registry in the SAP PI 7.1.1 system. Copy the name of the Service Registry for later use. If there is no logical port configured in WSPARAM list, click here (http://help.sap.com/saphelp_nwpi711/helpdata/en/25/683fbe7e01407cb20995d10d71c895/content.htm) for more information on setting Up the Connection from ECC backend to the Services Registry. Advised by SAP that since Microsoft UDDI does not provide the Security service, when configuring the connection in the ECC backend, make sure the new consumer proxy ServicesRegistryFlatSi is used instead of the older one ESRegistryWSSi. The older one always goes via the UDDI security service.
  2. Execute the program “PRG_ER_SERVICES_PUBLICATION” a. Enter the enterprise service name “ECC_MATLERPINVHNDLBYIDLOCQR” b. Check the Force Publication checkbox c. Enter the logical port name copied in step 1 d. Click on the Execute button
  3. The publishing log is displayed showing that the service has been published successfully*. Follow the same procedure described in step 9 and step 10 in the previous section to verify the published service in SAP service registry and in Microsoft UDDI server.
*Note: This service publishing from ABAP backend was not working initially. From the tracing log the issue was found related to the physical system name published into the UDDI server. Somehow the physical system name has “#ABAP” attached to the tail that got published into the UDDI server. Hence when publishing the service definition using the physical system name without the “#ABAP” it failed. I have not figured out the root cause but have come up with a work-around by manually publishing the physical system name (without “#ABAP”) into the UDDI server. Then everything worked fine. h3. Publish an Enterprise Service Definition without End-point from SAP ESR to the Microsoft UDDI Server 1. Open a service interface in SAP ESR, select the WSDL tab, and click on the Publish button  2. Click on the Publish button again
  3. Publishing result is displayed
  4. The service definition without end-point is published into Microsoft UDDI as a tModel instead of a service.
