
- SAP Community
- Products and Technology
- Additional Blogs by Members
- Cut Out the Spaghetti - Create Navigation Links at...
Additional Blogs by Members
Turn on suggestions
Auto-suggest helps you quickly narrow down your search results by suggesting possible matches as you type.
Showing results for
Former Member
Options
- Subscribe to RSS Feed
- Mark as New
- Mark as Read
- Bookmark
- Subscribe
- Printer Friendly Page
- Report Inappropriate Content
03-22-2010
5:43 AM
Web Dynpro makes it easy to develop complex applications with lots of screens. Creating navigation links between the screens at design-time can sometimes be quite time-consuming, and lead to increased maintenance effort in future. In this blog I will show how to create the links at runtime, when the exact screen order is known.
Consider the following example. The client - 'Fruit Co.' - wants to allow customers to purchase fruit from their website. The requirement is for an initial screen on which the customer indicates which types of fruit they want; a screen for each fruit on which they can select the quantity; and finally a confirmation screen, on which they can confirm their order.
If Fruit Co. were to offer apples, bananas and oranges the screen flow might look like this:
Initial screen...
 |
...leads to at least one fruit-type screen...
 |  |  |
...and then the confirm screen
 |
The application will be built using Web Dynpro Java (WDJ). Assume that the customer must select at least one fruit on the initial screen. It is quite easy to connect the views using plugs and navigation links. You will need one inbound plug on each view and one outbound plug for each screen that can be moved to from that screen. If all possible scenarios were catered for at design-time the views would look something like this:

This is probably just about manageable, with 18 navigation links needed. But what if the scope was increased to 5 different fruits? Then 40 links would be needed. 10 fruits would need 130 links (the formula is n = s2 + 3s, where n is the number of links and s the number of screens). The formerly simple application could easily become too complex and difficult to maintain.
One solution is to build the navigation links at run-time, when the exact screen flow is known. The purpose of this blog is to show how easily this can be done. At design-time all that needs to be added to the views is a single inbound plug. With this approach the views would look like this:

I will now show in detail the steps that are needed.
1) Build screen flow in context
You need to populate at run-time a context node in the component controller which will contain the desired screen flow, with one element added for each screen. This flow depends on the fruits that the customer selects on the initial screen. The idea is to seperate out the screen-flow logic (which will vary depending on the requirement) and the building of the links (which will be much the same for any application). The current screen will be indicated by the leadSelection property of the node.

The following method should be added to the component controller:
public void buildScreenFlow( )
  {
    //@@begin buildScreenFlow()
    wdContext.nodeScreenFlow().invalidate();

    // always add initial screen
    addScreenToFlow(SCREEN_INITIAL);

    // add fruit-type screens if selected
    if (wdContext.currentFruitTypesElement().getApples()) {
        addScreenToFlow(SCREEN_APPLES);
    }
    if (wdContext.currentFruitTypesElement().getBananas()) {
        addScreenToFlow(SCREEN_BANANAS);
    }
    if (wdContext.currentFruitTypesElement().getOranges()) {
        addScreenToFlow(SCREEN_ORANGES);
    }

    // always add confirm screen
    addScreenToFlow(SCREEN_CONFIRM);

    //@@end
  }
The method must be called when the customer clicks Submit on the initial screen, having chosen their fruit types. In addition we declare these constants:
public static final int      SCREEN_INITIAL           = 0;
public static final int      SCREEN_APPLES           = 1;
public static final int      SCREEN_BANANAS           = 2;
public static final int      SCREEN_ORANGES           = 3;
public static final int      SCREEN_CONFIRM           = 4;
public static final String   INBOUND_PLUG_NAME         = "InPlug";
The addScreenToFlow() method looks like this:
   public void addScreenToFlow( int screenId )
  {
    //@@begin addScreenToFlow()
    IScreenFlowElement screen;
    screen = wdContext.nodeScreenFlow().createScreenFlowElement();
    screen.setScreenId(screenId);
    wdContext.nodeScreenFlow().addElement(screen);
    //@@end
  }
2) Build outbound plugs and navigation links
Having populated the screen flow node it is quite straightforward to add outbound plugs and navigation links between the views. These will only be needed for the exact screen flow that the customer has already specified. The fruit-type views will have 2 outbound plugs each (one for forward, one backward) whilst the initial and confirm views will have one plug each. The following method should be called immediately following buildScreenFlow():
public void createLinks( )
  {
    //@@begin createLinks()
     IWDWindowInfo winInfo;
     IWDOutboundPlugInfo plugInfo;

     winInfo = wdThis.wdGetAPI().getComponentInfo().findInWindows("RunTime");

     IScreenFlowElement thisScreen;
     IScreenFlowElement nextScreen;
     IScreenFlowElement previousScreen;
     for (int s = 0; s<wdContext.nodeScreenFlow().size(); s++) {

          thisScreen = wdContext.nodeScreenFlow().getScreenFlowElementAt(s);

          if (s > 0) {
               // not the first one, create link to previous screen
               previousScreen = wdContext.nodeScreenFlow().getScreenFlowElementAt(s - 1);
               plugInfo = createLink(     thisScreen.getScreenId(),
                                             previousScreen.getScreenId(),
                                             winInfo);
               thisScreen.setPrevPlug(plugInfo);
          }

          if (wdContext.nodeScreenFlow().size() - s > 1) {
               // not the last one, create link to next screen
               nextScreen = wdContext.nodeScreenFlow().getScreenFlowElementAt(s + 1);
               plugInfo = createLink(     thisScreen.getScreenId(),
                                             nextScreen.getScreenId(),
                                             winInfo);
               thisScreen.setNextPlug(plugInfo);
            }
     }
//@@end
}
Note that in this example the views are embedded directly inside the window (which in this case is called RunTime). If you are using a viewset in your application you will need to alter the code slightly. The createLink() method looks like this:
public com.sap.tc.webdynpro.progmodel.repository.IWDOutboundPlugInfo createLink(int fromScreen, int toScreen, com.sap.tc.webdynpro.progmodel.repository.IWDWindowInfo winInfo ) {
//@@begin createLink()
IWDViewUsageInfo viewUsageFrom;
IWDViewUsageInfo viewUsageTo;
IWDViewInfo viewInfoFrom;
IWDOutboundPlugInfo plugInfoFrom;
IWDNavigationTargetReferenceInfo navTargetInfo;
String fromViewName;
String toViewName;
String viewPackageName;
fromViewName = getScreenName(fromScreen);
toViewName = getScreenName(toScreen);
// find 'from' view and create outbound plug
viewInfoFrom = wdThis.wdGetAPI().getComponentInfo().findInViews(fromViewName);
plugInfoFrom = viewInfoFrom.createOutboundPlug();
// get view usages and create navigation link
viewPackageName = wdThis.wdGetAPI().getPackageName() + ".";
/* Rather than assuming the view usage will end with 'Usage1' we could
* get all of them using getRootViewUsages() and then find the matching usage
*/
viewUsageFrom = winInfo.findInRootViewUsages(viewPackageName + fromViewName + "Usage1");
viewUsageTo = winInfo.findInRootViewUsages(viewPackageName + toViewName + "Usage1");
navTargetInfo = viewUsageFrom.createNavigationTarget(plugInfoFrom.getName(), viewUsageTo, INBOUND_PLUG_NAME);
return plugInfoFrom;
     //@@end
  }
The getScreenName() method simply returns the view id of a given screen.
3) Methods to move between screens
We will need a method in the component controller to navigate forwards between our screens, and one to go backwards. These methods will get the relevant plug from the ScreenFlow context node, and then call another method to fire it. These methods must be called from the views, when the Next or Back buttons are clicked.
  public void goToNext( )
  {
    //@@begin goToNext()
    IScreenFlowElement thisScreen;
    thisScreen = wdContext.currentScreenFlowElement();
    wdThis.wdGetRunTimeInterfaceController().wdFireEventNavigate(    thisScreen.getScreenId(),
                                                                    thisScreen.getNextPlug());
    wdContext.nodeScreenFlow().setLeadSelection(wdContext.nodeScreenFlow().getLeadSelection() + 1);
    //@@end
  }
   public void goToPrevious( )
  {
    //@@begin goToPrevious()
    IScreenFlowElement thisScreen;
    thisScreen = wdContext.currentScreenFlowElement();
    wdThis.wdGetRunTimeInterfaceController().wdFireEventNavigate(    thisScreen.getScreenId(),
                                                                    thisScreen.getPrevPlug());
    wdContext.nodeScreenFlow().setLeadSelection(wdContext.nodeScreenFlow().getLeadSelection() - 1);
    //@@end
  }
Note that these methods also increment or decrement the leadSelection (of the ScreenFlow node) to reflect the active screen. The plug itself must be fired by the view controllers, and these cannot be accessed from the component controller. Instead raise an event (called Navigate) in the interface controller, passing the current screen and the plug to be fired.

4) Handle Navigate event in views
Next implement a handler in each view for this event. The currently selected view will then call a component controller method to fire the relevant plug. This is the event handler from AppleView:
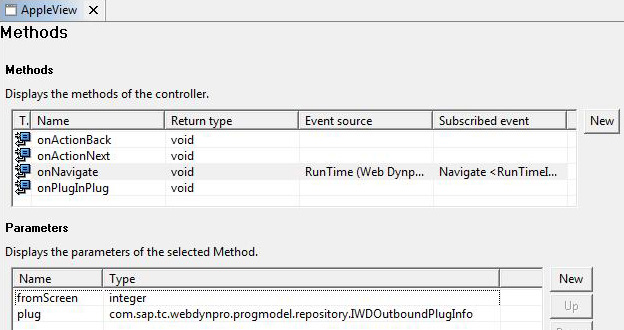
public void onNavigate(com.sap.tc.webdynpro.progmodel.api.IWDCustomEvent wdEvent,{int fromScreen, com.sap.tc.webdynpro.progmodel.repository.IWDOutboundPlugInfo plug )
//@@begin onNavigate(ServerEvent)
if (fromScreen == RunTime.SCREEN_APPLES) {
wdThis.wdGetRunTimeController().firePlug(wdThis.wdGetAPI(), plug);
}
//@@end
}
The (component controller) method to fire the plug must accept the view controller of the current view as a parameter as only the view controller can access the relevant method:
public void firePlug( com.sap.tc.webdynpro.progmodel.api.IWDViewController viewController,{com.sap.tc.webdynpro.progmodel.repository.IWDOutboundPlugInfo plugInfo )
//@@begin firePlug()
IWDMessageManager messMan = wdThis.wdGetAPI().getMessageManager();
String messageText = null;
if (plugInfo == null) {
messageText = "Missing plug: " + viewController.getName();
} else {
try {
viewController.firePlug(plugInfo, null);
} catch (Exception ex) {
messageText = "Error firing plug: " + viewController.getName();
}
}
if (messageText != null) {
wdThis.wdGetAPI().getMessageManager().reportException(messageText, false);
}
//@@end
}
Now you have a working application that is easy to maintain and enhance. Of course, there are alternative approaches. One is to build links in sequence between each screen, and if the user doesn't select that screen simply 'skip over' to the next one, firing both plugs in turn. This would work quite well in the simple example described above, but it wouldn't suit an application in which the screen order itself was determined at runtime.
I hope that the technique I have described will prove useful, and enable you to cut down on the navigation link 'spaghetti' in your own applications.
3 Comments
Related Content
- Horizon Theme and Templates for Stories in SAP Analytics Cloud in Technology Blogs by SAP
- Unleashing AI Magic: Building Full-Stack Apps with SAP Build Code in Technology Blogs by SAP
- SAP HANA Cloud provisioning in Kyma Runtime Environment in Technology Blogs by SAP
- SAP Fiori for SAP S/4HANA - Technical Catalog Migration – Why and Getting Ready for Migration in Enterprise Resource Planning Blogs by SAP
- Job and Automation Monitoring features - SAP Cloud ALM in Technology Blogs by Members
Top kudoed authors
| User | Count |
|---|---|
| 1 | |
| 1 | |
| 1 | |
| 1 |