In this blog I will be discussing the details of how to configure and set up the work status along with its featues. In the next blog in this series we will be covering the practical aspect of the same.
Work Status
The work status feature facilitates better information management and approval process by associating configurable and customizable wok status to the combination or intersection of data. The work status feature allows seamless communication and tracking of the work status during the data collection phase. The work status also prevents the unwanted data changes (locking) once the data entry is finalized based on the work status. This eliminates the need for a complex security model to lock the data once the data is finalized.
Features of Work Status
- Enables associating a work status to specific data intersections
- Prevents unwanted data changes after finalizing the numbers
- Applies both on structured and unstructured data
- Work Status are both configurable and customizable
· The work status uses the owner dimension (explained in detail below) for determining the approval organization and data locking behavior
Concept of Owner and Manager (Mgr)
The concept of owner and manager plays a vital role in the work status setup. At the application level in the work status setting, a dimension can be assigned as the owner (controlling) dimension. This dimension should also contain a property named “owner” which will determine the owner (authorized person) for changing work status for this member.
For example in a planning application the entity dimension could be the owner (controlling) dimension. In this case the user id/team id mentioned in the OWNER property of the entity dimension will be the owner of the work status for the entity.

Similarly the MGR for the same entity would be the OWNER of the parent of the controlling entity. In the above example for entity SalesUSNest the owner would be domainusneastusr and the manager would be domainsalesususr. We can mention more than one user or have team id instead in this field
Note: This field is validated during the dimension processing.
Work Status - Setup Steps
- Configuring Work Status – Like Unlocked, Submitted and Approved
- Ensure owner property is available in the controlling dimension – Example In a planning scenario the entity dimension could be the controlling dimension, so the owner property needs to be present with valid AD user id(s)
- Configure the work status setting at the application level – The work status setting could contain different set dimension to determine and control the work status
- Specify base hierarchy for the work state dimensions
- Provide member validation for the non work state dimensions
Configuring Work Status
APPSET Level Configuration
At the application set level the work state can be maintained and configured. Work state lists the different status of a data combination. For example in a planning scenario the work status could be Unlocked, Submitted or Approved. BPC allows adding additional work state to this default list.
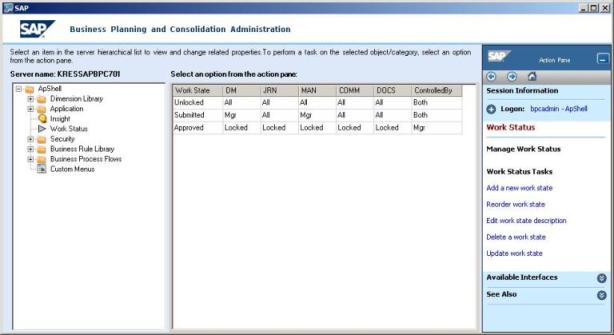
The work state also has a predefined sequence (order) in which it can be used. For example only after submitting a work it can be approved. This order can be changed using the “Reorder work state” option.
For every work state, there are five additional properties or attributes that needs to be configured to determine the lock behavior for different interfaces. The settings available for these interfaces are
A. Locked – This locks sending the data via the interface for all,
B. Owner - Allows the OWNER to send data via interface,
C. Mgr - Allows the manage to send data via interface and
D. All – Allows everyone to send the data via the interface (if the user has access via to the member via the security)
Below is the list of interface available
A. DM determines the lock behavior of the data manager
B. JRN determines the lock behavior of the Journals
C. MAN determines the lock behavior of the data sent manually via the office
D. COMM determines the lock behavior of the comments data
E. DOC determines the lock behavior of the support document
The administrator can set the locking behavior for each of these interfaces at different work state levels. In the above example once the data intersection is submitted the data can be changed (manually/data manager) by the manger only. And once in the approved state it is locked for all the interfaces and users.
The controlled by column determines who can advance the data intersection in the given work status level. The three options available are owner, manager and both. In the above example the approved status for an intersection can be changed only by the manger (the owner of the parent member).
Application Level Configurations
The work status setting is determined at the application level. Using work status setting the data intersection to determine and control the work status can be configured. The work status is assigned to this intersection. Each dimension can be set as a work state dimension or non work state dimension or owner (controlling) dimension.

Work State
If configured ‘yes’, the dimension is used for determining the intersection for work status purposes. In other words the dimension member will be used for tracking the work status. If configured ‘no’, the dimension is not used for the determining the data intersection for the work status. If configured as ‘owner’, the dimension is used for the intersection and the owner/manager of the intersection is also determined based on the “OWNER” property of the selected dimension.
Member Validation
For the non work state dimension it is mandatory to specify a default member, this member is used as the default value in the back end tables.
Base Hierarchy
For the work state or owner dimension it is mandatory to specify which hierarchy to be used.
Once these settings are done the settings should be saved. If this setting changes later point in time then all the historical information stored might be lost.
After following these steps you are ready to use the work status feature with in BPC. As we continue with the next blog of this series, we will cover the practical applications and aspects of configuring work status.
Next Blog Configuring Work Status Feature in BPC (Part 2)
Configuring Work Status Feature in BPC (Part 2)
