Although, in general, it's not a good idea to bypass authentication when calling a WS service application, it does come in handy sometimes when the application does not really need to authenticate the caller. Some examples might be retrieving non-secure data, e.g. products available for purchase, or airline schedules. But, when SAP is the provider of such an application, there seems to be no way to get around this requirement; we always have to provide some kind of authentication such as userid and password.
In this blog, we will explore a new feature in ESR 7.1.1 that does allows us to configure such a scenario.
Note: For this blog, you should at least be familiar with the creation of service interfaces in the ESR, generating ABAP proxy with SPROXY, and used SOAMANAGER to create WS services.
What are the steps:
- Create the service interface in the ESR, indicating no security.
- Generate the ABAP proxy and provide the application code.
- Use SOAMANAGER to create the endpoint and binding for the proxy.
- Test the WS application.
In this blog, we use a simple request-response example, a "Hello World" application. I will send a request and the response will come back with a text message containing the request message.
Steps in detail:
- Create the service interface in the ESR, indicating no security.
There is a new dropdown, Security Profile. Select No. Everything else in the design process remain the same. Save and activate the service interface. 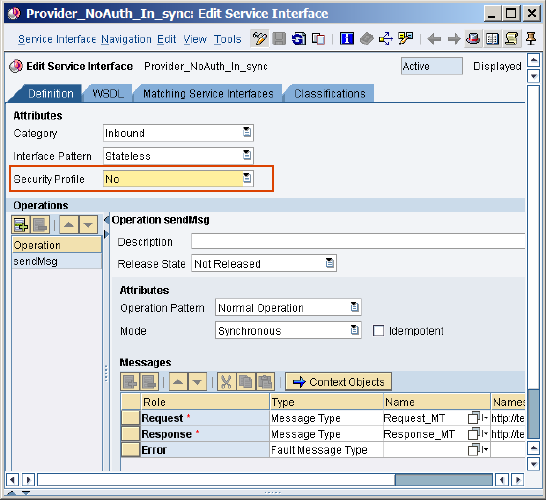
- Use ABAP transaction SPROXY on the service provider system, generate the ABAP proxy and provide the application code.

Please note, in the configuration tab, the authentication should indicate None. This value cannot be selected, it is carried over from the ESR.
The application code is quite simple (the response is just saying Hello...):

- Use SOAMANAGER to create the endpoint and binding for the proxy. As this is probably not a common task, I will provide a little more details here.
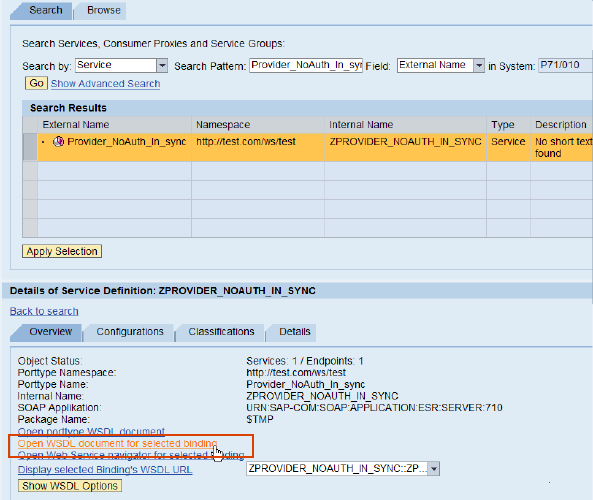
- Execute ABAP transaction SOAMANAGER on the service provider system, which will take you to a browser application. Select the tab and click on the link as indicated.

- Create the WS endpoint for the proxy.

For #2, the external service name can be gotten from the proxy name in SPROXY. It is the same as the service interface name created in the ESR. - A new window will appear. After verifying the entries, click "Apply Settings". You can change the binding name if you wish, as I have done here. The binding name should be unique and be identifiable with the proxy.

- Scroll down the browser screen, you will see the following:

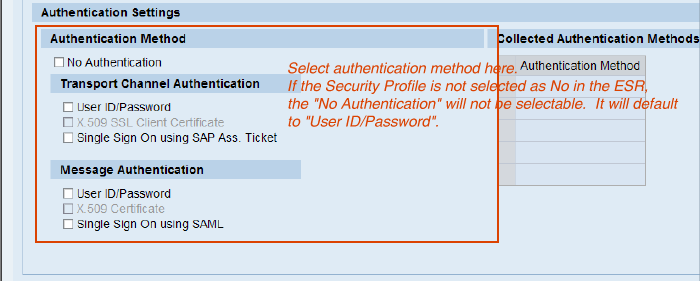
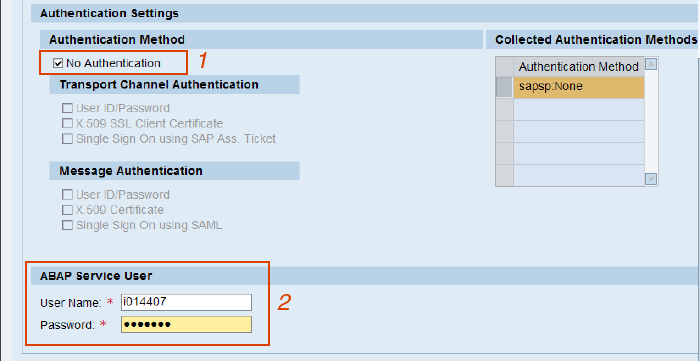
Unless the "Security Profile" is set to "No" in the ESR, the "No Authentication" option will not be selectable; it will be greyed out. - Select the "No Authentication" option. The "ABAP Service User" entry will appear. This is the user which will be used to logon to the the system, so that no logon information will be needed to be entered by the client or consumer application.
- Scroll up the browser page and save the configuration.

The service is now ready to be tested.
- Test the WS application.
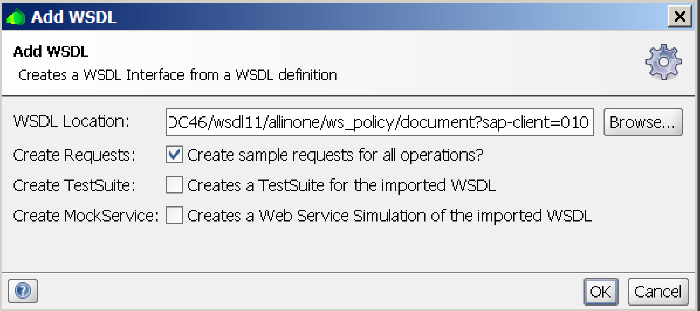
To test the service, I am using a generic WS/SOAP test program, soapUI, which can be downloaded for free from http://www.soapui.org. I will not go into the details of using soapUI; it should be self-explanatory and the download comes with documentations. - Import the WSDL of the service. The WSDL URL can be obtained from the SOAMANAGER screen:
In soapUI:

Copy-n-paste the WSDL URL and click "OK". You will be asked to enter userid and password to access the WSDL metadata.
- Expand the soapUI project to see the imported service.

On the right side is where we can enter the test data. - Enter anything as test data and click "Run":

- In soapUI, we normall have to enter runtime authentication information in the propeties section. But, as you can see, the username and password entries are left blank, indicating no authentication is needed.

