ActiveX Control is enabled in SAP Business One UI API, significantly enriching the user exprience of UI Add-On. This blog is to introduce ActiveX Control with C#/VS.Net, taking password ActiveX Control for example.
Code sample:
http://www.sdn.sap.com/irj/scn/index?rid=/library/uuid/50bf9bb9-26c5-2c10-3bac-9af8a1b6b43f
It shows two ways to implement password activex control:
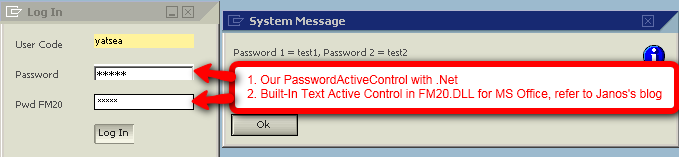
1.Create your own password activex control with .Net.
2.Use TextBox active control in Microsoft.Vbe.Interop.Forms. You may also refer the blog -
How to create Password TextBox Using ActiveX Control by
janos.nagy/blog
Screen shots of the sample:
Steps to create a ActiveX Control with C# in VS .Net
1.Create a new Windows Control Li from VS. Net and register it for COM Interop
1).File=>New=>Project=>Windows=>Windows Control Library, Enter the probject name as "ActiveXControls" and save.
2).Project Properties=>Build=>Output=>Checked "Register COM Inertop" and save.
2.Add a new windows control to the probject
1).Right click the project=>Add=>User Control
2).Enter the control name "PasswordActiveXControl"
Note: By default, a user control is created in the project, or just rename it as "PasswordActiveXControl"
3.Add a TextBox of passord to the control and resize the control as normal password control. Don't forget the set the PasswordChar property as "*" in the password text box.
Note: You should implement your own control accroding to your requirement here.

4.In the class of the control: Set ProgId for the ActivexControl and class interface as ClassInterfaceType.AutoDual:
///Step 4: ProgId and Classinterface type for Active Control
[ProgId("SAP.ActiveX.Password")]
[ClassInterface(ClassInterfaceType.AutoDual)]
public partial class PasswordActiveXControl : UserControl
{...
Note: Using ProgId is more comprehensive than ClassID(GUID). Please follow the name conversion: Your_Namespace
.ActiveX
.Your_Control to avoid conflicting.
6. in case that you would like to interop the control with B1. E.g. we need to reteive the password entered by the user in B1 and validate it against the user info. We need to setup remoting communication channel in construction function.
1). Right click "Reference"=>Add Reference=>.Net page=>Add reference for "
System.Runtime.Remoting"
2).Using the following package
using System.Runtime.Remoting.Channels;
using System.Collections;
using System.Runtime.Remoting.Channels.Tcp;
///
/// Step 6: Set up the Remoting communication channel for data exchange between AtiveX control COM Service and B1
/// public PasswordActiveXControl()
{
try
{
InitializeComponent();
//use Remoting for data exchange between AtiveX control COM Service and B1
BinaryServerFormatterSinkProvider provider = new BinaryServerFormatterSinkProvider();
provider.TypeFilterLevel = System.Runtime.Serialization.Formatters.TypeFilterLevel.Full;
// Creating the IDictionary to set the port on the channel instance.
IDictionary props = new Hashtable();
props["port"] = 0;
props["name"] = DateTime.UtcNow.ToString();
// Pass the properties for the port setting and the server provider in the server chain argument.
//(Client remains null here.)
TcpChannel tcpChannel = new TcpChannel(props, null, provider);
ChannelServices.RegisterChannel(tcpChannel, false);
}
catch (Exception e)
{
MessageBox.Show(e.Message);
}
}
7.Implement ComRegisterFunction: Register/UnRegister COM
///
/// Step 7: Auto register the activex to COM in registery
/// /// the parent registry key
[ComRegisterFunction()]
public static void RegisterClass(string key)
{
// Strip off HKEY_CLASSES_ROOT from the passed key as I don't need it
StringBuilder sb = new StringBuilder(key);
sb.Replace(@"HKEY_CLASSES_ROOT", "");
// Open the CLSID{guid} key for write access
RegistryKey k = Registry.ClassesRoot.OpenSubKey(sb.ToString(), true);
// And create the 'Control' key - this allows it to show up in
// the ActiveX control container
RegistryKey ctrl = k.CreateSubKey("Control");
ctrl.Close();
// Next create the CodeBase entry - needed if not string named and GACced.
RegistryKey inprocServer32 = k.OpenSubKey("InprocServer32", true);
inprocServer32.SetValue("CodeBase", Assembly.GetExecutingAssembly().CodeBase);
inprocServer32.Close();
// Finally close the main key
k.Close();
}
///
/// Auto unregister the activex to COM in registery
/// /// the parent registry key
[ComUnregisterFunction()]
public static void UnregisterClass(string key)
{
StringBuilder sb = new StringBuilder(key);
sb.Replace(@"HKEY_CLASSES_ROOT", "");
// Open HKCRCLSID{guid} for write access
RegistryKey k = Registry.ClassesRoot.OpenSubKey(sb.ToString(), true);
// Delete the 'Control' key, but don't throw an exception if it does not exist
k.DeleteSubKey("Control", false);
// Next open up InprocServer32
RegistryKey inprocServer32 = k.OpenSubKey("InprocServer32", true);
// And delete the CodeBase key, again not throwing if missing
k.DeleteSubKey("CodeBase", false);
// Finally close the main key
k.Close();
}
8.Make the password field as COMVisible for data exchange between ActiveX and B1
///
/// Step 5: B1 will retieve the password from the active control
/// thus make a COM Visible property for remoting accessing in B1
/// [ComVisible(true)]
public string Password
{
get
{
return this.txbPassword.Text;
}
}
9.Manage AssemblyInfo for your ActiveX Control, like provider and version etc in AssemblyInfo.cs
Now you have your own ActiveX Control with C# rather than C++/ATL. Enjoy!
In next blog, We'll learn how to use ActiveX Control in your addon and deploy it in customer lanscape.
