
- SAP Community
- Products and Technology
- Human Capital Management
- HCM Blogs by Members
- E-recruitment – Candidate scenarios using Webdynpr...
Human Capital Management Blogs by Members
Gain valuable knowledge and tips on SAP SuccessFactors and human capital management from member blog posts. Share your HCM insights with a post of your own.
Turn on suggestions
Auto-suggest helps you quickly narrow down your search results by suggesting possible matches as you type.
Showing results for
Former Member
Options
- Subscribe to RSS Feed
- Mark as New
- Mark as Read
- Bookmark
- Subscribe
- Printer Friendly Page
- Report Inappropriate Content
04-01-2009
7:45 PM
We are all more than aware that Web Dynpro ABAP, also referred to as WDA or WD4A, is the latest SAP UI technology. As of SAP E-Recruiting 600 SP08, SAP has provided the option to develop user interface for candidate scenarios using WDA. Candidate scenarios include activities like maintaining profile, applying for job, etc.There are advantages in using either BSP or WDA ( from a developer's point of view) however from an E-recruiting perspective, there are certain processes like Hot Jobs, Recommendation of job posting and Job Agent, which are only possible in WDA.
WDA like BSP sounds technically daunting to functional consultants like me who have limited technical skills, therefore I thought this blog may be of help to those functional consultants who would like to use WDA for candidate scenarios without having to depend too much on technical development.
To begin with the picture below shows how the start page looks for a candidate using WDA.

Picture 1 -Candidate Start Page
One can customise the tabs that define the First level and the entries that appear in the Second Level. You can also create your own Level 1 entries. Whether the overview screen is displayed as above is something you can control via configuration.
Approach;
My approach was to read up anything I could lay my hands on in SDN, SAP help portal, etc, which would provide me with an understanding of WDA, however the best start I got was by going through a tutorial on the help portal.( http://help.sap.com/erp2005_ehp_04/helpdata/EN/7c/3545415ea6f523e10000000a155106/frameset.htm).This tutorial does not require any prior knowledge of WDA and helps put the different elements of a Web Dynpro Component into perspective. I strongly recommend you go through this tutorial if you are new to WDA.
The key elements of a WDA component are a Controller, Window, View and an associated WDA application. Most elements of a component get created automatically when you create a component. The WDA application associated with a component needs to be created manually though. You can then create the related WDA application from the context for the component (Right click on the component and click on create - > Web Dynpro Application).
The standard package delivered by SAP for E-recruitment related WDA components is PAOC_RCF_UI_SELF_SERVICES. You can access the package from the Object navigator via transaction SE80. Once you select the package you can see the standard Web Dynpro components and applications in a tree structure.
Configuration of WDA Components:
As opposed to the configuration carried out in IMG, one can carry out configuration of WDA components and applications from the transaction SE80. This ability provides a lot of flexibility in tailoring the candidate screens based on user requirements. It also does away the need for development work.
The standard package - PAOC_RCF_UI_SELF_SERVICES - delivers various WDA components that are used to define the candidate start page. These include personal details, Education, Work Experience, etc. As an example we can look at the WDA component HRRCF_C_PERSONL_DATA_UI which is used to capture personal information like name, address and communication details of a candidate. This screen appears when candidates maintain their profile in ‘Candidate Profile' or while applying for a job posting in the application wizard. (See figure 2 below)
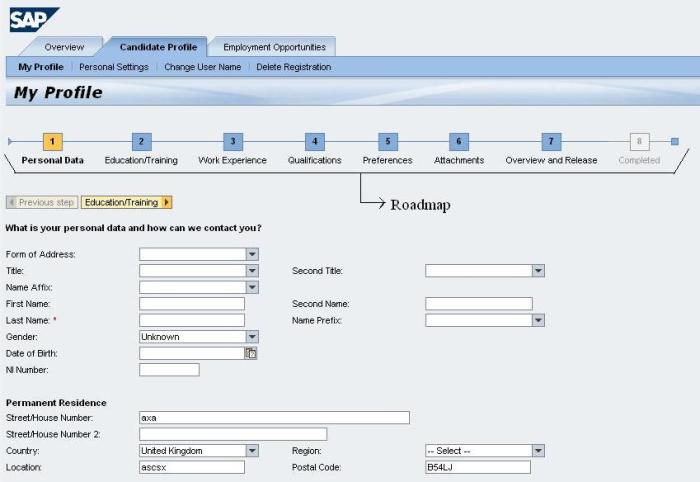
Picture 2 - Roadmap
You can see the layout of the screen by selecting the view VW_PERSONALDATA contained in this component. All the fields and texts contained in this screen are placed in a hierarchy under the ROOTUIELEMENTCONTAINER. In order to alter the screen, you can create a configuration for the WDA component.
Select the component and right click on it. Select Create/Change configuration which will open up a browser window. The component name will be auto populated in the window. Give a name for the configuration ID e.g. ZHRRCF_......( advisable to follow a uniform naming convention) and click on ‘Create'. Give a meaningful description and save against a custom package or as a local object.
Tip: You can rename the configuration or change the object assignment later if required.
Once you have created a configuration id, you will need to refresh the screen and the configuration will appear under a new node called ‘Component Configurations' below the component. Click on the ‘Start Configurator' button in the Tool area of the object navigator, in order to start the configuration. You can now carry out the configuration as per your requirements. Likewise you can create different configurations for all components where the standard does not meet your requirement.
Tip: Do not change the text for any fields or labels here. Go to Object Text repository (transaction SOTR_EDIT) in order to do that.
Typical things you can do in configuration are hiding certain fields or making them mandatory. If you want you can change the text but make sure to change the mapping for the field in the view. In case you want to add new fields make sure you do it in an enhancement.
Configuration of WDA Application:
You can create a configuration ID for a WDA application in the same manner as you create a configuration ID for a WDA component (Right click and select change/create configuration). I have used an example to illustrate the steps involved in application configuration.

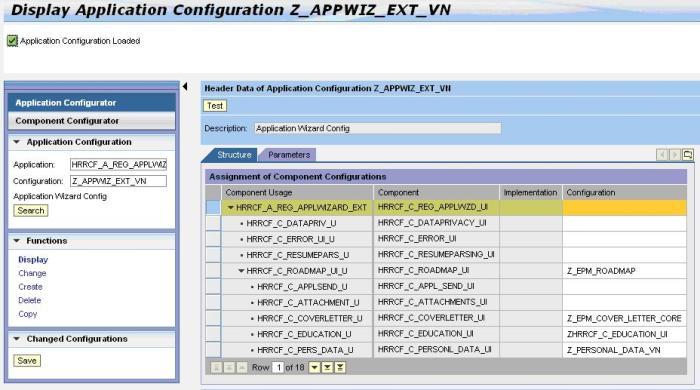
Picture 3
Z_APPWIZ_EXT_VN is a configuration ID for the Web Dynpro Application HRRCF_A_REG_APPLWIZARD_EXT.Once you have created a configuration ID, click on 'Start Configurator' in the Tool Area in order to carry out the configuration.
The Web Dynpro application shown in the above example HRRCF_A_REG_APPLWIZARD_EXT is used to control the application wizard for external candidates. The application wizard takes a candidate through different steps like Personal Details, Education, Work Experience, Qualification, etc before they can submit their application for a job. Each of these steps has a related web Dynpro component in the background.
The configuration opens in a new browser window and you can assign the appropriate configuration for the various components over here. The saved configurations are usually available in the F4 help. The picture below shows how the standard screens in the application wizard have been replaced by configurations for different components like cover letter, Education, Personal Data, etc.
Picture 4
Once you have saved the configuration you have created a custom application wizard. In order to test the configuration, right click on the configuration ID and select Test.
Tip: Remember to activate the application/view/controller every time you make any changes.
Therefore WDA provides a lot of flexibility to create as many variants for the web Dynpro components and the applications as required.
Changing the Roadmap
The sequence in which the different components or steps appear in the application wizard, compose the roadmap for the application (See Picture 2). If you would like to change the order for the roadmap you can do this by
- creating a unique configuration ID for the component HRRCF_C_ROADMAP_UI
- Assigning this configuration ID in the application wizard (as explained above, see Picture 4).
- Assigning the same unique config ID while creating the roadmap pattern in IMG. (E-recruitment -> Technical Settings ->User Interfaces -> Flexibilization - > Backend - > Create Roadmap Pattern
Picture 1 shows how a start page looks like and how it is composed of Level 1 and Level 2 elements. One can define their own Level 1 and Level 2 entries. Once you have done that,
- Create a configuration ID for the Web Dynpro component HRRCF_C_STARTPAGE.
- Create a Config Id for the WebDynpro Application HRRCF_A_STARTPAGE_EXT_CAND ( There is a separate start page for internal candidates)
- Assign the component configuration in this step
- Use the same Component Configuration ID while defining the start page in IMG.
Therefore the Component Configuration ID is the common parameter which links the Web Dynpro component to the configuration variant of the Web Dynpro application and the configuration of start page in the IMG. What I have described above is a simple example of using WDA for candidate scenarios. One can also modify the theme and colour using configuration.
- SAP Managed Tags:
- SAP E-Recruiting,
- SAP ERP,
- HCM (Human Capital Management)
17 Comments
You must be a registered user to add a comment. If you've already registered, sign in. Otherwise, register and sign in.
Labels in this area
-
2H 2023 Product Release
1 -
ACCRUAL TRANSFER
1 -
Advanced Workflow
1 -
Anonymization
1 -
BTP
1 -
Business Rules
1 -
Career Development
1 -
Certificate-Based Authentication
1 -
Cloud Platform Integration
1 -
Compensation
1 -
Compensation Information Management
1 -
Compensation Management
1 -
Compliance
2 -
Content
1 -
Conversational AI
2 -
Custom Data Collection
1 -
custom portlet
1 -
Data & Analytics
1 -
Data Integration
1 -
Dayforce
1 -
deep link
1 -
deeplink
1 -
Delimiting Pay Components
1 -
Deprecation
1 -
Employee Central
1 -
Employee Central Global Benefits
1 -
Employee Central Payroll
1 -
employee profile
1 -
Employee Rehires
1 -
external terminal
1 -
external time events
1 -
Generative AI
2 -
Getting Started
1 -
Global Benefits
1 -
Guidelines
1 -
H2 2023
1 -
HR
2 -
HR Data Management
1 -
HR Transformation
1 -
ilx
1 -
Incentive Management Setup (Configuration)
1 -
Integration Center
2 -
Integration Suite
1 -
internal mobility
1 -
Introduction
1 -
learning
3 -
LMS
2 -
LXP
1 -
Massively MDF attachments download
1 -
Mentoring
1 -
Metadata Framework
1 -
Middleware Solutions
1 -
OCN
1 -
OData APIs
1 -
ONB USA Compliance
1 -
Onboarding
2 -
Opportunity Marketplace
1 -
Pay Component Management
1 -
Platform
1 -
portlet
1 -
POSTMAN
1 -
Predictive AI
2 -
Recruiting
1 -
recurring payments
1 -
Role Based Permissions (RBP)
2 -
SAP CPI (Cloud Platform Integration)
1 -
SAP HCM (Human Capital Management)
2 -
SAP HR Solutions
2 -
SAP Integrations
1 -
SAP release
1 -
SAP SuccessFactors
5 -
SAP SuccessFactors Customer Community
1 -
SAP SuccessFactors OData API
1 -
SAP Workzone
1 -
SAP-PAYROLL
1 -
skills
1 -
Skills Management
1 -
sso deeplink
1 -
Stories in People Analytics
2 -
SuccessFactors
2 -
SuccessFactors Employee central home page customization.
1 -
successfactors onboarding i9
1 -
talent
1 -
Talent Intelligence Hub
2 -
talents
1 -
Tax
1 -
Tax Integration
1 -
Time Accounts
1 -
Workflows
1 -
XML Rules
1
Related Content
- Configuration for SAP eRecruitment for using TREX 7.1 as search engine in Human Capital Management Blogs by Members
- Unfortunately, the system is unavailable at the moment; try again later in Human Capital Management Q&A
- eRecruiting Standalone scenario - different EHP in Human Capital Management Q&A
- Error while Assigning candidate to different process in Human Capital Management Q&A
- Search Screen in Candidate Profile Tab in Human Capital Management Q&A
Top kudoed authors
| User | Count |
|---|---|
| 4 | |
| 4 | |
| 2 | |
| 2 | |
| 1 | |
| 1 | |
| 1 | |
| 1 | |
| 1 | |
| 1 |