
- SAP Community
- Products and Technology
- Additional Blogs by Members
- BI refresh abap+java on netweaver 04s
Additional Blogs by Members
Turn on suggestions
Auto-suggest helps you quickly narrow down your search results by suggesting possible matches as you type.
Showing results for
Former Member
Options
- Subscribe to RSS Feed
- Mark as New
- Mark as Read
- Bookmark
- Subscribe
- Printer Friendly Page
- Report Inappropriate Content
03-30-2009
8:33 AM
BI System Refresh on Netweaver 04s
Disable activities on the source BIP system1. Ensure that SAP is stopped on BIP. Set the SAP services to ‘Manual’.
2. To prevent released jobs from running, edit the profile files and set parameter ‘rdisp/wp_no_btc’ to 0 on BI01. The original value was 6 and will need to be set back to that BIP after the export.
3. Map the SAP DVDs from drive to BIP
4. Run sapinst.exe
5. Choose ‘Database and Central Instance Export’

6. Specify the profile directory
 "
"
7. Specify the domain of the current user
 "
" 8. Use database specific tools
 "
"
9. Specify the export directory
 "
"
10. Start the Export
 "
"
11. Click OK after the Export has completed.

12. Edit the BIP profile file and set the profile parameter back to 6. Start SAP and set the services to ‘Automatic’ on BIP.
13 (a). According to OSS note 886102, step 2.3, delete the source system assignments on BIQ before the System Copy using RSA1. This step is necessary to delete all source-system-dependent objects from the source system (the objects of the old source system connection would interfere with the new source system connection, which will be created after the copy.

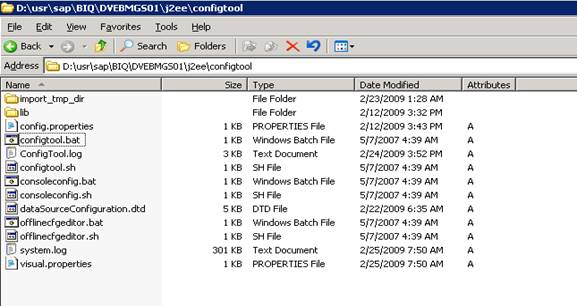
14. Export the following folders as shown below on BIQ source System before the refresh from the BIQ Qaulity System:
Start OfflineCfgEditor.BAT
1) PropertySheet Instance.Properties.ID172872
2) Cluster_Data -> dispatcher -> ID7287200
3) Cluster_Data ->server -> ID7287250
4) Cluster_Data -> server -> ID7287200 -> cfg -> PropertySheet Element.Info ID172872
Export the following files before on BIQ System :
PropertySheet Instance.Properties.ID172872
 "
"
Export the following folder by Clicking on the export Button
Cluster_Data -> dispatcher -> ID7287200

Export the following folder by Clicking on the export Button
Cluster_Data -> server -> ID7287250
 "
"
Export the following Folderby Clicking on the export Button
Cluster_Data -> server -> ID7287200 -> cfg -> PropertySheet Element.Info ID172872

15. On BIQ, stop SAP and set the SAP services to ‘Manual’.
16. Start SAPinst on BIQ. Begin the ‘Central System Installation’

16. Specify the location of the Java Component DVD
 "
"
17. Specify BIQ for the system ID

18. Specify the password for all the userids as well as for biqadm and SAPServiceBIQ

20. Specify ‘Homogeneous System Copy’
 "
"
21. Verify system ID ‘BIQ’
 "
"
22. Specify the location of the export files

23. Enter J2EE_ADMIN, and the BIP password
 "
"
24. Enter DDIC password
 "
"
25. Enter the location for the Kernel DVD
 "
"
26. Click on ‘Start’ at the ‘Parameter Summary’ window
 "
"
27. Installation Start:


Click ‘Ok’ and the application will exit out.
28. Copy the BIP data files from BIP to BIQ and ensure that the SQL database comes up.
29. Start the ABAP instance on BIQ, and perform the ABAP follow-up activities according to the System Copy Guide, beginning on page 95.
30. Perform the Java-related activities on BIQ, prior to starting the Java instance.
31. Manually start the BIQ Java instance.
32. We encountered Database Connectivity issues between SAP and SQL Server.
As per OSS note 551915,
Create User SAPMSSxpUser at OS level and assign administrators right to it
 "
"
33. In Enterprise Manager, create a new query
And paste the User_Change_BIQ file into it
Execute the same (PFA the screenshot above)
Although, you will get these error messages and I guess these messages are due to the compatiability of SQL 2005 with SQL 2000. But it serves our purpose and SAP does come up after running this script
34. Now Start SAP
Abap would come up,
 "
"
35. Delete the old license
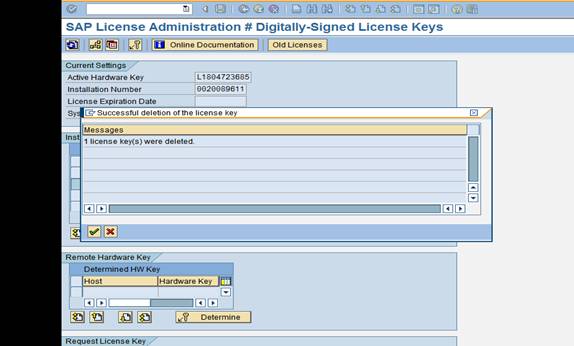 "
"
36. Apply the new license using SLICENSE
37. After applying License, Stop SAP
38. Make the copy of the original SAP profiles after startup

39. Restore the latest profiles which were backed up before the Refresh

40. Reboot the BI02 Server
41. Check the Default Profile
42. The Schema on refreshed BI system would be BIP and SAPBIPDB
We need to change it to BIQ and SAPBIQDB.
We need to use the following Script in SQL Server query analyzer to change the Schema:
USE BIQ
DECLARE @OldSchema AS varchar(255)
DECLARE @NewSchema AS varchar(255)
SET @OldSchema = 'BIP'
SET @NewSchema = 'BIQ'
DECLARE @sql AS varchar(MAX)
SET @sql = CHAR(13) + CHAR(10)
SELECT @sql = @sql + 'ALTER SCHEMA [' + @NewSchema + '] TRANSFER [' + TABLE_SCHEMA + '].[' + TABLE_NAME + ']' + CHAR(13) + CHAR(10)
FROM INFORMATION_SCHEMA.TABLES
WHERE TABLE_SCHEMA = @OldSchema
PRINT @sql
EXEC (@sql)
43. Execute the following ScriptEXEC sp_grantlogin 'biqadm'
exec sp_defaultdb 'biqadm', 'BIQ'
EXEC sp_grantlogin 'SAPServiceBIQ'
exec sp_defaultdb 'SAPServiceBIQ', 'BIQ'
44. Restart SAP and check the Dispatcher. It should not have a status of “Stopped”.
45. Delete RFC Destinations belonging to BIP
In Order to bring Java up:
Start ConfigTool.BAT
Ensure that the password in the secure storage is set because the user masters belong to the production environment
 "
"
Import the following folders as shown below on BIQ source System after the system copy has completed. (As exported in Step 13(b)).
Start OfflineCfgEditor.BAT

1) PropertySheet Instance.Properties.ID172872
2) Cluster_Data -> dispatcher -> ID7287200
3) Cluster_Data ->server -> ID7287250
4) Cluster_Data -> server -> ID7287200 -> cfg -> PropertySheet Element.Info ID172872
Import the following files before on Real BIQ System :
PropertySheet Instance.Properties.ID172872
 "
"
Import the following folder by Clicking on the export Button
Cluster_Data -> dispatcher -> ID7287200

Import the following folder by Clicking on the export Button
Cluster_Data -> server -> ID7287250
 "
"
Import the following Folderby Clicking on the export Button
Cluster_Data -> server -> ID7287200 -> cfg -> PropertySheet Element.Info ID172872

5) PropertySheet Instance.Properties.ID172872
6) Cluster_Data -> dispatcher -> ID7287200
7) Cluster_Data ->server -> ID7287250
😎 Cluster_Data -> server -> ID7287200 -> cfg -> PropertySheet Element.Info ID172872
This is necassary to bring the J2EE engine on BIQ up after the System Copy
Delete SAPLogon Group
 "
"

Client Setting After Restore
 "
"
Open the Client
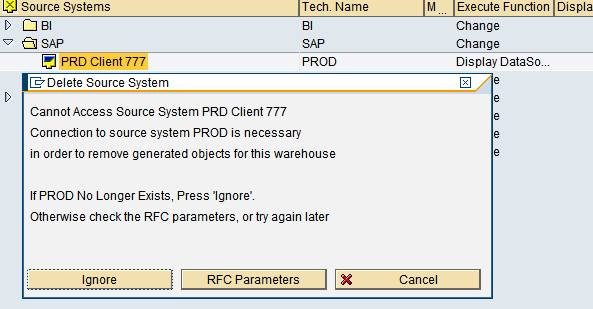
 " IN RSA1, Delete the Source Systems PRD and P11
  "
"
Choose Ignore

 "
"
Choose Delete
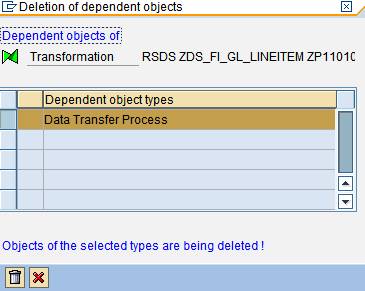
Delete PROD source system
It would prompt you to press enter key for around 200 Odd times. Keep on pressing until all the Info packages are deleted
Delete Logical System BIQCLNT001
 "
"
Run BDLS Transaction and enter the following parameters


Increase the parameter for Dialog Work Processes

Bring BIQ back into the BID transport domain. In client 000, run STMS. Note that IF the transport system is set to DOMAIN_BIQ, click on the ‘System Overview’ button, (with the yellow and two green boxes), and the on the resultant screen, choose to ‘Delete TMS Configuration’.

You will get the following message:

Click on the green checkmark. If you do not get a pop-up to specify the DOMAIN_BID system, log out and log back into client 000, run STMS, and on the following pop-up:

In testing, we found that if we enter ‘DOMAIN_BID’ in the above ‘Name’ field, and ‘Transport domain BID’ in the ‘Description’, the system brought in the domain information from BID as expected, but kept the DOMAIN CONTROLLER as BIQ when it should be BID.
So, ‘X’ out of this pop-up, and there is an opportunity to specify ‘BID’ as the domain controller. BIQ will then connect to BID, and transfer the transport configuration over to BIQ.
Choose ‘Yes’ if you get the pop-up to ‘adjust the configuration of the system BIQ with the controller’.
This is the configuration that should result on ALL three BI servers in STMS, button ‘System Overview’.

The BID transport domain is now visible in STMS on BIQ.
In RZ10, Import the BIQ_DVEBMGS01_BI02 instance profile, and ‘save’ and ‘activate’ the profile. You will be prompted to stop and start SAP for the settings to take effect.
After importing and activating the instance profile that was created during the installation, and ensuring that SAP comes up, note that there are very few SAP processes configured in SM50:

In order to use the instance profile parameters that have been modified and increased over the years on BIQ, make a backup copy of the new instance profile at the Windows level, and create a copy of the BIQ_DVEBMGS01_BI02.Version23 instance profile. Rename this copy to ‘BIQ_DVEBMGS01_BI02’. This is the instance profile that is used in the live BIQ system. The parameters on the live system should be consistent with newly-copied BIQ system.
After renaming this original file used on the live BIQ system, run RZ10 again and ‘Import’ this instance profile, ‘Save’ and restart SAP after the system says to restart SAP in order to ‘Activate’ the profile.
Additional ABAP Activities – Please also refer to page 95 – 106 of the SAP System Copy Guide, Follow-Up Activities Check the RFC connections (See in Copy Guide, 5.2.2 Performing Follow-up Activities for ABAP)
Check the SAPOSS RFC connection in SM59. The password for OSS_RFC is ‘CPIC’.
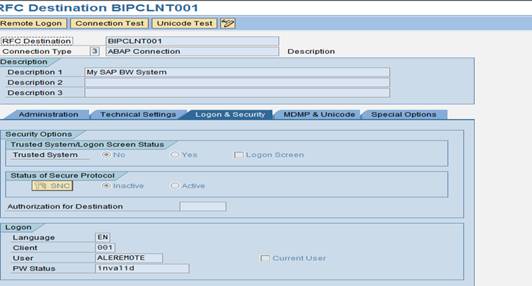
Create the BIQCLNT001 RFC as a prerequisite for the QAI Source System connection. The easiest way to create this RFC is to us a copy of the BIQ RFC.

Check to ensure that the QAS RFC for the QAI Source System connection exists. Enter the BWREMOTE password. On the clone BIQ system, this RFC will not work since the QAI system does not exist.
Under TCP/IP Connections, recreate the BIQ_BI02_BIQ portal RFC.
![]()
This RFC is required in order to connect to the JCO Connector, configured later in J2EE Admin Tool.


Further portal configuration is required in the J2EE Visual Administrator in order to have a successful Connection Test on BIQ.
Work with the functional team to test the jobs needed on the BIQ system. Jobs may need to be copied, modified, or deleted on the refreshed BIQ system.
Check the consistency of the Temporary Sequential Objects (TemSe) by searching for files of TemSe objects for which no TemSe objects exist. Run t-code SP12, pull-down ‘TemSe Data Storage’, ‘Consistency Check’.
Choose ‘Delete All’ to delete all of the orphaned TemSe objects.
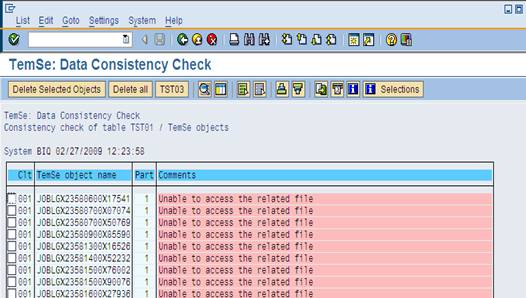
After deleting the orphaned objects, run the Consistency Check again and verify the following result:

Adapt the definition of the printers to meet the new system requirements. Run SPAD.

Update the ‘Spool servers’ to bi02_BIQ_01 for the three printers listed, and investigate the necessity for the LP01 (?) printer.
Delete all of the old transactional RFC errors in SM58:

In order to remove the ALEREMOTE entries, temporarily change the ALEREMOTE user from a SYSTEM user to a DIALOG user, log in as ALEREMOTE, and run SM58 and click the trash can multiple times until the errors are all deleted.
Change the ALEREMOTE back to a SYSTEM user.
Start transaction SECSTORE using ‘Check Entries’. Click the ‘Execute’ button. Note the passwords that will need to be updated for the RFCs. After updating the passwords (for example, the ADS password is probably set, and should be changed. Also, for the ADS RFC, the Target Host needs to be changed from ‘bi01’ to ‘bi02’), run SECSTORE again. When updating the passwords on the clone BIQ, these RFCs probably still will error out depending upon if they need to connect to a separate server.

Per SECSTORE, change the ALEREMOTE password
for RFC RS_IMPORT_POST_PROCESSING in SM59.
Fix the password issues for the remaining RFCs after turning the system over to the FI team as these RFCs are not necessary for the running of the BW system. Also, the clone BIQ will still not be able to verify the passwords since they cannot connect to servers other than the servers in the isolated network.
The SAP System Copy Guide mentions in step 14 - 16 on page 97 to adapt the operation mode time table, but since BIQ is a refreshed version of BIP, keep the updated time table from BIP in order to be consistent between the two systems. On the original BIQ system prior to any refresh, there are no exceptions specified, which may or may not be correct. If the refreshed BIQ causes problems due to this new time table, set it back to the following default
The time table copied from the BIP to the BIQ system is currently:
Using SU01, make the necessary modifications and authorization changes to the BIQ users copied from BIP. Coordinate this with the security administrator.
Adapt other CCMS settings, for example, alert thresholds, reorganization parameters of CCMS table MONI, if required.
Use SE14 to delete all entries from tables TPFET and TPFHT. These contain information about changes made to the profile of the BIP system. Click on ‘Delete data’, and then ‘Activate and adjust database’.

Delete all entries from table TLOCK, using SE14. This holds the repair requests from BIP.
Using SCC4, set the 001 client to the following settings:
Run SGEN in order to generate any missing ABAP program loads. Since part of the refresh involved installing SAP, SGEN may need to run in order to recompile programs.
Checking the Target System
Perform initial consistency check SM28. Currently, this transaction is failing, possibly because the number of batch processes is set to 0. When ready, set the parameter ‘rdisp/wp_no_btc’ in the instance profile back to 6 and re-run SM28.
Check the system log, transaction SM21.
Check the consistency of the database, transaction DB02.Perform server check, transaction SM51.
Have the functional team members run jobs SAPF190, RFUMSV00, RAGITT01, RAZUGA01, RAABGA01, and compare the results to those gained on the source system before the system copy.
Have the CO team run report 1SIP and compare the results to those gained on the source system before the system copy.
Replacing the PSEs in the Target SystemReplace all existing PSEs in the target systems with new ones which contain the new system’s information.
In t-code STRUSTSSO2, the PSE information on the refreshed BIQ reflects BIP copied information:

Make a copy of the D:\usr\sap\BIQ\DVEBMGS01\sec \SAPSYS.pse file.
Select/highlight the Certificate CN=bi01.net certificate, and delete it.
Select/highlight the Logon Ticket CN=bi01.net, and delete it.
From the BIQ D:\certificate directory, copy the original bi02.net.crt certificate to your local Desktop\Username\SapWorkDir directory.
Click on the ‘Import Certificate’ button in the ‘Certificate’ section, and specify the bi02.net.crt file in the SapWorkDir directory
Click on the green checkmark to import the BIQ certificate.
Click on the ‘Add to Certificate List’ button to add this
certificate to the ‘Certificate List’. Also, click on ‘Add to ACL’ to add the certificate to the Access Control List (ACL).


After exiting out of STRUSTSSO2, the information in the ‘Certificate’ section will go away if STRUSTSSO2 is run again.
Configuration Steps for the SAP Java Connector
In the J2EE Visual Administrator, under BIQ, Server, Services, JCo RFC Provider, two ‘Available RFC Listeners’ under the ‘Runtime’ Tab exist named ‘BI01_PORTAL_BIQ’ and SAP.CCMS.J2EE.BIP’. Since they have invalid information, they have stop signs next to them.

Highlight the BI01_PORTAL_BIP listener, and update the right pane indicating the correct ‘bi02’ host and Program ID ‘BI02_PORTAL_BIQ’. Also, update the SAPJSF password to the master password, which was chosen during the installation. Click on the ‘Set’ button at the bottom, and a new listener will be created next to the original BI01_PORTAL_BIP listener. Click the ‘Remove’ button to remove the BI01_PORTAL_BIP listener.

Similarly, create an SAP.CCMS.J2EE.BIQ listener by highlighting the SAP.CCMS.J2EE.BIP entry, change the Program Id to ‘SAP.CCMS.J2EE.BIQ’, and the hostname entries to ‘bi02’ and clicking on ‘Set’. Delete the SAP.CCMS.J2EE.BIP listener with the ‘Remove’ button.
Now, the two entries have a running man next to them.
Test the BIQ_BI02_BIQ RFC created earlier in this document.
In Visual Admin, underKeystorage service,
Select TicketKeystore, Click on Create
 "
"
Enter Country Name: US
Common Name: BIQ
Entry Name: BIQ_BW
Repeat the steps for remaining entries:
BIQ_Certificate
SAPLogonKeypair
SAPLogonKeypair-cert
Reference Documentation
· http://service.sap.com/systemcopy
Download the Homogeneous System Copy Guide
· http://service.sap.com/solutionmanagerbp
Download the SAP Best practices documentation for SAP System Landscape Copy for SAP Netweaver and SAP Solutions.
· Refer the following OSS Notes:
Note 886102 - System Landscape Copy for SAP BW and NW BI
Note 551915 R3 wont start after database restore or database copy
Note 831812 - Config Tool shows incorrect parameters after System Copy
Note 610640 - sp_check_sap_login
4 Comments
Related Content
- S/4HANA 2023 FPS00 Upgrade in Technology Blogs by Members
- SAP Enterprise Support Academy Newsletter April 2024 in Enterprise Resource Planning Blogs by SAP
- Safeguard your SAP BW conversion with SAP Enterprise Support services in Technology Blogs by SAP
- Customize the ABAP Editor Theme in SAP NetWeaver in Enterprise Resource Planning Blogs by Members
- RHEL AND SAP UPGRADE WITH COMPATIBILITY CHECKS #ATR in Technology Blogs by Members