h1.
<u>SAP Workflows –With PC Application</u>* *
*Keywords How to Process MS-WORD and Excel Application with workflows. </p><p>Business requirement </p><p>Most of the time the user has to work with application document like Microsoft Word, XL or Power point during workitem execution. Also the system has to capture the changes done by the user and stores the document within the workflow and can be binded to different tasks and workflows.</p><p><a name="Details" title="Details"></a>Details: **The Below Contents are divided into 2 Sections. </p><p>Section 1: *This part contains the step wise creation of Document Template.
*Section 2: *In this section we will came to know how we can use the Document which was made in section 1.
* <u>SECTION 1: CREATION OF DOCUMENT TEMPLATE** </u><a name="Step_1(3A)_Creating_a_Template" title="Step_1(3A)_Creating_a_Template"></a> </p><p>Step 1: Go to transaction SWDD. Here the latest made workflow will open. ** </p><p>!https://weblogs.sdn.sap.com/weblogs/images/251979154/test_image.jpg|height=482|alt=image|width=610|s...!</p><p> *Step 2. For creating the new workflow, Click on Create button which is on TOP left of Screen. The following will appear.* <strong> </strong></p><p>!https://weblogs.sdn.sap.com/weblogs/images/251979154/Image.JPG|height=482|alt=image|width=688|src=ht...!" </p><p> *STEP 3. Give your Workflow a name and Save it .* <strong> </strong></p><p>!https://weblogs.sdn.sap.com/weblogs/images/251979154/3.JPG|height=434|alt=image|width=626|src=https:...!" </p><p>STEP 4. Now we have to Create a Container of Document Template type . For this use the Left pane of workflow Builder *As shown below.
!https://weblogs.sdn.sap.com/weblogs/images/251979154/4.JPG|height=482|alt=image|width=610|src=https:...!"
STEP 5. After Selecting the Document Template, You will get the screen as below:

STEP 6. Now Double click on <Double-click to create> shown in above screen shot. The following Screen Comes.
!https://weblogs.sdn.sap.com/weblogs/images/251979154/6.JPG|height=width: 684px; height: 451px|alt=image|width=684|src=https://weblogs.sdn.sap.com/weblogs/images/251979154/6.JPG|border=0!"
*STEP 7. Now Click on Change Document Class and select the doc. Type in which you want to convert your document Template. *
!https://weblogs.sdn.sap.com/weblogs/images/251979154/7.JPG|height=482|alt=image|width=629|src=https:...!
STEP 8. After selecting the doc. Type we will get our required document.* *
*!https://weblogs.sdn.sap.com/weblogs/images/251979154/8.JPG|height=482|alt=image|width=616|src=https:...!" </p><p>STEP 9. Type the required Information which you want to save in the document and save the document.* Save the Document and Go back, Below Screen comes.*The document will store with the workflow as below: </p><p>!https://weblogs.sdn.sap.com/weblogs/images/251979154/9.JPG|height=482|alt=image|width=668|src=https:...!" </p><p>Section 2 - *Using the template in the Workflow
* *Step1. After the template is created, we can use the step type 'Document and Template' to use the template.
!https://weblogs.sdn.sap.com/weblogs/images/251979154/10.JPG|height=482|alt=image|width=610|src=https...!"
* *STEP 2. After Clicking on ‘Document From Template’, the following screen comes, select the Doc. Template and assign the agent and step name.
!https://weblogs.sdn.sap.com/weblogs/images/251979154/11.JPG|height=482|alt=image|width=610|src=https...!
STEP 3. After following the above steps, workflow will look like this, Save and Activate:

Step 4: Run the Workflow
When the 'Edit Document' workitem is run, the template document is automatically loaded in the SAP screen and the user can change the document and save it. The document is saved in the workflow container.

STEP 5. Press F8. The following Screen Comes.

*STEP 6. Edit the Document by adding your Comments. Save the Document and Go back. As this is only the step in the workflow, **the workflow would be completed. </p><p>!https://weblogs.sdn.sap.com/weblogs/images/251979154/15.JPG|height=420|alt=image|width=482|src=https...!</p><p> </p><p>STEP 7. Verify the Change*After changing the xls, go back and Goto the workflow log and get the workflow container.
!https://weblogs.sdn.sap.com/weblogs/images/251979154/16.JPG|height=337|alt=image|width=530|src=https...!"
STEP 8. After click on the workflow log the below Screen will come. Click on the Workflow Instance Z112409_bok.

STEP 9. After Click on the Workflow Instance, the following screen will comes. Click on Available Object.
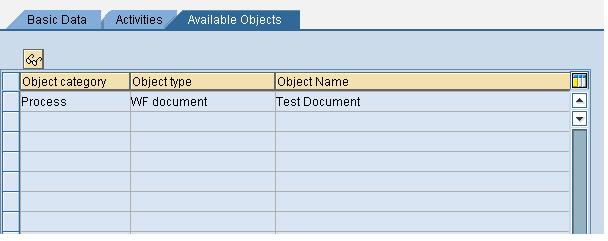
STEP 10. Click on Test Document in Object Name. The screen with the new changes comes as:
!https://weblogs.sdn.sap.com/weblogs/images/251979154/15.JPG|height=420|alt=image|width=482|src=https...!</body>
