Hi,
This blog is basically an attempt to demonstrate how the OrgPublisher interface to SAP is used. Here I shall also attempt to draw on how users can use the SAP interface of OrgPublisher to extract OM data and utilize OrgPublisher to the best.
1. INTRODUCTION:
A number of vendors are offering third party softwares that help enhance SAP output. Aquire (http://www.orgpublisher.com) is one such organization attempting to simplify the SAP HR(HCM), submodule, Org Management and help end users view (using OrbPublisher) and maintain (using SAP write back) data along with additional functionalities.
OrgPublisher comprises of two interfaces:
i. OrgPublisher (Windows interface) used to display and manipulate extracted SAP OM data.
ii. OrgPublisher (SAP interface) used to determine how and what fields to extract into it's windows interface.
2. OrgPublisher SAP INTERFACE:
OrgPublisher uses it's standard T-Code /n/EHR/SOL71_ORGPUB. The "/EHR" space is reserved for OrgPublisher. Adding "/n" would enable users to run the application from SAP's command field. Without using /n user will be required to run T-code SE83 and run /EHR/SOL71_ORGPUB as a report. So basically, we have two ways of running the SAP interface:
i. Using /EHR/SOL71_ORGPUB in SE38 as a report.

OR
ii. Adding /n and using /n/EHR/SOL71_ORGPUB in SAP easy access command field.

Please note that Aquire also provides the installation guide for the Basis Administrator or a Functional Consultant with basis experience on how to export files into SAP in order to enable the above interface run successfully.
Therefore, before using the above stated report and T-code, it is expected that the export files were successfully transferred to your SAP system.
Once the /n/ehr/sol71_orgpub T-Code is run, it will bring up the following screen.

We shall look into all the four tabs in the next few screen shots.
The selection options in the upper area of this screen remains the same for all the tabs in the lower area.
Starting the above screen we have the selection options in the upper area to:
a. Select a Plan Version, if we are maintaining an alternative org management plan version other than current plan, it is possible to choose from the available choices.
b. Select an Object Type: Typically O for "Org Unit" but this box will allow all available SAP objects used in HR. Most commonly used object types, however, are O (Org Unit), S (Position), P (Person), C (Job) and K (Cost Center).This means we are able to extract data related to the seleection made in the Object type box.
c. Select Object ID: Here, after having specified the object type, the selection allows to pick the root object from where we wish to start extracting our data. e.g. We can choose O as object type and select the object ID of any of the org units to display the org chart below.
d. Search Term: Instead of browsing through the org structure, we can use the search term box and quickly see the filtered results to choose our required object id. This is useful and a quick way if we know the object name to search for and will automatically fill up the Object ID field.
e. Object Status: This field allows us to filter the extraction from the availble planning statuses i.e. Active, Planned, Submitted, Approved or Rejected. If this field is left empty, by default "All existing" status is used.
f. Set Structure conditions: This button is used to apply complex filtering conditions involving a number of different options including checks on Object type, Root Object Type, Root Object ID, Evaluation path and Status Vector. In addition, we can also apply "AND"and "OR" operation along with "Object" and "Branch" Filters.
g. Today: Here we can set the Reporting key date as required.
Select data TAB:
a. Output format: This is a madatory field and defines the evaluation path. Aquire provides pre-configured output formats with standard SAP evaluation paths that will extract data based on JOB(/EHR/JOB), Org Units(/EHR/ORG), Position hierarchy(/EHR/POS), Org Units with Staff function(/EHR/STAFF) and another two additional output formats involving Org structure with additional data extracted for each org unit called /EHR/MIN and /EHR/MAX that would extract a great lot of details in each org unit box.
It is however possible to add/remove custom required fields from HR infotypes as required. We shall come to that in another blog.
b. Evaluation path:This field is predefined in the output format definition and hence will be grayed out. It takes it's value from the output format selected.
c. Number of hierarchy lev: This field is optional and is used to restrict the extraction to the required number of hierarchy levels. However, it reads the same object type defined above in the object type field. Leaving it empty would, by default, consider ALL LEVELS.
d. Template: We can create a custom template using OTM file in Customizing, however, the system provides predefined templates. If a template is selected, the data will be extracted and displayed in the format defined in our template selection.
e.Language for text data: Selecting the One Language radio button with EN, will display the restricted to English, however, the flexibility is there to choose languages.
Now we look into other tabs.
Output Tab:

The "Output" tab offers some interesting features including one to create a new template for extraction. We shall look into this in the next blog. However, this tab generally offers the file output option. Both options i.e. saving output file in OCB format and OTM format On local workstation AND/OR On application server are available. Default path are prespecified in the fields but these can be changed.
Tick the "Call OrgPublisher application" if you wish to view data in the windows based application. However, in case we are only generating a new template it is perhaps not necessary to call the application unless a view of the output is required.
If we tick the "Call OrgPublisher application" box, the "Display custom fields for all position types" radio button area becomes active. Select "None" (default selection) if it is a usual extraction. Changing the "None" options other options can have an impact on the template. We shall see in the next blog how and when we use these other options.
TemSe Temporary storage:

We can use this option, if there are no file directories on the application server available and the program must run in background. Objects Data should be stored in the TemSe (Temporary Sequential) objects. An object name must be selected to identify the stored object. The "Read data from TemSe object" can be used later to download data.
I have not been using this area so there is not much that could be explained beyond this at this stage.
Further Options Tab:
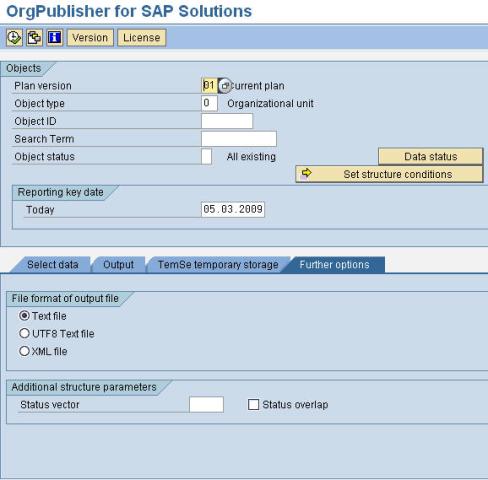
Further options Tab offer two main options:
File format of output file, this by default is "Text file" using CSV format. We shall look into other two options in our next blog.
The other option available is Additoinal structure paramaters including Status vector that looks into the status relationship of objects, by default it's empty and that means "Active" status is in use.
Status overlap will request a simulation for activating relationship infotypes.
In the next blog, I shall give the screen shots from SAP system and show how to extract data followed by some basic customizing functions available to enhance the application.
