
- SAP Community
- Products and Technology
- Additional Blogs by Members
- BusinessObjects Enterprise XI R2 Beginner Tutorial
Additional Blogs by Members
Turn on suggestions
Auto-suggest helps you quickly narrow down your search results by suggesting possible matches as you type.
Showing results for
Former Member
Options
- Subscribe to RSS Feed
- Mark as New
- Mark as Read
- Bookmark
- Subscribe
- Printer Friendly Page
- Report Inappropriate Content
11-17-2008
3:21 PM
About this tutorial
I created this tutorial when I first started using BusinessObjects. My goal was to learn the basics by installing BusinessObjects Enterprise and figuring out how to report off a data source. It's intended for a novice user.
The tutorial will take you through installing BusinessObjects Enterprise XI R2, deploying a simple MySQL database, creating an ODBC connection to the database, defining a universe, and creating a Web Intelligence report.
Prerequisites
This tutorial is performed on a Windows operating system. You require BusinessObjects XI Release 2 and the MySQL World database. The World database source file can be downloaded from the following site:
This tutorial assumes installation on a machine with no previous BusinessObjects or MySQL database server installations.
//////////////////////////////////////////////////////////////////////////////////
Part 1: Installing BusinessObjects Enterprise XI R2
1. Insert you product disk to have it autorun or run the BusinessObjects setup.exe program from your installation source directory.
2. Select your language and click OK.
3. Click Next.
4. Accept the license agreement and click Next.
5. Choose the Platform Server Installation and click Next.
6. Provide the user and company information and enter your product key code. Note: The Performance Management feature is not installed as part of this tutorial.
7. Provide an installation directory or accept the default. In this tutorial, the default location is used. Click Next.
8. This is a new installation, so select the New install option. This tutorial will make use of the MySQL database server that can be installed with BusinessObjects, so select "Install MySQL database server". The MySQL database server is used to store BusinessObjects Central Management Server (CMS) data (system data) but for the this tutorial we'll also use it this database server to house our report data (not recommended for a real-world Enterprise deployment but it will serve our purpose here. In a real-world deployment, you'll want a dedicated data server, separate from the data server that hosts the BusinessObjects CMS data). Click Next.
9. On the MySQL Database Server dialog, enter account information for the MYSQL root user and the BusinessObjects user that is required to access the BusinessObjects CMS database that will be created there. Make a note of this user information. You'll need it later. In this tutorial, the default port address (3306) is used. Click Next.
10. On the Choose Web Component Adapter dialog, specify the application server that BusinessObjects will use. The Web Component Adapter (WCA) is basically a component that connects BusinessObjects to your application server. We don't have an existing application server on our machine, so we are going to use the Tomcat application server that comes with BusinessObjects Enterprise. Check the Java application server checkbox and select the Install Tomcat application server radio button. Deselect IIS ASP.NET. Click Next.
11. On the configure Tomcat dialog, we accept the default ports and click Next to begin the installation.
//////////////////////////////////////////////////////////////////////////////////
Part 2: Deploying the MySQL World sample database
About the World database
BusinessObjects Enterprise comes with a couple of sample databases (the eFashion database and Club database) but for this tutorial, I wanted to start from scratch, and proceed as if I were using my own data source. Also, I wanted to use a data source that is both simple and familiar. As I become more familiar with BusinessObjects, I plan to use more complex data sources that that will allow me to explore more advanced universe design and reporting features of BusinessObjects.
The data source I chose is the MySQL World database. I've used this data source in the past when working with MySQL. The database contains city and country data and has a very simple structure comprised of three tables (Country, City, and Countrylanguage).

The database is simple enough to keep me out of trouble but will still allow me to explore the basics of BusinessObjects universe design and report creation.
Deploying the World database
1. Download the World database source file (world[1].sql.zip) from http://dev.mysql.com/doc/
2. Unzip the file to your MySQL bin directory. If you installed BusinessObjects (with MySQL) to the default installation directory, the MySQL bin directory is: C:\Program Files\Business Objects\MySQL\mysql-pro-4.1.13a-win32\bin. When you are finished you should have a file named world.sql in your MySQL bin directory.
3. Open a command window, change to the MySQL bin directory, and login to MySQL as the root user using the following command:
Mysql -u root -p
You will be prompted for the MySQL root password.
Note: I don't recommend using root to deploy a database but for the purpose of this tutorial, we will go ahead and just use the MySQL root user we created when installing BusinessObjects.
The following screen capture shows the MySQL login procedure:

4. After you are logged in, use the following commands to create the World database:
mysql> CREATE DATABASE World;
mysql> USE World;
5. Load the contents of world.sql into the World database:
mysql> Source world.sql;
You will see quite a bit of output as the data from world.sql is loaded into the World database.
6. After processing completes, run a show tables command to verify that the database content has been loaded:
mysql> show tables;

You can use the describe command to see table structure. For example:
mysql> describe city;

//////////////////////////////////////////////////////////////////////////////////
Part 3: Creating an ODBC data source connection
BusinessObjects is installed and you now have a database. The next step is to create an ODBC data source connection for the World database. Without the ODBC data source connection defined, BusinessObjects is unaware of your database.
To create an ODBC data source connection, perform the following steps:
1. Select Start -> Settings -> Control Panel -> Administrative Tools -> Data Sources (ODBC) to open the "ODBC Data Source Administrator" dialog:

2. Select the "System DSN" tab and click Add to open the "Create New Data Source" dialog. Select the MySQL ODBC 3.51 Driver.

3. Click Finish. The "Connect ODBC - Configure Data Source Name" dialog opens. Define the values for the World database:

• For Server, I specified localhost since I'm using the MySQL database server installed (with BusinessObjects) on my local machine
• For user and password I provide the MySQL root user and password I defined for the MySQL database server when installed BusinessObjects.
• For the database, I select the World database from the list of databases available on the MySQL database server. (Note: You'll see a few other databases here including the BusinessObjects CMS database (boe115) and audit database (boe115_audit) and MySQL server system database (mysql).
4. After you have filled out the required fields, click the Test button to ensure that the connection works.
5. Click OK to finish.
//////////////////////////////////////////////////////////////////////////////////
Part 4: Setting the BusinessObjects Administrator password
Before we do anything, we will set a password for the BusinessObjects Administrator user. By default, the BusinessObjects Administrator user has no password defined. We don't really need to do this for the tutorial but you might want to know how when it comes to performing a real-world deployment.
We'll perform this task through the Central Management Console (CMC), which is a web-based administration tool for BusinessObjects Enterprise.
To change the BusinessObjects Administrator password:
1. Select Start -> Programs -> BusinessObjects XI Release 2 -> BusinessObjects Enterprise -> BusinessObjects Enterprise Java Administration Console. Select Central Management Console.

2. On the "Central Management Console Log On" dialog, enter "Administrator" as the user name. Leave the password field blank. Click Log on.

3. On the CMC Home page, select Users.

4. Select the Administrator account from the list of users.

5. In the Enterprise Password Settings area, type and confirm a new password.

6. Click Update.
7. Log off and close the CMC.
//////////////////////////////////////////////////////////////////////////////////
Part 5: Creating a universe
Up to this point you have installed BusinessObjects, created the World database, populated the database with data, defined an ODBC connection, and set the BusinessObjects Administrator password. The next step is to create a "universe" based on the World database. So, what's a universe? The BusinessObjects Administrator's guide describes a universe as follows:
"A universe is an abstraction of a data source that contains data in non-technical terms. Users of Web Intelligence, Desktop Intelligence, and Crystal Reports can connect to a universe and through it and run queries against a database. They can perform data analysis and create reports using the objects in a universe, without seeing, or having to know anything about, the underlying data structures in the database."
The best way to get your head around the concept of a universe is to see an example, so let's get into it. There are three parts below (A) Creating the universe and using the connection wizard to connect to the data source, (B) defining the universe, and (C) Adding classes and objects to the universe
A. Creating the universe and connecting to the data source
Universes are created using the Universe Designer, a tool that you installed with BusinessObjects.
1. To open the Universe Designer, select Start -> Programs -> BusinessObjects XI Release 2 -> BusinessObjects Enterprise ->Designer.
2. On the "User Identification" dialog, log in as the BusinessObjects Administrator user and provide the password you defined previously and click OK.

3. In the "Designer" dialog, select File -> New.
4. In the "Universe Parameters" dialog, provide a name for the Universe and a description. In this example, I named the Universe, "WorldDB".

5. On the same dialog, Under the Connection field, click New to define a connection to the World database. The Connection Wizard opens (before you can create the universe, you need to define a connection to your data source which is the World database. That's what we do here using the connection wizard):

6. Click Next.
7. On the "Define a new connection" dialog, expand the MySQL database node. As you may recall, BusinessObjects XI R2 was installed with a MySQL 4 database. Select the ODBC driver for the MySQL 4 database server.

8. Click Next.
9. On the "Login Parameters" dialog, we'll stick with the default Secured connection type. For the connection name, I enter "WorldDB". For user name and password, I provide the user name and password I used to create the World database. As you may recall, we created the World database as the MySQL root user. From the data source drop down list I select "WorldDB", which is the ODBC data source we defined earlier.

10. Click Next.
11. Click Test to test the connection. If successful, you will be notified that the server is responding.

12. Click Next. The "Advanced Parameters" dialog opens. Accept the defaults and click Next.

13. On the "Custom Parameters" dialog, leave the default values and click Finish.

14. The "Connection List" dialog appears. Click Finish.

You now have an empty universe named WorldDB.unv that is connected to the WorldDB data source. The next step is to define a Universe.
B. Defining the Universe
We will start developing the universe by inserting tables from the WorldDB data source to define our schema.
1. In the "Designer" dialog, select Insert -> Tables
2. In the "Table Browser" dialog, select each of the tables and click Insert until all three tables from the World database have been added to the Designer structure pane, as shown below:

3. Next, you want to define the relationships between the tables by defining table joins. I create the joins between the tables by left clicking on a column in one table to highlight it, then, while holding down the mouse button, drawing a join to the corresponding column in the next table.
I create two basic joins between columns containing the same values:
- Between the CountryCode column in the city table and the Code column in the country table
- Between the Code column in the Country table to the CountryCode column in the countrylanguage table
After you draw the basic joins, your Designer dialog appears as follows:

4. Now, with the basic joins defined, I'm going to edit each join to define table relationships.
For the country table there is a one to many relationship with the city table and a one to many relationship with the countryLanguage table.
5. To edit a join click directly on the join to open the Join editor. I define the two joins as follows:
Join 1: Country to City Join

Join 2: Country to Countrylanguage

After you have edited the joins, the "Designer" dialog appears as follows:

6. Let's validate our joins by performing a quick Integrity check. In Designer, select Tools -> Integrity Check. The "Integrity Check" dialog opens. Select all of the options and click OK.

7. The "Integrity Check Results" dialog tells me that everything is OK:

Now, let's move on to creating classes and objects for our universe.
C. Adding classes and objects to your universe
What are classes and objects?
Short answer: A Class is a logical grouping of objects, and an object is a named component that maps to a piece of data or data derived from information in your database. In many cases, a class can be mapped to a database table and an object can be mapped to a column within that table.
But, and this is a BIG but, when defining classes and objects, this is your opportunity to present data in a way that your end-users will understand and that reflect their reporting needs. For example, your end users may need to create sales related reports. If your database break sales data down into several tables, perhaps you can hide this complexity from your users by creating one class called, "Sales" and defining objects under this class that maps to columns in multiple tables.
Lucky for us, in this tutorial, classes and objects map well to the databases structure. We will have three classes that reflect the tables in our World database, and the objects in each class will map to table columns.
The easiest way to create classes and objects when classes map closely to tables is to perform the following steps:
1. In the structure pane of the "Designer" dialog, click on a table to highlight it and drag it to the Universe pane. Do this for all three tables. The "Designer" dialog should appear as follows when you are finished:

2. Expand one of the classes to see how the database table columns are defined as objects:

3. Your Universe is now complete. Before we move on to creating a report (as an end-user of the Universe) let's save and export the universe.
a. To save the universe, click File Save.
b. To export the universe, click File -> Export. In the "Export Universe" dialog, select the WorldDB universe and groups to assign to the universe and click OK. In this example, I export the universe to the default universe folder on my machine and select the Everyone group.
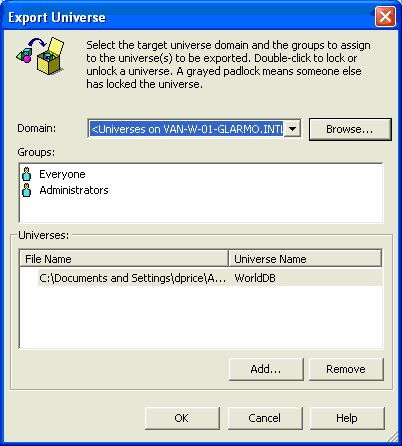
Note: Saving a universe saves the universe to you local repository. Exporting the universe updates the universe at the CMS and makes the universe available to your Web Intelligence users.
You're done. We can now move on to creating a report.
//////////////////////////////////////////////////////////////////////////////////
Part 6: Creating Web Intelligence reports
We will use the Web Intelligence application to create a simple report. The report we create will show city, country, and city population data for cities with a population over 5 million. Let's get started.
1. To open the Web Intelligence application select Start -> Settings -> Programs -> BusinessObjects XI Release 2 -> BusinessObjects Enterprise -> BusinessObjects Enterprise Java Administration Console
2. Launch the InfoView application by clicking on the link InfoView link
3. Login as Administrator (we have created no other BusinessObjects users, so we stick with the Administrator user account we've used all along)

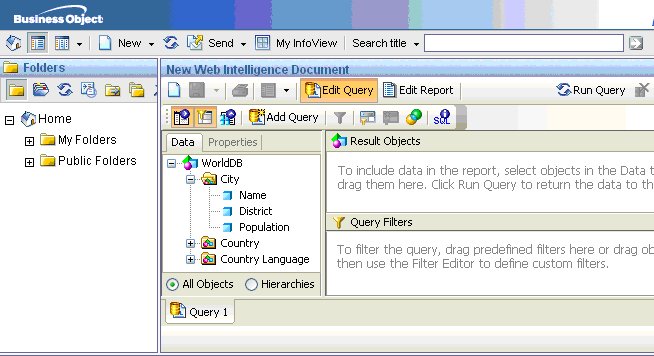
4. On the InfoView interface, select New -> Web Intelligence Document:

5. Click on the WorldDB universe to open it.

The WorldDB universe may take a few moments to load. When it does, it will appear as follows:
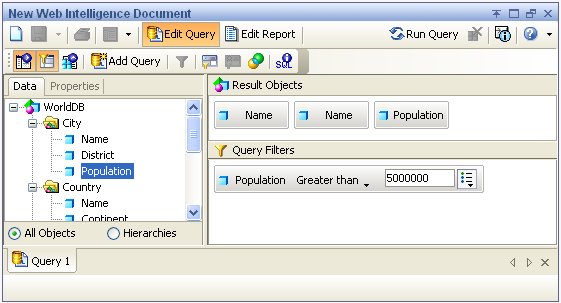
6. To create the report:
a. Drag the City Name object, Country Name object, and City Population object to the Result Objects pane.
b. Drag the City Population object to the Query filters pane.
c. In the Query filter pane, specify the Greater than option (from the drop down menu) and type in 5000000 in the text field beside the Population object.
The interface now appears as follows:
6. Click Run Query. The query result appears as follows:

If you like you can try creating different reports, or try modifying the report format by modifying colors, entering a report title, repositioning the table and title, etc.
THE END
//////////////////////////////////////////////////////////////////////////////////
Reference information:
Information sources used to develop this tutorial include the following guides:
- BusinessObjects Enterprise XI Release 2 Installation Guide
- BusinessObjects Enterprise XI Release 2 Administrator's Guide
- BusinessObjects Enterprise XI Release 2 Designer Guide
5 Comments
Related Content
- ABAP Cloud Developer Trial 2022 Available Now in Technology Blogs by SAP
- Deployment Error "ABAP language version is not supported for objecttype WAPA." in Technology Q&A
- Building Low Code Extensions with Key User Extensibility in SAP S/4HANA and SAP Build in Enterprise Resource Planning Blogs by SAP
- Top Picks: Innovations Highlights from SAP Business Technology Platform (Q1/2024) in Technology Blogs by SAP
- Crystal Reports text clipping issue. PDF created by Business Obj on Red Hat Enterprise Linux (RHEL) in Technology Q&A
Top kudoed authors
| User | Count |
|---|---|
| 1 | |
| 1 | |
| 1 | |
| 1 |