
- SAP Community
- Products and Technology
- Additional Blogs by SAP
- Writing Weblog - Made Easy Using MS Word
Additional Blogs by SAP
Turn on suggestions
Auto-suggest helps you quickly narrow down your search results by suggesting possible matches as you type.
Showing results for
Former Member
Options
- Subscribe to RSS Feed
- Mark as New
- Mark as Read
- Bookmark
- Subscribe
- Printer Friendly Page
- Report Inappropriate Content
10-22-2008
2:47 AM
Writing
Mere mortals; like me and might I say Brian, prefer to use Microsoft Word! Its good editor supports me with good onscreen formatting, a spell checker and most important, a thesaurus. The juice in writing a weblog :).
In MS Word you can use any formatting and tables as you want to use. Use any formatting you like but do make it a point to make it readable and have an impact on your audience.
Just use Word as you would do to create any other nice presentable document and let the fingers fly!
Proof Reading (straight from Brian's Blog)
Although not often though about; proof reading is a very important step in the production step. Keep in mind that the hours invested in writing stand in no relationship to the hours that other people spend in reading.
Recommended are two levels of proof reading. For the use of language, ask somebody that speaks native English (the more official language for use in SDN). SDN has an open offer to help with the English aspects.
At the same time, also ask a colleague to proof read the document for technical content. It helps to catch simple mistakes.
Often during the proof reading steps, changes are made in the Word document, with “Track Changes” active. You can review the changes (and at the same time learn more English!). Thereafter, accept all changes and then switch off this feature again. In addition, delete all comments from the document after reading and following the suggestions. This information should not be published!
Publishing
1. Publishing is the simplest and easiest step.
2. As a first step, save the document to have the .DOC version of the weblog still available.
3. Immediately thereafter, save the document a second time in an HTML version.
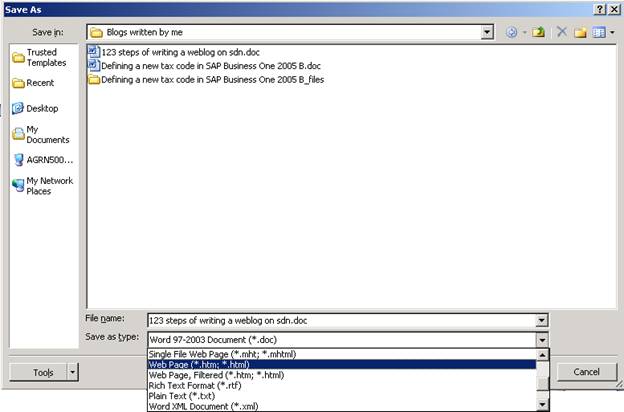
4. Use the menu sequence “File->Save as-> Other Formats” or as it would now in MS 2007 be referred to as: Press the Microsoft Office Button<<img src="https://weblogs.sdn.sap.com/weblogs/images/251743777/Officebutton.jpg" border="0" alt="image" width="35" height="35" />, and then click on ‘Save As’.
5. In the File name box, enter a new name for the file.
6. In the Save as type list, click the file format as either Web Page (.htm or.html).
7. Click Save.
Please remember to close MS Word immediately after the above step. Otherwise, all new changes will land in the .HTM version of the document.
Now we have on disk both the .DOC and the .HTM versions of the document. In addition, we also have all the exported pictures.
The final step in publishing the Weblog, is just to upload all of this quickly. When you registered as a blogger, you received an URL that is to be used for creating new weblogs.
The whole of the HTML code can be uploaded to the SDN via using the option ‘HTML’ available on the TEXT Editor, but there is an issue with the pictures. The pictures in the HTML file are not stored as embedded pictures but actually refer to a link from another WebSpace or disk space. So tackle this issue, we need all the pictures which are required to be uploaded to the SDN. This can be easily done via the ‘Upload Image’ option available on the SDN.
 Once the pictures have been uploaded, SDN will automatically provide you with the URL for the pictures uploaded. Please do note that, if this is not your first BLOG then the pictures might have the same names as that of the previous BLOG. So these new names would need to be changed else SDN will ask you to ‘Overwrite’ the existing pictures.
So in turn what all is needed is, that while uploading the HTML contents, we need to modify the tags with the image URL to the above URL and that’s it.
For changing the tags in the HTML version of your document, please follow the following process:
1. After the above steps by now you would be able to get the html code of the .htm file that you have created. It can be easily accessed by ‘View->Source Code’, which would show the html contents in a notepad file.
 ">
">
2. Press ‘Ctrl+A’ to select the whole of the contents of the notepad file.
3. Open a new MS word document and paste the contents into the new file.
4. Now all that you have to do press ‘Ctrl+F’ and find the tags and change the URLs to the corresponding URLs provided by SDN in the above mentioned procedure and your HTML Code is all set to be uploaded to the SDN.
5. For uploading the HTML code of your document, simply click on the ‘Create New Weblog Post’. Enter the title of the Weblog, select a category and type in a small description.
- Click on the small ‘HTML’ icon in the text editor which would open up the HTML editor in a new window and paste your HTML code (create in step 4 above) here and click on the button ‘Upload’.
<<img src="https://weblogs.sdn.sap.com/weblogs/images/251743777/HTML.jpg" border="0" alt="image" width="586" height="213" />
That is it.. and my coffee is getting cold.. need to rush to grab it now 😉
Although the above procedure is a bit lengthier but it does not require any programming skils and can be done very easily by mere mortals like me.
In Summary
See also the interesting Weblog from Mark: Weblog formatting Tips and Tricks
Even although this step-by-step description is slightly long, it is only because of the detailed description. These few steps always take less than fifteen minutes!
1. Write using MS Word. Use images as they add spice. Just crop them to maximum 600x400 pixels.
2. Proof read!
3. Save, Save as Web Page and then Exit!
4. Upload the Pictures and change the URLs in the HTML code
5. Paste HTML code into SDN.
1 Comment
Related Content
- Group Reporting Rule Based COI - TP calculation in Financial Management Q&A
- Abap2xlsx: print internal table without header in Technology Q&A
- Group Reporting Rule Based COI - TP calculation in Technology Q&A
- Demystifying the Common Super Domain for SAP Mobile Start in Technology Blogs by SAP
- Composite Data Source Configuration in Optimized Story Experience in Technology Blogs by SAP