
- SAP Community
- Products and Technology
- Technology
- Technology Blogs by SAP
- Directory API Development - Part 2 of 3
Technology Blogs by SAP
Learn how to extend and personalize SAP applications. Follow the SAP technology blog for insights into SAP BTP, ABAP, SAP Analytics Cloud, SAP HANA, and more.
Turn on suggestions
Auto-suggest helps you quickly narrow down your search results by suggesting possible matches as you type.
Showing results for
Former Member
Options
- Subscribe to RSS Feed
- Mark as New
- Mark as Read
- Bookmark
- Subscribe
- Printer Friendly Page
- Report Inappropriate Content
10-20-2008
3:41 PM
Introduction:
This is the 2nd part of Directory API development. The Directory API Development - Part 1 of 3 gave a high-level overview of directory API development and the pre-requisites of using the Directory API.In this 2nd part, we will explore the detail involving the development preparation required in NWDS before actual coding can begin.
Then, in Directory API Development - Part 3 of 3, we will dive into the actual coding using the Directory API.
To use as an example for this blog, I will use the Directory API to create SOAP receiver communication channels. The steps of creating other types of communication channels are similar. Primarily, the parameter names and the adapter type will need to be changed.
Pre-Requisite of using the Directory API:
As mentioned in Directory API Development - Part 1 of 3, to use the Directory API, the userid must be assigned specific roles. These roles must be assigned in the java server. The roles are not available using the ABAP transaction code SU01. It is critically important that step III in Directory API Development - Part 1 of 3 is carried out before proceeding with using the Directory API.Development Process:
Please note, for this blog, NWDS 7.1 is used with PI 7.1.Overview:
The development process consists of the following steps:- Create project in NetWeaver Developer Studio
- Import the WSDL using one of the following methods:
- URL location
- WSDL file extracted from External Definition in the ESR (Note: with this, binding configuration in NWDS will be required)
- Generate client proxy from imported WSDL
- Develop program to use the API (during development the WSNavigator can be used to determine the required fields and keys to use.)
This blog, part 2, covers the 1st 3 steps, and Directory API Development - Part 3 of 3 covers step 4.
Step-by-Step:
- Create a "Java" project and include the following libraries in the build path:
- mailapi.jar
- saaj.jar
- wsdl4j-1.5.1.jar
- activation.jar
- axis.jar
- axis-ant.jar
- commons-discovery-0.2.jar
- commons-logging-1.0.4.jar
- jaxrpc.jar
For convenience, I included the above libraries in a user-library in NWDS.
After project creation, my project, DirAPI_Blog, looks like the following:

- Import the WSDL using one of the following:
- From WSDL:
This is an easier way of importing the WSDL, since the binding and endpoint are already in the WSDL URL. However, for some reason, specific to the Communication Channel webservice, we will receive an error when generating proxy using this import. Consequently, for this blog, this method should only be used as a reference to be used with other Directory API webservices. Please use step (B) for the exercise in this blog.
- The WSDL can be retrieved from /WSNavigator, by selecting the communication channel webservice
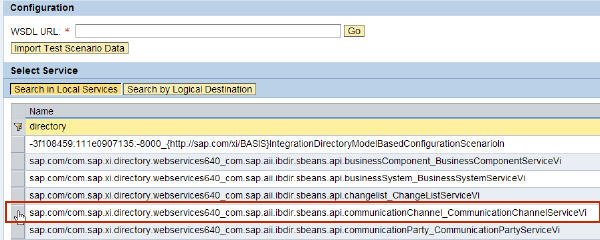
Communication channel webservice:

Copy-n-paste the URL into the following in NWDS.
- Right-click on the project and select "Import...":

- Select "WSDL" and click "Next":

- Select "Remote Location" and click "Next":

- Enter the WSDL URL of the webservice from above, and click "Finish":

- The java project will now have the following:

When we double-click on the root WSDL, we will see that the bindings have already been included:

- The WSDL can be retrieved from /WSNavigator, by selecting the communication channel webservice
- From External Definitions (as an alternate method):
- As another option, we can export the external definition of the WSDL.
- In the Enterprise Service Repository (7.1) or the Integration Repository (7.0), double-click on the communication channel external definition:

- Export the WSDL to a file:

- As in steps ii, iii, iv and v in step (A) from above, we can enter the location of the file. But, please note, instead of the URL, we can enter the file where we exported the external definition. (Use the "Browse" button to select the file.)

We should see the following in our project:

- However, now when we double-click on the "CommunicationChannel.wsdl", we do not see the binding:

So, now, we have to create the binding and endpoint.
- To create the binding, on the right side of the display screen of "CommunicationChannel.wsdl", right-click on "Bindings" and select "Add Binding":

- In the "Property" tab on the bottom, enter any name for the binding name, and select the Port Type, using the dropdown: (In this example, I gave "HTTPBinding" as the binding name. The port type, CommunicationChannelServiceVi_Document, is already in the WSDL file, so there is no need to create another one.)

- Click on "Generating Binding Content...":
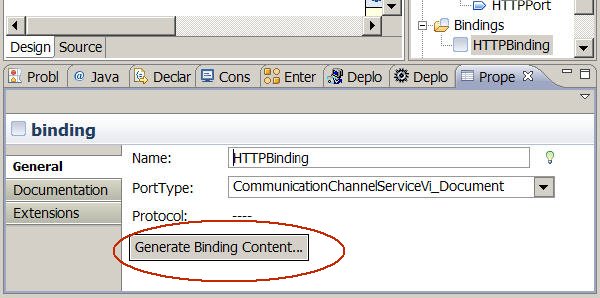
and, select "SOAP" for the protocol:

- Now, we can create the service. Right-click on "Services" and select "Add Service":

- Enter any service name. In this example, I entered "HTTPService":

- A "NewPort" will automatically be created for the service. Assign a new port name to the service and select the binding created above in the dropdown: (In the example, I gave "HTTPPort" as the port name.)

- Enter the WSDL URL of the communication channel webservice into the address field:

- Now, we see the binding and endpoints are present in the display:

Save the wsdl file.
The reason I am introducing this alternative method is because I have encountered situations when the previous method caused problems during the proxy generation step. - In the Enterprise Service Repository (7.1) or the Integration Repository (7.0), double-click on the communication channel external definition:
- From WSDL:
- Generate the Proxy Client from the WSDL
If you used step (A) to import the WSDL, you will encounter a proxy-generation error: IWAB0399E Error in generating Java from WSDL: java.lang.NullPointerException
This error seems to occur only with the Communication Channel webservice. As a result, I will generate the proxy using the WSDL from step (B) above. If you have already done step (A), you can delete the 4 WSDLs created from the import and redo the import using step (B).
- Generate the java proxy by right-click on CommunicationChannel.wsdl, select "Webservices" and click on "Generate Client".
(Sorry the screenshot is so small...there is nothing I can do due to the graphic limitation placed for blogs.)
- Slide the scale to "Develop Client", select "Overwrite files without warning", and click on "Finish":

- After the proxy generation, you should have the following, with the newly created packages:

Note: If step (A) was used during the import, then you will need to do this for all of the 4 WSDLs created from the import.
- Because we will also create changelist and activate the communication channel configruations, please repeat the above steps to import the WSDL URL for the changelist. We can use the URL instead of using external definition. After importing the WSDL URL and generating the proxy for the WSDLs, we should have the following:
Note: Do not forget to generate the java proxies for all the WSDLs created after importing the WSDL URL.
Because we imported the WSDL URL instead of using the external definition, there is no need to go thru the steps in the configuration of the binding and endpoint. We can just generate the java proxies after importing the WSDL URL.

- Generate the java proxy by right-click on CommunicationChannel.wsdl, select "Webservices" and click on "Generate Client".
- Create Java Client Program: go to Directory API Development - Part 3 of 3
- SAP Managed Tags:
- Cloud Integration
10 Comments
You must be a registered user to add a comment. If you've already registered, sign in. Otherwise, register and sign in.
Labels in this area
-
ABAP CDS Views - CDC (Change Data Capture)
2 -
AI
1 -
Analyze Workload Data
1 -
BTP
1 -
Business and IT Integration
2 -
Business application stu
1 -
Business Technology Platform
1 -
Business Trends
1,658 -
Business Trends
92 -
CAP
1 -
cf
1 -
Cloud Foundry
1 -
Confluent
1 -
Customer COE Basics and Fundamentals
1 -
Customer COE Latest and Greatest
3 -
Customer Data Browser app
1 -
Data Analysis Tool
1 -
data migration
1 -
data transfer
1 -
Datasphere
2 -
Event Information
1,400 -
Event Information
66 -
Expert
1 -
Expert Insights
177 -
Expert Insights
298 -
General
1 -
Google cloud
1 -
Google Next'24
1 -
Kafka
1 -
Life at SAP
780 -
Life at SAP
13 -
Migrate your Data App
1 -
MTA
1 -
Network Performance Analysis
1 -
NodeJS
1 -
PDF
1 -
POC
1 -
Product Updates
4,577 -
Product Updates
344 -
Replication Flow
1 -
RisewithSAP
1 -
SAP BTP
1 -
SAP BTP Cloud Foundry
1 -
SAP Cloud ALM
1 -
SAP Cloud Application Programming Model
1 -
SAP Datasphere
2 -
SAP S4HANA Cloud
1 -
SAP S4HANA Migration Cockpit
1 -
Technology Updates
6,873 -
Technology Updates
421 -
Workload Fluctuations
1
Related Content
- Extend Your Crystal Reports Solutions in the DHTML Viewer With a Free Function Library in Technology Blogs by Members
- Add React app to SAP Build Workzone in Technology Q&A
- Consuming SAP with SAP Build Apps - Mobile Apps for iOS and Android in Technology Blogs by SAP
- Embracing TypeScript in SAPUI5 Development in Technology Blogs by Members
- Developing & Deploying the UI5 App to Cloud Foundry and Accessing from App-router End-to-End Steps in Technology Blogs by Members
Top kudoed authors
| User | Count |
|---|---|
| 39 | |
| 25 | |
| 17 | |
| 13 | |
| 7 | |
| 7 | |
| 7 | |
| 7 | |
| 6 | |
| 6 |