In various scenarios, SAP NetWeaver MDM is sending master data to R/3 systems. This article focuses on how an R/3 system can technically confirm that a new record has been created; using standard technologies of PI and R/3 and without using even one line of code. This can be achieved by using a standard R/3 event, and binding it to an ABAP proxy. You need to have at least an ERP system with SAP basis release 6.20 including SAP note 879121 or an ERP system with SAP basis release 6.40. Here I shall show a minimized example of this solution, which can of course be extended in nearly every step to specific requirements.
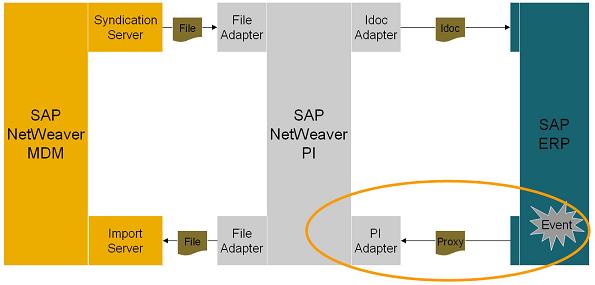
Below you can see an example business case. A material master is created in MDM and then sent to R/3 using PI as integration platform. In this blog, we shall consider the highlighted part of the process below, beginning with the creation of the material in R/3 (achieved using an IDoc), and subsequent dispatch of the data to PI.
![]()
To begin with, you need to know the business object that you are dealing with in this scenario. You may figure this out using R/3 transaction BAPI. In our example we shall use business object BUS1001.

Implementation
As a prerequisite, you should have a running system landscape, containing MDM, PI and R/3 systems. The aspects of technical connectivity shall not be handled in this article. Besides, the remaining parts of the process have already been presented in other articles on SDN, as an example, in the very good blog SAP NetWeaver Master Data Management (MDM) Posting Confirmation via Exchange Infrastructure. We shall start the design of the process using the Enterprise Services Builder of PI. As a first step, you need to create a data type. In this example I have modeled a minimal version, wherein I send only the material number from R/3 to MDM, whenever a new material is created. This results is a reduced structure for the message, which you may see below


Thereafter, we need to create a message type and reference the new data type in the message type.

In the next step, we create a service interface. As we wish to send data from R/3 to PI, we may choose Category outbound, and reference the newly created message type from the previous step. This is sufficient to set up a proxy communication.

For the next step we log on to the R/3 system and execute transaction code SPROXY to generate the outbound interface. You may search for the message interface which has been created in the previous step, and initiate proxy generation by double-clicking the message interface. In the following dialog, you need to specify a package and prefix. If you do not have a package on your development system, you may create one in a parallel, using the ABAP Development Workbench. When proxy generation is completed, you should activate your ABAP Proxy.


Now we may bind the generated ABAP proxy to standard event CREATED of business object BUS1001. To do this, we may execute transaction SWF_BAM. In the subsequent user dialog, all you need to do is fill out the fields as shown in the screenshot below. In field Proxy Object you should enter the ABAP Name of the generated proxy class, which may be seen using transaction SPROXY.

The linkage may be done by drag and drop. In our example we map the Event _EVT_OBJKEY to the field MATERIAL_NUMBER. You may also add conditions for the binding, however this functionality is not described in the current example.


Now you have everything you need to the set up automated communication between R/3 and PI.
Test
In a real life scenario, you may syndicate a material record from MDM and transfer it to the R/3 system via PI. However in this example, we merely simulate the IDoc posting and create a material manually, using transaction MM01. I chose MDM_CH_TEST2 as sample material number.

In transaction SWEL you may search for the event. Make sure that event tracing is switched on beforehand using transaction code SWELS. In the screenshot below, you may see that our chosen event was executed and resulted in a call of the generated ABAP proxy. You may take note that R/3 has an event queue, which ensures that events are processed in sequence. This is especially important, when designing scenarios involving mass updates in MDM.

As a result of the above steps, an XML message has been created and sent to PI. You may see the XML file in R/3 by using transaction code SXMB_MONI.


You may also see the message in PI using the same transaction. All you need to do now is configure PI and transfer the XML file to the appropriate port folder, where the MDM Import Server may pick it up and perform an import. In the associated import map, you may set a specific status for the record in MDM, e.g. “Created in Backend”. As mentioned already at the beginning of this blog, there are various ways to extend this example. You may add conditions to the binding, extend the message structure, use the change event and many more. 