
- SAP Community
- Products and Technology
- Additional Blogs by Members
- How to Access Enterprise Services using Axis2
Additional Blogs by Members
Turn on suggestions
Auto-suggest helps you quickly narrow down your search results by suggesting possible matches as you type.
Showing results for
Former Member
Options
- Subscribe to RSS Feed
- Mark as New
- Mark as Read
- Bookmark
- Subscribe
- Printer Friendly Page
- Report Inappropriate Content
02-08-2008
12:17 PM
How to Access Enterprise Services using Axis2
This tutorial gives a brief overview of what is required to consume SAP's enterprise services using Axis2 and the JavaTM platform. It is a step by step guide: from installation of the required software packages, via generating service stubs, to invoking the enterprise service.
Installation of Required Software Packages
The steps in this tutorial were tested on the WindowsTM platform only. However, the steps described here should work as well on any other platform supporting JavaTM.
The following software packages need to be installed (in this sequence):
Java Development Kit (JDK) | Java 5 JDK (instructions on setting up the JDK can be found here http://java.sun.com/) |
Eclipse Europa 3.3 for Java Developers | Download the IDE for Java Developers http://www.eclipse.org/downloads/ |
Axis2 Libraries | The Axis2 1.3 library can be downloaded here http://ws.apache.org/axis2/download/1_3/download.cgi |
Axis2 Code Generator Wizard - Eclipse Plugin | The plugin can be downloaded here http://ws.apache.org/axis2/tools/index.html, installation instructions can be found here, http://ws.apache.org/axis2/0_94/CodegenTools-EclipsePlugin.html |
The installation procedures are not described here. Please follow the instructions provided with each software package.
Additionally, you need a user account to access the ES Workplace systems. In case you do not have a user, you can register here: https://www.sdn.sap.com/irj/sdn/esareg.
Creating a New Project
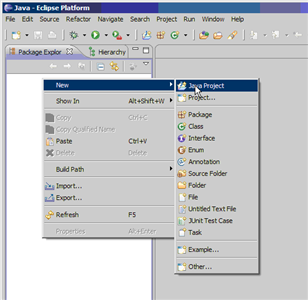
Once you have the environment setup. Start Eclipse with a fresh workspace and create a new Java Project. Right-click in the "Package Explorer" area and select "New > Java Project".
Call the project "TestES"

Adding Required Jar Files
Click "Next" and select the "Libraries" tab. Press the "Add External JARs" button.

Navigate to the folder where you unzipped the Axis2 1.3 binary distribution. In that folder, open the "lib" folder and select all Jar files and press "Open". In the previous dialog, press "Finish".

Note: Putting all Jar files on the Java classpath is not required. If you would like to reduce the number of Jar files, here is the minimal set of Jar files required:
- junit.jar
- axiom-impl-1.2.5.jar
- axiom-api-1.2.5.jar
- axiom-dom-1.2.5.jar
- XmlSchema-1.3.2.jar
- wsdl4j-1.6.2.jar
- commons-logging-1.1.jar
- commons-httpclient-3.0.1.jar
- commons-codec-1.3.jar
- log4j-1.2.14.jar
- axis2-adb-1.3.jar
- axis2-kernel-1.3.jar
Retrieving and Importing a WSDL File for an Enterprise Service
In this tutorial we want to consume an Enterprise Service that allows us to retrieve the bank details for a customer. The Enterprise Service "CustomerERPBankDetailsByIDQueryResponse_In" allows just that. This Enterprise Service is part of ERP. You can retrieve the WSDL file for this Enterprise Service using the "Services Registry". The Services Registry application can be started via the Enterprise Workplace on SDN https://www.sdn.sap.com/irj/sdn/explore-es (important hint: you should use the Internet Explorer to browse the ES Workplace as some pages are not correctly rendered using other browsers):

In the "Find" text box enter the name of the the Enterprise Service' port type name "CustomerERPBankDetailsByIDQueryResponse_In" and press the "Go" button:

In the bottom displaying the details of the service definition select the "Endpoints" tab. On this tab there is a link to the WSDL file describing the service including endpoint definitions. The URL of the WSDL file should be http://erp.esworkplace.sap.com/sap/bc/srt/xip/sap/ecc_customerbankdetailsidqr/version2?sap-client=80.... For accessing the WSDL file you need a user account Note: If you select the link to the WSDL file on the "General" tab, you will get a WSDL file without endpoint definition - this version of the WSDL file cannot be used to consume the service.

Save the WSDL file under the name "CustomerERPBankDetailsByIDQueryResponse_In.wsdl" to your local hard drive. The last step is to import the WSDL file into your "TestES" project. Remember the location you saved the WSDL file to.
On "TestES" project folder right click and select "New > Other"

Select the "Axis2 Code Generator" wizard and press "Next":

Select the option "Generate Java source code from a WSDL file" and press "Next".

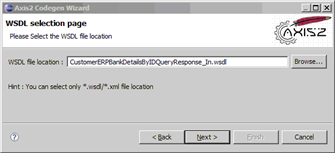
Via the browse button select the WSDL file you downloaded to your local hard drive. And press the "Next" button.
Select the following generation options and press the "Next" button.

In the last step, first select the "Browse and select a project on current eclipse workspace" radio button. Click the "Browse..." button and select the "TestES" project folder. Now press the finish button.

On successful generation you should get the following dialog:

Select the "TestES" folder in the package explorer and press F5 to refresh the file system view. There should be a new folder "test", new folders and files in the "src" folder and a new file "build.xml".
Right click the test folder and select "Build Path > Use as Source Folder"

You will now see build errors in the "test" source folder. The problem is the missing JUnit library on the build path. To add the library right click the "TestES" project folder and select "Build Path > Add External Archives".

Navigate to the installation folder of Eclipse. In this folder find the folder "plugins/org.junit4_4.3.1" (or a similar version of junit). In this folder select the junit.jar file.
The project should now build without errors (there are still a number of warnings but they can be ignored for now).
Running the JUnit Test
Open the class CustomerERPBankDetailsByIDQueryResponse_InServiceTest located under the "test" source folder. Right click the file and select "Run As... > JUnit Test"

The JUnit view will open and the test case will fail. Some things are still missing. Let's tackle them step by step.
Configuring Log4J
Axis2 uses Log4j for logging information to files and the console. To get the Log4J output on the console we need to add a log4j.properties file. First, create a new folder "conf" in the "TestES" project folder. Next, import the log4.properties file located in the root folder of the Axis2 distribution.
The "conf" folder needs to be on the classpath of the runtime configuration of the test case. To do this, go to the application menu "Run > Open Run Dialog...".

You should see a JUnit run configuration with the name "CustomerERPBankDetailsByIDQueryResponse_InServiceTest". Change to the "Classpath" tab.
Note: If you have run the test case multiple times you might see a number of entries with different numbers appended in braces (e.g. "...InServiceTest (1)"). You can delete all but one of the run configurations.

Select "User Entries" and press the button "Advanced...".
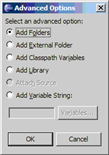
Select "Add Folders" and press OK.

Select the "conf" folder and press OK. Now press the "Apply" button.
Completing the Test Case Stub
Before the test case can run and the service call returns the desired output we have to do some more steps:
- 1) add basic authentication configuration
- 2) add code to fill the result structure (customer id 2000)
- 3) add code to access and output the result
- 4) Optional: HTTP proxy configuration (ff you only have access to the internet through an HTTP proxy)
Here is the resulting code for the test case that covers 1 - 3:
package com.sap.xi.appl.se.global;


import org.apache.axis2.databinding.types.Token;

import org.apache.axis2.transport.http.HttpTransportProperties;


import com.sap.xi.appl.se.global.CustomerERPBankDetailsByIDQueryResponse_InServiceStub.CustomerBankDetailsSelectionByID_type0;

import com.sap.xi.appl.se.global.CustomerERPBankDetailsByIDQueryResponse_InServiceStub.CustomerERPBankDetailsByIDQueryMessage_sync;

import com.sap.xi.appl.se.global.CustomerERPBankDetailsByIDQueryResponse_InServiceStub.CustomerERPBankDetailsByIDResponse_sync;

import com.sap.xi.appl.se.global.CustomerERPBankDetailsByIDQueryResponse_InServiceStub.CustomerID;


public class CustomerERPBankDetailsByIDQueryResponse_InServiceTest extends

          junit.framework.TestCase {


     public void testCustomerERPBankDetailsByIDQueryResponse_In()

               throws java.lang.Exception {


          CustomerERPBankDetailsByIDQueryResponse_InServiceStub stub = new CustomerERPBankDetailsByIDQueryResponse_InServiceStub();


          // basic authentication configuration start

          HttpTransportProperties.Authenticator auth = new HttpTransportProperties.Authenticator();

          auth.setUsername("your user id");

          auth.setPassword("secret");

          stub._getServiceClient().getOptions().setProperty(

                    org.apache.axis2.transport.http.HTTPConstants.AUTHENTICATE,

                    auth);

          // basic authentication configuration end


     CustomerERPBankDetailsByIDQueryResponse_InServiceStub.CustomerERPBankDetailsByIDQuery_sync customerQuery = (com.sap.xi.appl.se.global.CustomerERPBankDetailsByIDQueryResponse_InServiceStub.CustomerERPBankDetailsByIDQuery_sync) getTestObject(CustomerERPBankDetailsByIDQueryResponse_InServiceStub.CustomerERPBankDetailsByIDQuery_sync.class);


          // build query structure start

          CustomerERPBankDetailsByIDQueryMessage_sync queryMessage = new CustomerERPBankDetailsByIDQueryMessage_sync();

          CustomerBankDetailsSelectionByID_type0 selectionById = new CustomerBankDetailsSelectionByID_type0();

          CustomerID customerId = new CustomerID();

          customerId.setCustomerIDContent(new Token("2000"));

          selectionById.setID(customerId);

          queryMessage.setCustomerBankDetailsSelectionByID(selectionById);

          customerQuery.setCustomerERPBankDetailsByIDQuery_sync(queryMessage);

          // build query structure end


          // send the request

          CustomerERPBankDetailsByIDResponse_sync response = stub

                    .CustomerERPBankDetailsByIDQueryResponse_In(customerQuery);

          assertNotNull(response);


          // output the bank name

          System.out.println(response

                    .getCustomerERPBankDetailsByIDResponse_sync().getCustomer()

                    .getBankDetails()[0].getBank().getBankName());


     }


     // Create an ADBBean and provide it as the test object

     public org.apache.axis2.databinding.ADBBean getTestObject(

               java.lang.Class type) throws Exception {

          return (org.apache.axis2.databinding.ADBBean) type.newInstance();

     }


}
In case you have to go through a HTTP proxy to connect to the internet, you will need to do some additional configuration tricks. First, you have to tell Axis2 to use a proxy. Second, you have to set the HTTP protocol version from 1.1 to 1.0. Here is the complete code:
package com.sap.xi.appl.se.global;


import org.apache.axis2.databinding.types.Token;

import org.apache.axis2.transport.http.HttpTransportProperties;


import com.sap.xi.appl.se.global.CustomerERPBankDetailsByIDQueryResponse_InServiceStub.CustomerBankDetailsSelectionByID_type0;

import com.sap.xi.appl.se.global.CustomerERPBankDetailsByIDQueryResponse_InServiceStub.CustomerERPBankDetailsByIDQueryMessage_sync;

import com.sap.xi.appl.se.global.CustomerERPBankDetailsByIDQueryResponse_InServiceStub.CustomerERPBankDetailsByIDResponse_sync;

import com.sap.xi.appl.se.global.CustomerERPBankDetailsByIDQueryResponse_InServiceStub.CustomerID;


public class CustomerERPBankDetailsByIDQueryResponse_InServiceTest extends

          junit.framework.TestCase {


     public void testCustomerERPBankDetailsByIDQueryResponse_In()

               throws java.lang.Exception {


          CustomerERPBankDetailsByIDQueryResponse_InServiceStub stub = new CustomerERPBankDetailsByIDQueryResponse_InServiceStub();


          // basic authentication configuration start

          HttpTransportProperties.Authenticator auth = new HttpTransportProperties.Authenticator();

          auth.setUsername("your user id");

          auth.setPassword("secret");

          stub._getServiceClient().getOptions().setProperty(

                    org.apache.axis2.transport.http.HTTPConstants.AUTHENTICATE,

                    auth);

          // basic authentication configuration end


          HttpTransportProperties.ProxyProperties proxyConfig = new HttpTransportProperties.ProxyProperties();

          proxyConfig.setProxyName("proxy");

          proxyConfig.setProxyPort(8080);

          stub

                    ._getServiceClient()

                    .getOptions()

                    .setProperty(

                              org.apache.axis2.transport.http.HTTPConstants.HTTP_PROTOCOL_VERSION,

                              org.apache.axis2.transport.http.HTTPConstants.HEADER_PROTOCOL_10);

          stub._getServiceClient().getOptions().setProperty(

                    org.apache.axis2.transport.http.HTTPConstants.PROXY,

                    proxyConfig);


          CustomerERPBankDetailsByIDQueryResponse_InServiceStub.CustomerERPBankDetailsByIDQuery_sync customerQuery = (com.sap.xi.appl.se.global.CustomerERPBankDetailsByIDQueryResponse_InServiceStub.CustomerERPBankDetailsByIDQuery_sync) getTestObject(CustomerERPBankDetailsByIDQueryResponse_InServiceStub.CustomerERPBankDetailsByIDQuery_sync.class);


          // build query structure start

          CustomerERPBankDetailsByIDQueryMessage_sync queryMessage = new CustomerERPBankDetailsByIDQueryMessage_sync();

          CustomerBankDetailsSelectionByID_type0 selectionById = new CustomerBankDetailsSelectionByID_type0();

          CustomerID customerId = new CustomerID();

          customerId.setCustomerIDContent(new Token("2000"));

          selectionById.setID(customerId);

          queryMessage.setCustomerBankDetailsSelectionByID(selectionById);

          customerQuery.setCustomerERPBankDetailsByIDQuery_sync(queryMessage);

          // build query structure end


          // send the request

          CustomerERPBankDetailsByIDResponse_sync response = stub

                    .CustomerERPBankDetailsByIDQueryResponse_In(customerQuery);

          assertNotNull(response);


          // output the bank name

          System.out.println(response

                    .getCustomerERPBankDetailsByIDResponse_sync().getCustomer()

                    .getBankDetails()[0].getBank().getBankName());


     }


     // Create an ADBBean and provide it as the test object

     public org.apache.axis2.databinding.ADBBean getTestObject(

               java.lang.Class type) throws Exception {

          return (org.apache.axis2.databinding.ADBBean) type.newInstance();

     }


}
3 Comments
Related Content
- How to set up the Data Migration Cockpit in Enterprise Resource Planning Blogs by Members
- ABAP Cloud Developer Trial 2022 Available Now in Technology Blogs by SAP
- SAP Partners unleash Business AI potential at global Hack2Build in Technology Blogs by SAP
- Simplifying Employee and Manager Experiences with Employee Central Quick Actions in Human Capital Management Blogs by SAP
- It’s Official - SAP BTP is Again a Leader in G2’s Reports in Technology Blogs by SAP