
- SAP Community
- Groups
- Interest Groups
- Application Development
- Blog Posts
- ABAP Trial Version for Newbies Part 7: Creating a ...
Application Development Blog Posts
Learn and share on deeper, cross technology development topics such as integration and connectivity, automation, cloud extensibility, developing at scale, and security.
Turn on suggestions
Auto-suggest helps you quickly narrow down your search results by suggesting possible matches as you type.
Showing results for
thomas_weiss
Active Participant
Options
- Subscribe to RSS Feed
- Mark as New
- Mark as Read
- Bookmark
- Subscribe
- Printer Friendly Page
- Report Inappropriate Content
04-17-2007
6:43 AM
This weblog is about how to create a transportable package, how to create a program within this package, and how to get the connection to the integrated software logistics of the server, the SAP Change and Transport System (CTS) right from the beginning. Doing this you will get a grasp of what a multi layer system landscape for development is for and what the concepts of a transport layer and a transport requests mean in this context. This will provide you with a basic understanding of the complex world of software logistics in the ABAP world.
Unfortunately, I must confess it, you need a lot of dialog windows to define the relevant properties of a package and a program. And clicking through these windows is a bit of a bore. No kidding. And the worst is: It will take so much time to show you what attributes the package and the program need and to explain why they need these attributes with which value that I have decided to postpone any program code to the next weblog.
But still I believe that you need the information I present in this weblog. And I will try to make the long walk through many dialog windows more interesting by adding some more basic information to the CTS. But do not expect too much from it. The world of SAP CTS is complex, and I can only scratch its surface. But let me first spend some thoughts on why we are not content with our demo programs in the package $tmp for local developments.
Some Words of Motivation: Why Your Programs Deserve Better than Package $tmp
Development is not only about devising cool patterns, algorithms and coming up with a hip design. This is the bright side of developing. What I show in this weblog is, in a way, the monotonous housekeeping of the developer. It is not cool, but it has to be done, if you will not end up in a mess with your cool programs. And you will get rewarded for it. By assigning your development objects to a package and a transport request with the right properties, you will keep your developments tidy, from the very outset.
This proper structuring of development objects becomes particularly important if you work in a team on a development project. When just developing on your own at home, this assignment of your objects to the software logistics is not strictly necessary and means some overhead expense for you. Nevertheless, you might also profit from it when just working on your own. To return to our analogy of housekeeping: Avoiding producing a mess is more important if you share an apartment, but it is not wrong if you live on your own either. The same applies in analogy to developing on your own with our demo version at home. There is only one default package $tmp for local development for each user. And you need more packages to manage a lot of different developments. Just imagine you had all files on you PC in one folder. In the same way, it does no good to have all your development objects in your package $tmp.
But there is an even more compelling reason to use a transportable package as a container for your programs right from the beginning: You cannot even export local objects to a file. (In fact this unconditionally true only for objects in package $tmp. They can never be transported. Objects in a local package can be transported in a special type of transport request: a request for the transport of copies. But this type of request can only be created in the Transport Organizer, SE09 and not from the dialog windows provided by the ABAP Editor in the SE80. As I do not want to introduce the SE09 in this weblog we have to make do with a normal transportable package).
As ABAP development objects are stored in the database of the system you cannot just copy a program file if you need it elsewhere. You need to export it to transport files first, and then you can import these files into any other application server ABAP if you have access to the file system of the underlying physical server. So much for the motivation and an explanation as to why even solitary developers at home should not be content with developing in package $tmp. Your programs deserve better. They should live in a transportable package.
Creating a Package - the Chance to Get in Touch With the CTS
This walk through a lot of dialog windows, cumbersome as it is, might still be interesting to those who have some experience in handling these things. In a way, this cascade of dialog windows resembles a wizard driven activity. You may get along in these windows, and still not really know what you are doing. This is the way I got through some wizards. I was happy to be out of it, and hoped that I had fed the wizard the info it needs and that the wizard would not take revenge on me: Maybe due to my limited knowledge I had provided some syntactically correct data that nevertheless did not lead to a semantically meaningful outcome.
Since the input in these dialog windows connects your development objects to the SAP Change and Transport System and this powerful system is really complex, the odds are good that you do not really know what you are doing there, though you get along quite successfully in these windows. In any case, if you are one of those you will probably profit from this weblog.
Creating a Package - the Details
By creating a package we are laying a cornerstone for all subsequent developments in later weblogs, as we will use it throughout all parts of our little demo application. Moreover you learn the little steps you have to take before you can start typing in the code, whenever you need a new development object. After this weblog we will simply presuppose that you know how to perform these steps, and if we create other development objects such as a global class, a function group and a function module, a database table or a data element in the ABAP Dictionary, we will only explain what is different from the procedure explained in this weblog.
As packages themselves are also repository objects, which can be edited using the ABAP Workbench, we use this tool to create our package. To do this, we select the package object list in the Repository Browser, and enter the name y_abap_demo into the input field below.

Again you see this very helpful feature of the ABAP development environment: If you want to edit an object that does not exist, in general the system asks you if you want to create the respective object. We confirm and get a dialogue window:
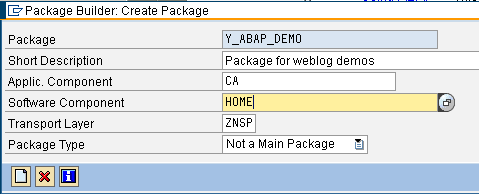
In addition to a short description you must specify the Application Component, the Software Component, and the Transport Layer. In order to input the software component, we select suitable entries from the selection list, which is displayed after pressing the input help key (F4). As already mentioned, this value help is an important and extremely helpful feature, and you find it throughout the SAP AS ABAP and all ABAP-based applications if their developer has provided it. So let me show you in the next figure how this value help works. You select the field with the label Software Component, enter (F4) and you get the value help if it is provided:

In our case the values you see are created by the system administration when the system was set up: It is a list the software components that are available in the system. The software component HOME is meant by SAP for customer development and equipped with all the tools available for this. We select it and confirm by selecting the check mark (1). In case a list in a value help is very long, select the telescope icon (2) and start a search.
The Concept of a Transport Layer
The transport layer is an important concept. It refers to the transport path a package should take in a system landscape. The usual landscape has a least three layers:
The basic idea behind this layered system structure is simple: You develop an object in the development system and test it in the consolidation system. When all tests are successful you transport your tested development objects to the productive system. The SAP CTS enables you to define this path as an attribute of a package. Due to this feature there is no fiddling about with the destinations of development objects. You just define them in the properties of the respective package in the beginning.
How useful the concept of a transport layer is, becomes in particular evident if you have, for example, one development system for different productive systems.
In the landscape shown in this figure it makes sense to define two transport layers, one that for a path from the development system over consolidation system 1 to productive system 1 and the other layer that leads from the same development system to consolidation system 2 and productive system 2.
Due to this organizational structure development objects destined for productive System1 are from the very outset in a different pigeonhole than those for productive System 2.
The arrows in these figures only show the direction and the destination of the relevant transports. The transport layer by itself does not transport anything. You need a transport request to get something transported. Maybe an analogy can help to expose the way the concepts of a package, a transport layer, its respective destination system, and the export from and import into a system are interrelated:
The transport layer is like a subway line and the transport request is like the tram. Assigning some object to a transport line is like buying a ticket for this line, while assigning an object to a transport request is like actually putting it on the train. Exporting the transport request is like the train leaving the station, and the import is the reverse.
Some More Basic Concepts of the SAP Change and Transport System
Let me show you an example to help you understand how a program BB in a package z_my_package assigned to transport layer DeCoPro and transport request 1 is transported through a system landscape with three layers (the names of the transport request and the transport layer are simply chosen for didactic reasons and irrespective of existing conventions and technical constraints). The figures just concentrate on the entities mentioned: The program, its package, the transport request and the transport layer.
1. Our Program is assigned properly to the package, this in turn is assigned to a transport layer, both are assigned to the same transport request, that is a transport request that has the same destination as the first destination defined in the transport layer. So far nothing has been transported. The transport is not released and you can still change it, that is, you can, for example, assign other objects to it or change programs in the request.
2. The transport request has been released from the development system and been imported into the consolidation system. As you see, there are copies of program BB and its package in the relevant destination system after the transport. And this makes sense: If the transport moved the program, many transports would empty a system, and above all, you could no longer change a program after it has been transported out of a system. The released transport request is in the consolidation system too, and it also still exists in the development system. In fact, this is only the logical perspective. Physically the objects in a released transport request are written to a file, and this file exists only once. When it is imported into another system, this system gets a reference to this file.
3. Next after the tests in the test system are completed successfully we import the transport request into the productive system.
Again, physically the productive system just gets a reference to the exported transport request in the file. So the arrow between the systems only expresses a temporal and logical sequence. I still decided to use these arrow as this is the typical way to sketch the structure of the transports through a SAP system landscape. The physical structure (see figure below) is like this: When importing the Transport Request 1 into the consolidation and the productive system these systems just get a reference to the export files of the relevant transport request:
At this stage of the explanation, you might ask yourself what happens if you have to change program BB for some reason. Well, let us suppose in the productive system a branch of your program is executed that has not been tested so far, and the program does not behave as expected. So we have to change it, and we do this in the development system. This is what the division in the three layers is for. As the name suggests, in general, you only develop in the development system. Of course, there are some situations when you better correct errors in the consolidation system (for example if this system gets programs from different development systems and the error does not appear in the development systems, but only when the sources from the relevant development systems are activated and run on one system), but then you should change the relevant development objects in the consolidation and the development system. Otherwise you will easily get inconsistencies between these two systems. But in our example we can stick to the general rule to develop in the development system.
In order to change the program, we need to assign it to a new unreleased transport request:
There we are. We have assigned the program to a new unreleased transport request, which can still be changed. A package is usually only transported once, except for the case that the package properties have changed. For this reason we only assign the program to a new transport request and not the package. But what happened to the previous assignment of the program to transport request 1? Nothing. The point is simple: A development object can be assigned to one unreleased changeable transport request only, but, in addition to many released transport requests.

But why is it that the assignments to the old, released requests do still exist, if they are not changeable? What are they good for? Probably you guess the answers: This is for matters of versioning. Whenever a transport request is released a actual version of the program state at this time is stored. You can both return to this old version in case you need to or simply use it to track when which version of a program was released. Before leaving this short introduction to the transport system, let me mention that, of course in our example we need to transport our bug fix to the productive system, before our problem is corrected there.
But this should suffice by now to give you a basic understanding of the SAP Change and Transport System. As I told you before, the CTS offers a complex set of features, and in this intro weblog I can do no more than give you a clue as to what you are doing when you fill out the relevant fields during the creation of package and a program.
Package Building Continued
So let us go on with our example. For our demo system you should use the transport layer znsp throughout (as already told, you also need a transport layer if want to export a development object to a file. In a later weblog we show how you export and import development objects to or from a file).
If you have input all values as shown on the last figure you press the Create button.
In the next dialog window you have to assign your package to a transport request.

As we do not have a transport request of our own so far we create one by pressing the Create button in this dialog window and the next dialog window appears. We input some short description as shown:

Just note in this context: In a real-world development project you will always use a transport request that is created in the transaction SE09 and paste this into the window with the header Prompt for transportable Workbench Request, that is the window we have just shown, and not create the transport request by using the Create button in this window. By using the SE09, you have more control on the transport request you get. If you just need a transport request without any particular properties, you can do it the way we do it here.
Pressing the Save button opens another dialog window:

There it comes: Our first transport request. We finish the creation of our package by pressing the Create button. And now we have done it. We have created a package of our own.
The package we have just created is shown in the list below the input field of the Repository Browser where the $tmp package of our BCUSER was shown before.
In case you feel a bit dizzy by now because of the bunch of dialog window, do not hesitate. Let us do something similar again and pass a similar cascade of dialog windows in order to create a program in our package.
Creating a Program Within a Package
So we create a program within this package, or to put it another way, create a program and assign it to this package. If you have completed this task you will see that these dialog windows always appear in a defined order, and once you have understood this order, you will feel no more confused by clicking your way through the dialog windows that by walking through a long floor with several doors.
So let us start. We right-click on the package Y_ABAP_Demo and choose Create - Program.

Again we are lead to a dialogue window, where we input the name of the program we want to create y_select_f_flight . We deselect "Top Include" because we still do not need a top include, and we confirm. As in the case of our last program z_hello_word_local we get the dialog window that defines the program properties. We confirm again and in the dialog window we see that the system already proposes y_abap_demo as the package for our program. We press the Save button.

The next dialog window also offers little work for us. The transport request our package belongs to is already in the relevant field.

Again we confirm and we have done it: We have created a new program within a package.
The procedures I have just described might look like a lot of work, but let me repeat it: After a short while it will cause no more trouble than getting the car key, opening the car, sitting down, fastening the seat belt, and turning the ignition key. In real life, you hardly pay any attention to these actions. In the same way you will create programs in ABAP. The steps are always the same:
- Give the program name,
- Define the properties of the programs (in general, you just accept the values proposed by the system),
- Assign your program first to a package,
- Assign your to a transport request.
Outlook
Instead of a summary I want to finish this weblog by giving an outlook on how we will go on in one of the next weblogs. By now the ABAP Editor has opened in the change mode and below the usual comments at the beginning of a report you have the first line: report y_select_f_sflight. You know this already from the last weblog
From here we will start in one of the ABAP Trial Version for Newbies Part 10: A First Little Business Program and write a program that performs the task of a typical business program: It selects some lines from a database table that fulfill a given condition, stores them in a container in the program, an internal table, and shows this internal table in a quick and dirty way on the screen. We will use a Dynpro-based list and an object-oriented alternative to do this. As already mentioned, you should use this technology for test purposes only: It facilitates a fast and easy output to the screen, but does not support the model-view-controller paradigm.
In some later weblog we will show you how to output a table like this in a real world program: You encapsulate your business logic that contains the SELECT statement in a global class or a function module and offer the relevant data in a getter method. The presentation in the UI is done in a Web Dynpro ABAP application that accesses the relevant modularization unit that offers the data.
- SAP Managed Tags:
- ABAP Development
5 Comments
You must be a registered user to add a comment. If you've already registered, sign in. Otherwise, register and sign in.
Labels in this area
-
A Dynamic Memory Allocation Tool
1 -
ABAP
8 -
abap cds
1 -
ABAP CDS Views
14 -
ABAP class
1 -
ABAP Cloud
1 -
ABAP Development
4 -
ABAP in Eclipse
1 -
ABAP Keyword Documentation
2 -
ABAP OOABAP
2 -
ABAP Programming
1 -
abap technical
1 -
ABAP test cockpit
7 -
ABAP test cokpit
1 -
ADT
1 -
Advanced Event Mesh
1 -
AEM
1 -
AI
1 -
API and Integration
1 -
APIs
8 -
APIs ABAP
1 -
App Dev and Integration
1 -
Application Development
2 -
application job
1 -
archivelinks
1 -
Automation
2 -
BTP
1 -
CAP
1 -
CAPM
1 -
Career Development
3 -
CL_GUI_FRONTEND_SERVICES
1 -
CL_SALV_TABLE
1 -
Cloud Extensibility
8 -
Cloud Native
6 -
Cloud Platform Integration
1 -
CloudEvents
2 -
CMIS
1 -
Connection
1 -
container
1 -
Debugging
2 -
Developer extensibility
1 -
Developing at Scale
4 -
DMS
1 -
dynamic logpoints
1 -
Eclipse ADT ABAP Development Tools
1 -
EDA
1 -
Event Mesh
1 -
Expert
1 -
Field Symbols in ABAP
1 -
Fiori
1 -
Fiori App Extension
1 -
Forms & Templates
1 -
IBM watsonx
1 -
Integration & Connectivity
9 -
JavaScripts used by Adobe Forms
1 -
joule
1 -
NodeJS
1 -
ODATA
3 -
OOABAP
3 -
Outbound queue
1 -
Product Updates
1 -
Programming Models
12 -
RFC
1 -
RFFOEDI1
1 -
SAP BAS
1 -
SAP BTP
1 -
SAP Build
1 -
SAP Build apps
1 -
SAP Build CodeJam
1 -
SAP CodeTalk
1 -
SAP Odata
1 -
SAP UI5
1 -
SAP UI5 Custom Library
1 -
SAPEnhancements
1 -
SapMachine
1 -
security
3 -
text editor
1 -
Tools
14 -
User Experience
4
Top kudoed authors
| User | Count |
|---|---|
| 6 | |
| 2 | |
| 2 | |
| 2 | |
| 2 | |
| 2 | |
| 2 | |
| 1 |