
- SAP Community
- Products and Technology
- Additional Blogs by Members
- Visual Composer and ABAP RFC/BAPI a powerful combi...
Additional Blogs by Members
Turn on suggestions
Auto-suggest helps you quickly narrow down your search results by suggesting possible matches as you type.
Showing results for
Former Member
Options
- Subscribe to RSS Feed
- Mark as New
- Mark as Read
- Bookmark
- Subscribe
- Printer Friendly Page
- Report Inappropriate Content
02-02-2007
8:22 AM
The second part of my first SDN blog, which extends the Visual Composer application of the first part and shows how to use external debugging of RFC/BAPI for resolving issues.
Table of Contents
First Part of the SDN Blog
Connection Lifetime in the Visual Administrator
Create an InfoObject for our example
Create a RFC function module for displaying master data in Visual Composer
Adding example master data in the backend system
Create the Visual Composer Model for displaying master data
Search function
Second part of the SDN Blog
Create another RFC function module for modifying master data
Add “Modify master data” feature to the Visual Composer model
External debugging of RFCs or BAPIs
System requirements
SAP NetWeaver 2004s BI SP08
SAP NetWeaver 2004s EP SP08
Internet Explorer 6 SP2 with flash plugin
MSXML Parser 4
Adobe SVG Viewer 3
Second Part of the SDN Blog
Create another RFC function module for modifying master data
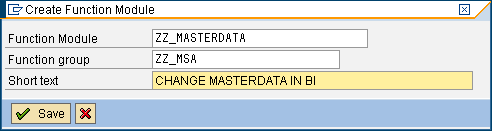
In the next step I will extend the application, so that the user can modify the master data in Visual Composer. For this new feature we need a further function module. Go back to the transaction SE80 and create a new function module.
For the technical name enter “ZZ_MASTERDATA” and for the description “CHANGE MASTERDATA IN BI”.
Change to the Attributes tab and change the values within the section “Processing Type” from “Normal Function Module” to “Remote-Enabled Module” as shown in the following picture.

I also have to add an import parameter as shown in the screenshot below. This parameter is like the text table, so that you can append your modified records to this table. In Visual Composer you pass the modified records to this import parameter.

Now assign an export parameter called message for returning a result of the operation in Visual Composer, e.g. “Operation successful” or “Operation failed”.

Then I must enter the coding under the tab “Source code”. The following code modifies master data records of the InfoObject “ZZ_BLOG” as they are passed into the import parameter “I_T_TEXTTABLE”. After the modification it returns if the operation is successful or not.
FUNCTION ZZ_MASTERDATA. *"---------------------------------------------------------------------- *"*"Local Interface: *" IMPORTING *" VALUE(I_T_TEXTTABLE) LIKE /BIC/TZZ_BLOG STRUCTURE *" /BIC/TZZ_BLOG *" EXPORTING *" VALUE(E_RESULT) TYPE STRING *"---------------------------------------------------------------------- * Type pools used by conversion program TYPE-POOLS: RS, RSARC, RSARR, SBIWA, RSSM. data: l_t_texts like /BIC/TZZ_BLOG occurs 10, l_s_minfo Type rssm_s_minfo, l_t_idocstate type rsarr_t_idocstate, l_subrc like sy-subrc. append I_T_TEXTTABLE to l_t_texts. * Change Text of ZZ_BLOG call method cl_rsdmd_update_master_data=>update_texts_static EXPORTING i_iobjnm = 'ZZ_BLOG' i_chavl_enqueue = rs_c_true i_t_data = l_t_texts i_s_minfo = l_s_minfo i_monitoring = rs_c_false i_create_statistics = rs_c_false IMPORTING e_subrc = l_subrc CHANGING c_t_idocstate = l_t_idocstate. if sy-subrc <> 0. E_RESULT = 'Operation without success.'. else. E_RESULT = 'Operation successful.'. endif. ENDFUNCTION.After finishing this, go back to the Visual Composer and add the new feature we just created.
Add “Modify master data” feature to the Visual Composer model
First add a toolbar to the master data table with a “modify record” button. Therefore select the table “master data table” and click in the task panel “toolbar” on configure and then on edit as shown in the next screenshot.

The following picture shows you, how to add the button:
- Step 1: Click on the plus symbol to add a button.
- Step 2: Rename the button.
- Step 3 is to change the action.

Then add a popup iView for editing the selected record.

Step 1: Create a new iView. In this popup iView we add a form for editing the master data.
Step 2: Enter a technical name for this new popup iView.

Then select the line between table and popup (step 1) and change the event name to submit (step 2) as shown in the screenshot below.

Drill down into the created popup iView.
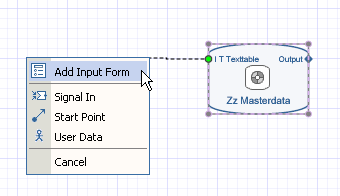
Pull the Data Service “ZZ_Masterdata” into the storyboard and add an input form.
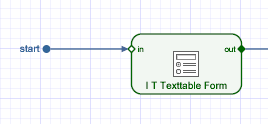
Add a start point and connect it with the input form.
Select the start point and click on configure in the task panel toolbar (step 1). In the second step add an input parameter by clicking on the plus symbol.

Enter a fieldname and confirm by clicking on the OK Button.

Repeat these steps for adding the input parameters TXTSH and TXTMD for the short texts and the medium length texts.
By the time you finished this, you have created three input parameters.

Add a data store after the function module for storing the result value of the function. The value is stored in a data store, because this value should be displayed in a plain text field in the editing form as status information.

Add a field to the data store like the output parameter of the function module.

Then you must assign a value to the data store field. Therefore you select the line between the function module and the data store(step 1). Next (2), click on configure in the task panel toolbar. In the last step (3), choose @E_RESULT from the drop down.

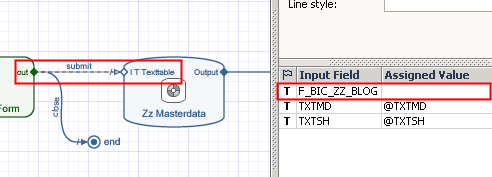
Select the input form (“I T Texttable Form”) and click on configure in the task panel toolbar.

Remove the red framed field “F_BIC_ZZ_BLOG” as this field is not necessary, because we use the field “ZZ_BLOG” from the start point for the InfoObject key.
In order to display the status message, add a plain text field by clicking on the plus button in the task panel toolbar. In the popup you choose “Plain Text” (step 1), then enter the field name (step 2) then click on the OK button (step 3).

To have a minimum of navigation options, we need two further pushbuttons abort and close. Repeat step 1 – 3 choose “Pushbutton” instead of “Plain Text” in step 1 and in step 2 enter abort and close for the corresponding buttons.
Now we have to customize the layout of our popup iView. Go to the layout mode of Visual Composer for customizing. In my case the modified layout looks like the following screenshot.
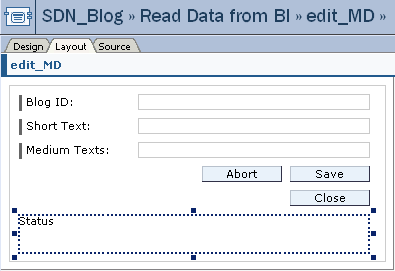
I renamed the button “submit” to “save”. I want that the “abort” and “save” buttons are displayed until the user clicks on either one of these. If the user clicks on the abort button, the popup window should be closed. Accordingly, if the user clicks on “save”, the modified data is passed to the function module, which writes the data into the backend system and returns a status message of the operation.
I use the combination of a data store and a plain text field for displaying the status of the modify operation. Under the control properties of the status field you enter a formula into the label as shown in the next screenshot.

In the “control properties” of the “save” button enter a condition as shown in the screenshot, because the save button should be hidden after clicking on it.

Enter as well a condition for the “abort button” under the “control properties” as shown in the screenshot.
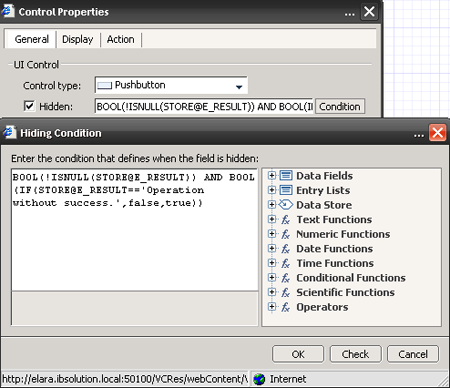
In the “control properties” of the “close” button enter a condition as shown in the following screenshot. The close button should be displayed, when the modification of the master data was successful.

But: We still have to define the actions of the abort and close button.
As you want the window to close when hitting the “abort button”, you use the system action “close window”.

For the Close button you have to define a custom action called “close”.

In the control properties of the field “ZZ_BLOG“ the disabled settings is assigned the value “true”, as it makes no sense to change a key value.

Back in the storyboard you have to add an end point, which returns the modified short text and medium length text to the parent iView (into the table).


Choose TXTMD and TXTSH for the endpoint output fields as shown in the second screenshot above.
Select the line between end point and input form (1). Choose configure in the task panel toolbar (2) and change the event name to close (3).

Then go back to the parent iView of the popup (click on “Read Data from BI”).
There you have to assign the popup input values and the popup output values.
First, select the line between table and popup and choose “configure” in the task panel toolbar (2).
In the third step you have to enter the popup input values and in step four the popup output value.

That’s it! Now you can deploy the application and test if it works.
After deploying I want to change the texts of the record with the ID “0000006” from “SDN Blog” to “my SDN Blog”. Therefore I first search for “SDN Blog” and click on the “Modify record” button to do the changes.

The popup appears and I change the texts as I mentioned. When you click on “Save” the success message appears, on “close” it disappears again.

Search again for “my SDN Blog” and you will notice that there is a new record with the ID “00000000”.

The screenshot above shows, that there must be an error. This would be a bad blog, if I show you how to create an application with errors, wouldn’t it? – But: This was intended for showing you how to debug ABAP RFCs and how to resolve issues with RFCs or BAPI, because I’ve read about several issues with BAPIs in the Visual Composer Forum in the last months.
External debugging of RFCs or BAPIs
In the next chapter I will show you how-to debug an RFC (this can also be done with BAPIs). Therefore you go back to the SAP GUI and start the transaction RSD1 and enter the technical name of the InfoObject “ZZ_Blog” and click on the “display button”.

On the next screen, click on maintain or use the shortcut F6 and then F8 (or click on the clock) to display all records.

The table shows, that our operation was not successful. The texts of the record with the ID six has not been modified, instead there is a new record without a BLOG ID.

Maybe this is an error of the function module? To resolve this, go to transaction SE80 and open the function module.

Then set your cursor to line 20 (first step). The second step is to set an external breakpoint.
A symbol appears on the left side of line 20.
After that, go back to the deployed Visual Composer application and try again to change the record with the ID “00000006”. When you click on the save button and the data is passed into the function module, a new window opens with the ABAP debugger.
Within the ABAP debugger you can double click on the “I_T_TEXTTABLE” import parameter. This displays the content of this variable in the tab on the right side of the window. It seems that the function module does not get the right value from visual composer. To resolve this, we go back to Visual Composer and check our model.

Navigate to the popup iView. Check the line between input form and the function module, because the data of the input form are passed into the function module.
Now you will find the error. There is no value passed from the form to the RFC.
To fix this error you must assign the value of the Blog ID (enter: @ZZ_BLOG).
Then test it again. Deploy your model again and try to modify the master data.
The Debugger starts again.

Now the correct values are passed into the function module and the application works fine.
This was a simple example for debugging RFCs. You can also debug BAPIs on the same way. There are often issues with passing the values from Visual Composer, that’s why you should always check the passed import parameters if an error occurs. Often there are issues because the values are not in the correct format. For example dates are stored in the backend system in an internal format. In the application you use a local formatting for the date, e.g. in Germany you use 31.12.9999 .You can also have another formatting in other countries like 9999/12/31. If these dates are from the data type date, the dates will be converted into the correct format by the backend. But at the moment there is a bug with dates in input fields. That’s why many Visual Composer developers use an input field of the type text (string) instead of the type date, and then there is no conversion in the backend system and the RFC/BAPI dumps. Another example is the language key. Every user knows that the language key for German is ‘DE’ and for English it is ‘EN’ in the front end client like the SAP GUI. But when SAP started in 1972 they only had two languages: German and English. In the 1970’s the memory capacity of the mainframes was very limited, that’s why SAP stored the language key only with one letter: ‘D’ for German and ‘E’ for English. As time goes by, more and more languages are supported by SAP and the language key was changed into a two letter field. But these are only two examples.
I hope this demonstration helps you to debug and resolve issues on your own with RFC and BAPI in your Visual Composer applications. This Blog also should show you, that it’s quite easy to become acquainted with ABAP RFC programming, nevertheless which programming language is you’re coming from. The combination of ABAP coding and Visual Composer enables a lot of possibilities in application developing. When there is no BAPI or RFC available from the SAP, just write your own RFC!
That was the last part of my first SDN blog. I hope you enjoy it and that you have learned something new. The whole SDN Blog can also be downloaded from the IBSolution webserver as a PDF file. You can download it the blog here: http://www.ibsolution.de/sdn/msa/SDN_Blog01.pdf
That was my first blog about ABAP RFC and Visual Composer. I hope this was a helpful one for you.
Maybe I have more time in the future for writing another blog or publishing a Visual Composer application in the SAP xApp Analytics - Composite Applications Resource Center.
That was the second part of my first SDN blog. The whole SDN Blog can also be downloaded from the IBSolution portal as a PDF file.Download the Blog from the IBSolution Portal
Please give me a feedback, so that I can improve my next blog.
Thanks in advance and best regards,
Marcel
20 Comments
Related Content
- Account Balance Validation in SAP S/4HANA Cloud, Public Edition in Enterprise Resource Planning Blogs by SAP
- SAP Sustainability Data Exchange: Your Key to a Sustainable Supply Chain in Spend Management Blogs by SAP
- Maximize Results and Drive Sustainability in Fashion Retail with SAP and GK AIR Dynamic Pricing in CRM and CX Questions
- plug and gain 101: #4 What is a Process Flow Variant? in Technology Blogs by SAP
- Custom data as table, CDS, Domain, Business object and all that jazz... in Technology Blogs by SAP