So without wasting much time, here is a business scenario: Purchase Requisition (PR) is created by a requisitioner, initially it is blocked & automation is subsequently needed to send each PR/Item to a different approver, based on business logic. Approver either rejects or approves separately each PR/item from his business workplace and then further processing of each PR/Item takes place till it is either released or deleted as part of the automation cycle. The below illustration depicts the scenario and also indicates the area where we will need to use the multi-line parallel processing in SAP Workflow.
The challenge in this scenario is we need to send each PR/Item to a different approver based on the business logic & also that we can’t process all PR/Items in a sequential manner as I would normally have done it using loop….endloop in an ABAP program. Why not? – Reason is simple. Each work item(equivalent to PR/Item) needs to be sent to the approver’s inbox and hence you can’t imagine PR/Item 2 not being sent to Approver Y at all since PR/Item 1 is still waiting in Approver X’s inbox. In such cases, and most other scenarios where the BOR event is triggered at the header level of the application document but the automation processing of workflow needs to be done at item level & involving different approvers in the R/3 system, the following step-by-step guide will be useful to develop robust automation applications which handle such cases. For the above scenario, a simple processing should be as follows: 1. Create a workflow template WT1. Listen to the event of the application document stage where you want to trigger the workflow. 2. In the workflow builder use a task as a subsequent activity which gathers all items of the PR items in a multi-line container. There are further tips later in the blog how you can minimize development & use SAP provided methods to achieve this. 3. Create another workflow template WT2. This will be the next activity in WT1. WT2 will be a sub-workflow and all the further processing of each PR/Items will be done in WT2. So the overall WT1 graphical representation should finally look like as below. The 3 triangles icon represents sub-workflow and the halo around it represents the usage of multi-line parallel processing.
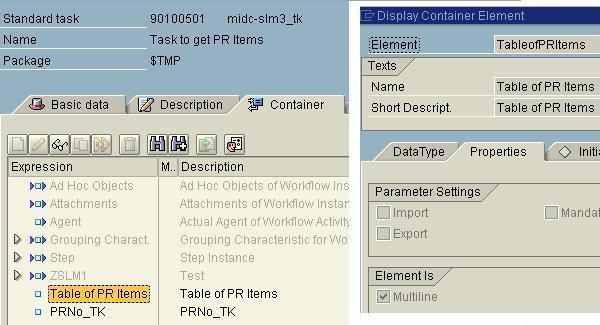
So as shown above, the salient points on step 1 of “Task to get PR items”, you need to define a multi-line container element (say TableOfPRItems_TK) as shown below to receive the PR Items. Here to avoid redundant programming of getting the Items of a PR once the PR # is passed from the event, you can use a method from BUS2105. Now create a similar multi-line container element on WT1 and bind Task element to the WT1 element (TableOfPRItems_TK ====> TableOfPRItems_WT1)
Better is if you create a subtype of BUS2105, delegate to the subtype and use the method of the subtype. This will give you the advantage of better maintenance of custom code needed in your automation application. You can always create new methods in your subtype. To create the sub-workflow do the following: 1. On a second session of PFTC transaction, create your WT2 (sub-workflow). The salient point is you create a container element of PR/item (EBAN-BNFPO), but this should not be multi-line but a normal data element, since it will be a runtime value of each PR/Item. 2. When the WT2 is saved, it will be saved with a WS********** number. Copy this and go to WT1 now. Create a new step as an activity, after the Get PR items task. Use the WS********** which was generated for the sub-workflow earlier and stick it in on the activity. 3. You will see that you are currently on the “Control” tab of the activity as shown below. Go to the “Other” tab as shown below and define the multi-line element TableOfPRItems_WT1. This will ensure the rest of the steps within the sub-workflow will be at the PR/Item level and will happen in parallel.
4. When you save WT1, you will see the WT2 is inserted successfully in WT1 and is “parallel processing enabled”. Now on the graphical editor of WT1, double click WT2 & go to the binding editor. This is the most thrilling part – You will see on the left side (WT1 workflow container), two new elements defined by SAP automatically as a result of the “parallel processing enabling” of point 3 above. They are : a. _Wf_ParForEach_Index – Gives the current index i.e. ‘n’th PR/Item during run time b. TableofPRItems_WT() – Gives the actual value of the current PR/Item Binding is then from the WT1 container of the current PR/Item (as indicated in b above, to the sub-workflow element of PR/Item, element defined in point 1 above). Here is the snapshot of the binding as shown below
5. Now double click WT2 and we will see how each of the run-time PR/Item from the sub-workflow is bound to the further processing. When you are inside WT2, you can do all the necessary business logic which is at the item level here. The below snapshot shows a simple first step of a user decision of the PR/Item approval.
6. The title of the user decision will dynamically get the relevant PR/Item, through the parameters 1 & 2, and the dynamic approver at item level is defined by the Rule as shown below. Thus, this whole design offers you a very flexible yet robust way to parallel-process at item level and also is able to handle complex business logic inside the sub-workflow.
7. Some hints while designing such applications: Make sure that you take care of simultaneous access of the same application object in the parallel branches. If this is not taken care then in some rare cases the user might face a error saying “User X is processing this Material/Plant combination…”