The steps for creating a software component and implementing the whole life cycle of NWDI are:
1. Creating a Software Component in the SLD.
2. Creating a domain and track in the CMS
3. Checking in and importing the requires Software Components
4. Importing Development Configuration
5. Creating an application
6. Testing and checking in and activating the application
7. Releasing the changes for consolidation
8. Consolidating the changes
9. Creating a version(Assembly)
10.Importing the version into Test system
11.Approving the transport
12.Importing into Production System
The first three steps of the life cycle are dealt in the first part of this blog
Guide to Develop Applications using NWDI - Part 1
4. Importing Development Configuration
Open your NWDS.
Go to Windows->Open Perspective->Other->and select Development Configurations

and click ok.
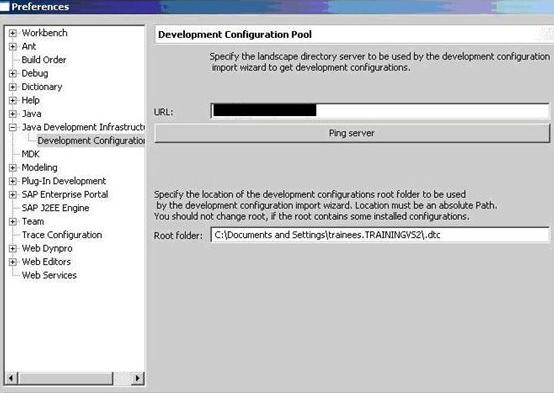
To import the Development Configuration. Right Click on the Local DC’s and select Import Configurations.

A dialog appears, select remote and enter the userid and password of the portal which has JDI.Developers role.
You find all the tracks displayed. Select the track you created in the second step (in our case APPL), expand it and find APPL_dev. Select that and click on next.

Now click on Finish. Now you will be able to see the component which you created (APPlication) in step1 in your inactive DC’s.
5. Creating an application
Go to inactive DC’s. Right Click and select Create New DC.
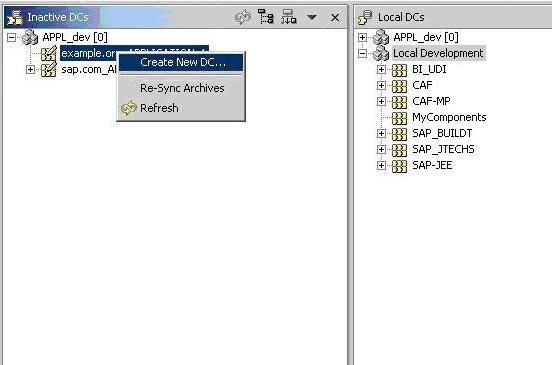
Now enter the Development Component Details like what type of component you would like to build(in our case Webdynpro)

Choose next and then Create a new Activity in the next step.

Now create a activity with name of the component ur building.
Once you do this you will be automatically shifted to webdynpro perspective.
Then start building a webdynpro Application. When you start creating the application, any modifications you perform on the application the activity asks you to save the changes.
6. Testing and checking in and activating the application
Once you complete building the application switch to Development Configuration view. And in the open Activities Window find the activity which you created. Select the activity right click and click checkin and click ok.
A dialog box appears which allows a build into CBS
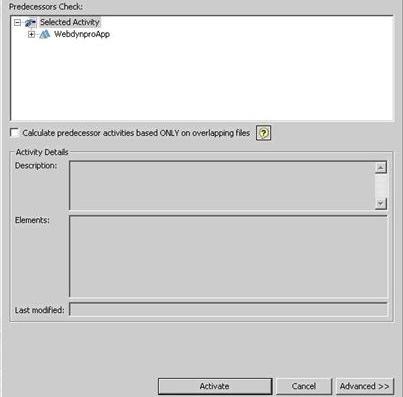
Click on activate. If you have some more developments, you can cancel it and do it later.
To do so
Go to Windows->Show View->Other->CBS Activation ->Activation

And then you can activate the activities pending.
7. Releasing the changes for consolidation
To release the activities into the consolidation phase.
Go to Windows->Show view->other->CMS->Transport View

A dialog box appears with the activities which are ready for release.
Select the activity and click on release
8. Consolidating the changes
Once you release the activity the Application is ready for consolidation and you can consolidate all your activities in the CMS.
Go to the CMS->TransportStudio->Consolidation tab.
There you can find your application waiting for consolidation. Select the application and click on import. And your application is consolidated.

9. Creating a version(Assembly)
Once you consolidate your application. You can assemble it into a archive. Here you create a sca file.
Go to the Assembly tab of CMS and find your application. Select the application and click on Assemble Components. Once you click on it you get a dialog box, click on Assembly and you create a sca file of your application.

10. Importing the version into Test system
When you are creating the tracks that is the second step. If you give the sdm details for even test and production systems.

You will be able to see two extra tabs test and production in the CMS ->Transport Studio. In our configuration it was only for development and consolidation. Hence forth no tabs for test and production.
If you have your test tab. Import the application into the test system. Test the Application thoroughly.
11. Approving the transport
Once you test the application you can approve the application, otherwise reject it and make the changes in the development system.
Go to the Approval tab in CMS. Select your application and click on Confirm for approval.

<SC name>
