
- SAP Community
- Products and Technology
- Additional Blogs by Members
- Bid adieu to bots - using CAPTCHAs
Additional Blogs by Members
Turn on suggestions
Auto-suggest helps you quickly narrow down your search results by suggesting possible matches as you type.
Showing results for
Former Member
Options
- Subscribe to RSS Feed
- Mark as New
- Mark as Read
- Bookmark
- Subscribe
- Printer Friendly Page
- Report Inappropriate Content
09-25-2006
6:01 AM
Motive - A brief note:
First things first, so, what is a CAPTCHA?, you might ask. Most of us would have come across the band-pass filter like images when we sign up for a new account at Yahoo !.
Yes, you got it right!!!. A CAPTCHA is an automated test that can distinguish between machines and humans. It can generate and grade tests automatically that virtually accepts all humans and rejects all machines.
With bots posing severe threat, there are many instances where WebDynpro applications are exposed to the public for purpose of registration etc,. Under such circumstances, how to retaliate against the spam robots?. Here comes Password as graphic picture on a page to entry and Alexis`[Showing up the generated Image | Re: Read Session ID in WD].
During this attempt to solve the security problem, I got a simple yet effective solution for External Library (another forum post), as a by-product. Though there exists the possibily to work with a A bit of (impractical) scripting for Web Dynpro for this dependency problem, it becomes quite complex (atleast for me) as one would need to work across several DC borders using entity references.
Setting up the platform:
To start with, we need all the required libraries. As JCAPTCHA has built-in references to other open source libraries, let`s get those libraries as well from the links specified below:
</ol>
Extract the zip files (available @ links 1,2,3) to get jars commons-betwixt-0.7.jar, jcaptcha-all-1.0-RC3.jar, commons-collections-3.2.jar and commons-collections-3.2.jar.
Libraries & External Library DC:
In the NWDS, navigate to 'File' --> 'New' --> 'Development Component Project' and choose 'Local Development'. Then, select 'My Components' under 'Local Development' and click 'Next'. You'll get the 'New Development Component' wizard. Fill in the appropriate values (as shown below) and choose 'External Library' as the DC Type and click 'Finish' to create a new Library DC project.

Add the aforementioned jar files to this Library DC by simply copying and pasting them to the 'libraries' folder of the project.

Public Part declaration:
This is the an important step where in we define two public parts (with the same contents <--> libraries), with one of type 'Compilation' and the other of type 'Assembly' (In other words, one for Build-Time and another for Runtime). So, first, select one of the newly added jar files (under the Library Project --> 'libraries' folder) say, commons-betwixt-0.7.jar and right click to choose 'Development Component' --> 'Add to Public Part' from the context menu.

PP - Compilation:
In the 'Add Public Part' wizard, specify a valid name (see to it that the option 'Provides an API for developing/compiling other DCs' is checked!) and click 'Finish' to create a public part of type 'Compilation'.

PP - Assembly:
Now, right click the same jar file commons-betwixt-0.7.jar, and choose 'Development Component' --> 'Add to Public Part'. In the 'Pulic Part Editor' window, click 'New' to create a new public part of type 'Assembly' by selecting the option 'Can be packaged into other build results (e.g. SDAs)'.

Similarly, add the other three jar files to the same public parts by repeating the following steps seperately for each jar file:
Finally do a DC build by choosing 'Development Component' --> 'Build' in the right click context menu of the Library project. Now the public parts are ready with us and we may proceed further to see how these libraries (contained in the public parts) could be accessed from a WD DC.
WebDynpro DC & DC usage relations:
Create a WebDynpro DC (by following the same steps mentioned for External Library creation, except that the DC Type should be chosen as 'WebDynpro') and add both the External Library public parts to the WD DC as used DCs. Care must be taken to ensure that only the 'Build Time' dependency is established. Hint: One need not manipulate the dependency types as we already have two pulic parts: one each for 'Runtime' and 'Build Time'. Here are the steps to add the DC usage relations.
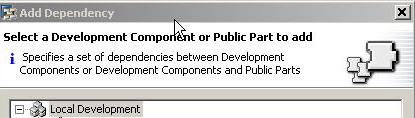
Choose 'DC Metadata' under your WD DC and navigate to 'DC Definition' --> 'Used DCs'. Right click 'Used DCs' to add the DC usage relations. In the 'Add Dependency' wizard, choose 'Local Development' --> 'My Components' --> 'jcaptcha/jars' --> 'Public Parts'. Select both the pulic parts ExternalLibCompilation and ExternalLibAssembly and check the dependency type 'Build Time', and click 'Finish'.


Finally, 'Build' the WD DC, so that all the declared dependency relationships gets well established. Thus far we've seen the approach for solving the problems related to the usage of External Library DCs.
Caveat confector:
One should always remember this significant and valid point: 'Use ONLY DC Builds to create the deployable archive if you work with assembly public parts.'. Let me explain this clearly. We have added a public part of type 'Assembly' to the WD DC and hence, the local create archive options are not supported. So, never use the function 'Create archive' or 'Deploy new archive and run' while working with 'Assembly' type public parts. Instead, always use the DC 'Build', after that DC 'Deploy' and then simply 'Run' the WD application.
Implementing JCAPTCHA/WD Application
Having discussed in detail, the procedure for invoking JCAPTCHA libraries from the WD DC, let`s dive into the actual application itself. Developing the application is very simple. In the WebDynpro perspective, switch to the 'Navigator' tab. Select the WD project and go to the folder 'src' to create a new logical folder structure 'com.jcaptcha.util'. Add a new java class 'CaptchaServiceSingleton.java' under that and add the following code to it for instantiating a singleton captcha service.
Go back to 'WebDynpro Explorer' to create a Label, (for specifying a short text) Inputfield, (to take the user perceived input based on the CAPTCHA), an Image UI element (for displaying the generated image) and a Button (for verifying the CAPTCHA</b>) in the view. Add a method called createCaptcha() and invoke it from the wdDoInit() of the view.
Code for createCaptcha()
/* Specify a Captcha ID that will identify the generated
wdContext.currentContextElement().setCaptchaID( WDProtocolAdapter.getProtocolAdapter().getRequestObject().hashCode()+ "");
/* Get the challenge for the specified ID */
BufferedImage image = CaptchaServiceSingleton.getInstance().getImageChallengeForID( wdContext.currentContextElement().getCaptchaID(), WDClientUser.getLoggedInClientUser().getLocale());
/* Create a new file for storing the image */
File outFile = new File( wdContext.currentContextElement().getCaptchaID() + ".jpg");
try
{
/* Write the image to the created file */
ImageIO.write( image, "jpg",outFile);
}
catch (IOException e)
{
wdComponentAPI.getMessageManager().reportException(e.getLocalizedMessage(), true);
}
/* Get the URL for the generated image */
String fileURL = "http://localhost:53000/" + "jcaptcha/resources/" + wdContext.currentContextElement().getCaptchaID() + ".jpg";
/* Instead of using hardcoded values for the hostname and
/* Set the image URL to the attribute bound to the image UI element. */
wdContext.currentContextElement().setEncryptedImage(fileURL);
How to retrieve the generated image?:
Everything in the code looks pretty straight forward except for one point. +Why should the image be retrieved using a URL instead of using a plain Image name (outFile.getName()) ?. The answer is simple and I guess all of us know that. By default, WD Runtime does a look-up for the specified 'Image' in the folder '<b>../../../resources/<folder>/<projectName>/Components/<componentName>/</b>', whereas the CAPTCHA image gets generated under the root folder '+'. Then, how to access the images?. Solution: 'Use HTTP Alias '. One may refer Creating an HTTP Alias in WAS for creating the alias (with Alias Name = '' ) used in the code above.

CAPTCHA verification:
'How to check if the user perceived input matches with the generated CAPTCHA?'. You can validate the input, by having the following code in the action handler associated with the Button.
public void onActionverify(com.sap.tc.webdynpro.progmodel.api.IWDCustomEvent wdEvent )
{
//@@begin onActionverify(ServerEvent)
/* Get the User Input code from the input field */
String userResponse = wdContext.currentContextElement().getEnteredText();
try
{
/* Call the service method to check if the user input
Boolean validate = CaptchaServiceSingleton.getInstance().validateResponseForID(wdContext.currentContextElement().getCaptchaID(),userResponse);
if(validate.booleanValue())
{
wdComponentAPI.getMessageManager().reportException("Entered code is correct !!!", true);
}
else
{
wdComponentAPI.getMessageManager().reportException("Entered code is Invalid. Please enter the correct code", true);
/* Blank out the input field */
wdContext.currentContextElement().setEnteredText("");
/* If the entered code is wrong, generate a new Captcha*/
createCaptcha();
}
}
catch (Exception e)
{
wdComponentAPI.getMessageManager().raiseException(e.getLocalizedMessage(), true);
}
//@@end
}
!https://weblogs.sdn.sap.com/weblogs/images/62531/Error.jpg|height=325|alt=image|width=438|src=https:...!
Points to be noted in CAPTCHA generation principles:
A new CAPTCHA has to be generated after every validation. i.e, let`s assume that the user entered code doesn't match the generated code, then, for the immediately next validation session, we can't use/show the same image, as CAPTCHA is destroyed after first validation. An exception (CaptchaServiceException) is thrown when the provided ID is no longer valid (non-existant/ destroyed/expired CAPCTHA). So, in such cases, there is no way to retrieve the response back from the CAPTCHA, as this is the way the JCAPTCHA core security feature has been designed.
store.removeCaptcha(ID);
Further, there is a small pitfall in the CAPTCHA verification rules. The method validateResponseForID(String, Object) returns a case in-sensitive result, i.e, it treats both the LowerCase/UpperCase input character codes as one and the same.
First things first, so, what is a CAPTCHA?, you might ask. Most of us would have come across the band-pass filter like images when we sign up for a new account at Yahoo !.
Yes, you got it right!!!. A CAPTCHA is an automated test that can distinguish between machines and humans. It can generate and grade tests automatically that virtually accepts all humans and rejects all machines.
With bots posing severe threat, there are many instances where WebDynpro applications are exposed to the public for purpose of registration etc,. Under such circumstances, how to retaliate against the spam robots?. Here comes Password as graphic picture on a page to entry and Alexis`[Showing up the generated Image | Re: Read Session ID in WD].
During this attempt to solve the security problem, I got a simple yet effective solution for External Library (another forum post), as a by-product. Though there exists the possibily to work with a A bit of (impractical) scripting for Web Dynpro for this dependency problem, it becomes quite complex (atleast for me) as one would need to work across several DC borders using entity references.
Setting up the platform:
To start with, we need all the required libraries. As JCAPTCHA has built-in references to other open source libraries, let`s get those libraries as well from the links specified below:
</ol>
Extract the zip files (available @ links 1,2,3) to get jars commons-betwixt-0.7.jar, jcaptcha-all-1.0-RC3.jar, commons-collections-3.2.jar and commons-collections-3.2.jar.
Libraries & External Library DC:
In the NWDS, navigate to 'File' --> 'New' --> 'Development Component Project' and choose 'Local Development'. Then, select 'My Components' under 'Local Development' and click 'Next'. You'll get the 'New Development Component' wizard. Fill in the appropriate values (as shown below) and choose 'External Library' as the DC Type and click 'Finish' to create a new Library DC project.
Add the aforementioned jar files to this Library DC by simply copying and pasting them to the 'libraries' folder of the project.
Public Part declaration:
This is the an important step where in we define two public parts (with the same contents <--> libraries), with one of type 'Compilation' and the other of type 'Assembly' (In other words, one for Build-Time and another for Runtime). So, first, select one of the newly added jar files (under the Library Project --> 'libraries' folder) say, commons-betwixt-0.7.jar and right click to choose 'Development Component' --> 'Add to Public Part' from the context menu.
PP - Compilation:
In the 'Add Public Part' wizard, specify a valid name (see to it that the option 'Provides an API for developing/compiling other DCs' is checked!) and click 'Finish' to create a public part of type 'Compilation'.
PP - Assembly:
Now, right click the same jar file commons-betwixt-0.7.jar, and choose 'Development Component' --> 'Add to Public Part'. In the 'Pulic Part Editor' window, click 'New' to create a new public part of type 'Assembly' by selecting the option 'Can be packaged into other build results (e.g. SDAs)'.
Similarly, add the other three jar files to the same public parts by repeating the following steps seperately for each jar file:
- Right click the jar and select 'Development Component' --> 'Add to Public Part' --> ExternalLibCompilation
- Right click the same jar and select 'Development Component' --> 'Add to Public Part' --> ExternalLibAssembly
Finally do a DC build by choosing 'Development Component' --> 'Build' in the right click context menu of the Library project. Now the public parts are ready with us and we may proceed further to see how these libraries (contained in the public parts) could be accessed from a WD DC.
WebDynpro DC & DC usage relations:
Create a WebDynpro DC (by following the same steps mentioned for External Library creation, except that the DC Type should be chosen as 'WebDynpro') and add both the External Library public parts to the WD DC as used DCs. Care must be taken to ensure that only the 'Build Time' dependency is established. Hint: One need not manipulate the dependency types as we already have two pulic parts: one each for 'Runtime' and 'Build Time'. Here are the steps to add the DC usage relations.
Choose 'DC Metadata' under your WD DC and navigate to 'DC Definition' --> 'Used DCs'. Right click 'Used DCs' to add the DC usage relations. In the 'Add Dependency' wizard, choose 'Local Development' --> 'My Components' --> 'jcaptcha/jars' --> 'Public Parts'. Select both the pulic parts ExternalLibCompilation and ExternalLibAssembly and check the dependency type 'Build Time', and click 'Finish'.
Finally, 'Build' the WD DC, so that all the declared dependency relationships gets well established. Thus far we've seen the approach for solving the problems related to the usage of External Library DCs.
Caveat confector:
One should always remember this significant and valid point: 'Use ONLY DC Builds to create the deployable archive if you work with assembly public parts.'. Let me explain this clearly. We have added a public part of type 'Assembly' to the WD DC and hence, the local create archive options are not supported. So, never use the function 'Create archive' or 'Deploy new archive and run' while working with 'Assembly' type public parts. Instead, always use the DC 'Build', after that DC 'Deploy' and then simply 'Run' the WD application.
Implementing JCAPTCHA/WD Application
Having discussed in detail, the procedure for invoking JCAPTCHA libraries from the WD DC, let`s dive into the actual application itself. Developing the application is very simple. In the WebDynpro perspective, switch to the 'Navigator' tab. Select the WD project and go to the folder 'src' to create a new logical folder structure 'com.jcaptcha.util'. Add a new java class 'CaptchaServiceSingleton.java' under that and add the following code to it for instantiating a singleton captcha service.
public class CaptchaServiceSingleton
{
 /* Instantiate a Singleton CaptchaService */
 private static ImageCaptchaService instance = new DefaultManageableImageCaptchaService();

 public static ImageCaptchaService getInstance()
 {
 return instance;
 }
}
Go back to 'WebDynpro Explorer' to create a Label, (for specifying a short text) Inputfield, (to take the user perceived input based on the CAPTCHA), an Image UI element (for displaying the generated image) and a Button (for verifying the CAPTCHA</b>) in the view. Add a method called createCaptcha() and invoke it from the wdDoInit() of the view.
Code for createCaptcha()
/* Specify a Captcha ID that will identify the generated
- captcha. Note that same Captcha ID must be used to
- validate the response as well .
- So, the request hashcode is a good candidate!.
- As an alternative, the standard java 'Random.nextLong()'
- can also be used as the Captcha ID.
wdContext.currentContextElement().setCaptchaID( WDProtocolAdapter.getProtocolAdapter().getRequestObject().hashCode()+ "");
/* Get the challenge for the specified ID */
BufferedImage image = CaptchaServiceSingleton.getInstance().getImageChallengeForID( wdContext.currentContextElement().getCaptchaID(), WDClientUser.getLoggedInClientUser().getLocale());
/* Create a new file for storing the image */
File outFile = new File( wdContext.currentContextElement().getCaptchaID() + ".jpg");
try
{
/* Write the image to the created file */
ImageIO.write( image, "jpg",outFile);
}
catch (IOException e)
{
wdComponentAPI.getMessageManager().reportException(e.getLocalizedMessage(), true);
}
/* Get the URL for the generated image */
String fileURL = "http://localhost:53000/" + "jcaptcha/resources/" + wdContext.currentContextElement().getCaptchaID() + ".jpg";
/* Instead of using hardcoded values for the hostname and
- port, you may use the WebDynpro service TaskBinder
- to get the hostname and the port
/* Set the image URL to the attribute bound to the image UI element. */
wdContext.currentContextElement().setEncryptedImage(fileURL);
How to retrieve the generated image?:
Everything in the code looks pretty straight forward except for one point. +Why should the image be retrieved using a URL instead of using a plain Image name (outFile.getName()) ?. The answer is simple and I guess all of us know that. By default, WD Runtime does a look-up for the specified 'Image' in the folder '<b>../../../resources/<folder>/<projectName>/Components/<componentName>/</b>', whereas the CAPTCHA image gets generated under the root folder '+'. Then, how to access the images?. Solution: 'Use HTTP Alias '. One may refer Creating an HTTP Alias in WAS for creating the alias (with Alias Name = '' ) used in the code above.
CAPTCHA verification:
'How to check if the user perceived input matches with the generated CAPTCHA?'. You can validate the input, by having the following code in the action handler associated with the Button.
public void onActionverify(com.sap.tc.webdynpro.progmodel.api.IWDCustomEvent wdEvent )
{
//@@begin onActionverify(ServerEvent)
/* Get the User Input code from the input field */
String userResponse = wdContext.currentContextElement().getEnteredText();
try
{
/* Call the service method to check if the user input
- matches the generated code. Remember that for validation,
- we need to use the same Captcha ID (that we specified
- during Captcha creation)
Boolean validate = CaptchaServiceSingleton.getInstance().validateResponseForID(wdContext.currentContextElement().getCaptchaID(),userResponse);
if(validate.booleanValue())
{
wdComponentAPI.getMessageManager().reportException("Entered code is correct !!!", true);
}
else
{
wdComponentAPI.getMessageManager().reportException("Entered code is Invalid. Please enter the correct code", true);
/* Blank out the input field */
wdContext.currentContextElement().setEnteredText("");
/* If the entered code is wrong, generate a new Captcha*/
createCaptcha();
}
}
catch (Exception e)
{
wdComponentAPI.getMessageManager().raiseException(e.getLocalizedMessage(), true);
}
//@@end
}
!https://weblogs.sdn.sap.com/weblogs/images/62531/Error.jpg|height=325|alt=image|width=438|src=https:...!
Points to be noted in CAPTCHA generation principles:
A new CAPTCHA has to be generated after every validation. i.e, let`s assume that the user entered code doesn't match the generated code, then, for the immediately next validation session, we can't use/show the same image, as CAPTCHA is destroyed after first validation. An exception (CaptchaServiceException) is thrown when the provided ID is no longer valid (non-existant/ destroyed/expired CAPCTHA). So, in such cases, there is no way to retrieve the response back from the CAPTCHA, as this is the way the JCAPTCHA core security feature has been designed.
public Boolean validateResponseForID(String ID, Object response)throws CaptchaServiceException
 {
 if (!store.hasCaptcha(ID))
 {
 throw new CaptchaServiceException("Invalid ID, could not validate!");
}
 else
 {
 Boolean valid = store.getCaptcha(ID).validateResponse(response);
store.removeCaptcha(ID);
 return valid;
 }
 }
Further, there is a small pitfall in the CAPTCHA verification rules. The method validateResponseForID(String, Object) returns a case in-sensitive result, i.e, it treats both the LowerCase/UpperCase input character codes as one and the same.
15 Comments
Related Content
- Building Resilient Applications using SAP Cloud Application Programming Model (SAP CAP) in Technology Blogs by SAP
- Reviving the Art of Manual Correspondence in SAP TRM in Financial Management Blogs by SAP
- MDG DQM: Troubleshooting DQM validation rules for central governance - Product Master S/4 HANA in Technology Blogs by Members
- Exploring SAP Secure Login Service for SAP GUI: A Comprehensive Review in Technology Blogs by Members
- SAP Analytics Cloud Top Contributors Challenge – Results in Technology Blogs by SAP