
- SAP Community
- Products and Technology
- Technology
- Technology Blogs by SAP
- Using ABAP OO attributes in workflows and tasks
Technology Blogs by SAP
Learn how to extend and personalize SAP applications. Follow the SAP technology blog for insights into SAP BTP, ABAP, SAP Analytics Cloud, SAP HANA, and more.
Turn on suggestions
Auto-suggest helps you quickly narrow down your search results by suggesting possible matches as you type.
Showing results for
Product and Topic Expert
Options
- Subscribe to RSS Feed
- Mark as New
- Mark as Read
- Bookmark
- Subscribe
- Printer Friendly Page
- Report Inappropriate Content
08-21-2006
6:14 PM
How do I know I'm ready for this?
This is number 5 in a series of blogs on ABAP OO for workflow, so you it would be a really good idea to make sure you have worked through the first 4 blogs. The examples we'll use here continue on from those we used in the earlier blogs.
Here's the list of the earlier blogs:
- Why use ABAP OO with Workflow?
- Getting started with ABAP OO for Workflow ... using the IF_WORKFLOW interface
- Using ABAP OO methods in Workflow Tasks
- Raising ABAP OO events for workflow
A little background history for those who know BOR
VERY HELPFUL TIP! If you are an ABAP OO programmer and never did any code in the Business Object Repository, skip this section... you don't need to know about it, and you probably don't want to know either.
Once upon a time, in the land of BOR (Business Object Repository), there were 3 types of attributes:
- Database attributes
- Virtual attributes
- Status attributes
Database attributes were always the easiest of attributes - just say what table and field you want to read and the BOR would generate some code to read all the data from a record of the table. You just had to fill in the blanks. Then you could add other database attributes referring to the same table and they would all use the same pre-generated code. Easy for workflow devlopers, but not always the most efficient way to read code, as you may only be using one or two fields but you still read the entire table row.
Virtual attributes were the most useful type of attribute as you could derive anything here including complex values, structures, tables, and instances of other objects.
Status attributes were a neat trick for business objects that used SAP status management, but most programmers didn't even know they existed. By using a special interface, and filling in the code behind a few predefined virtual attributes, you could then generate a yes/no flag to indicate if a particular status of that object was active.
In ABAP OO we no longer make the distinctions between these different types of attributes. So what do you lose? No more pre-generated code. And what do you gain? Flexibility and control over how your attributes are coded so that you can make the code as performance-efficient as possible.
Tip! Wanting to find whether a status attribute is set or not? Just call function module STATUS_OBJECT_READ with the status object number. All the statuses set for that object will be returned.
How do I define ABAP OO attributes for workflow?
Simple - just define them on the attributes tab of the ABAP OO Class. You need to specify:
- Attribute id
- Instance or Static or Constant
- Data type
Don't forget to make the attributes Public so they can be used by workflow. You can also specify a description and an initial value if you wish. In the example below a number of attributes have been added to the ZCL_PLANT class we have been using in the previous blogs to give you an idea.

Hint! If you don't want outside programs to be able to change your attribute it's also a good idea to mark it as Read Only. I like to do this for safety's sake.
Can I have attributes that are structures or tables?
Of course - the data type of your attribute just needs to be a structure or table type. There's no restriction on the complexity of the structure or table - and in SAP NetWeaver 6.20 and above, being able to handle components of structures and tables in workflow is much easier - especially during binding (parameter passing).
Can I have attributes that are objects themselves?
Of course - the data type of your attribute just needs to be a TYPE REF TO the appropriate ABAP OO class. You can then refer to attributes of objects that are attributes of another object. While there's no set limit on how many levels down you can go, most workflow developers don't like to delve too deep - because the technical ids become very long and unwieldy. As a general practice if I want to go down further levels, I usually create a workflow container element for the object reference, then use a Container Operation step (a simple assignment step - which behaves something like an ABAP MOVE command) to assign the attribute-which-is-an-object-reference to the container element at runtime. I can then easily refer to attributes of the container element in subsequent steps of the workflow.
Can I have attributes that are BOR objects themselves?
Of course - but this is a little more involved so it's a separate blog topic for later in this blog series.
So where do I put the attribute code?
This is very straightforward. As a rule of thumb you put the attribute code of instance attributes in the CONSTRUCTOR method, and the attribute code of static attributes in the CLASS_CONSTRUCTOR method. Like this:
METHOD constructor . * Filling our key attribute from a parameter * as we did in the previous blogs me->plant = iv_plant. * Now add some code to supply values to other attributes SELECT SINGLE * FROM T001W INTO me->T001W WHERE WERKS = iv_plant. category = me->T001w-vlfkz. description = me->T001w-name1. CONCATENATE me->plant me->description INTO me->longdesc. ENDMETHOD.If you don't want to use the CONSTRUCTOR or CLASS_CONSTRUCTOR method that's ok. You can always code a separate Public method to derive your attributes, but it does mean you add the overhead of calling that method (as a background task) prior to using the derived attributes in your workflow. I don't personally recommend this approach in 6.40 or above, but in 6.20 it's a way of getting around the lack of functional methods (more on these later).
Tip: You can also use private methods as a way of modularizing code within your CONSTRUCTOR or CLASS_CONSTRUCTOR method.
Using ABAP OO attributes in tasks
For the sake of those of you who don't do a lot of workflow, before you use an attribute of an object, you must first have an object reference in the container (i.e. the data area of your task). Often the object reference is created automatically for you, e.g. an object reference with techncial id _WI_Objectid is automatically created when you assign your ABAP OO Class to the task on the Basic Data tab.
You can also create your own additional object references in the container quite easily. Go to transaction PFTC_CHG, open your "Display Plant" task from blog 3. Go to the Container tab. Press the Create Element button. Give your container element a technical name, description, data type, and make sure you mark it as Importing - so that you can pass some data into it later when you test it. You should see something like the example below in your "Display Plant" task from the previous blogs.

You can use an attribute in the Work item text on the Basic Data tab. Just position your cursor where you want the attribute to be inserted, press the Insert Variables button just about the work item text, and use the expression help to expand and click on the appropriate attribute. You can see the expression help below.

You see below why it is important to use the expression help as the attribute needs to be returned in a specific format.

Of course it only makes sense to use simple value attributes here as you only have about 50-70 characters of text that will show as the subject line of your work item in the inbox (depending on which inbox you use).
You can also use attributes in the Long text of your work item. Go to the Description tab, make sure Task Description is selected and press the Change Description button. Position your cursor where you want the attribute to go. Use the menu option Insert -> Expression to bring up the expression help. Then just expand the expressions and select the appropriate attribute. The end result should look something like this:

Note: If you use complex attributes here you may be asked for more details - such as whether you want each row of a table attribute to appear as a separate line of text at runtime.
Now just test your workflow as we did in the previous blogs. In your inbox you should see that the inserted expressions have been replaced by actual values, such as the plant id and description.
Using ABAP OO attributes in workflows
Just as with tasks, before you use an attribute of an object ion a workflow, you must first have an object reference in the container (i.e. the data area of your workflow). Often the object reference is created automatically for you, e.g. when you added your "Display Plant" task to your workflow a container element was automatically created based on the ABAP OO Class used in the "Display Plant" task.
You can also create your own additional object references in the container quite easily. In the bottom left hand pane of the Workflow Builder (transaction SWDD), use the drop down to display the Workflow Container tray. Double-click on the line Double-click to Create. Give your container element a technical name, description, and data type. As we mentioned above, you should already have an appropriate container element in your workflow container that looks something like this:

Tip: You only need to mark it as Importing if you are going to pass some data into this element as you start the workflow - if you are just going to use it to hold data between steps of the workflow it doesn't need to be importing or exporting.
You can use ABAP OO attributes in any of the control steps in a workflow such as a Container Operation, Loop Until, Multiple Condition, User Decision, etc. Just as with tasks, any time you want to reference an attribute of your ABAP OO Class you simply use the expression help to expand and select the appropriate attribute.
To try this out, add a user decision step as the final step in the workflow we created in the previous blog. In the workflow builder flowchart, right-click on the "Workflow Completed" step and you will be presented with a list of step types. Choose the User Decision step type (this is a simple question/answer step). On the Decision page set up the title, outcomes and agents as shown below. Use the drop down help next to Parameter 1to select an appropriate attribute of your plant class.
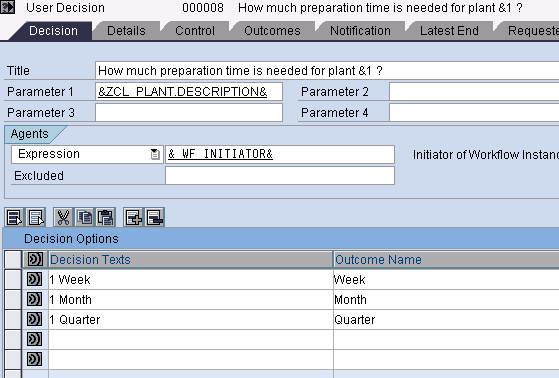
Note: The attribute will replace the &1 placeholder in the title.
Transfer the step back to the flowchart by pressing the green tick. Activate your workflow and test it again. Now after viewing your plant you should be presented with a second work item giving the question and answers you created in your decision step and with the plant attribute given a runtime value.
How do I pass attributes as parameters and handle narrowing cast?
There's one other place where you can use ABAP OO attributes in workflow, Bindings, i.e. the workflow term for parameter passing. Open your workflow again in the workflow builder (transaction SWDD), and drill down on your "Display Plant" task, then press the "Binding (Exists)" button immediately below the Task and Step Name fields. You should see a window appear that looks something like this.
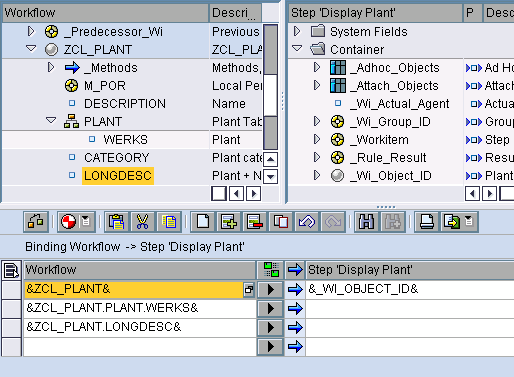
In the top panes of the window the workflow and task containers are shown. Down below are the bindings from workflow to task, and from task to workflow (the arrows show you which direction is being used). In the image above you can see I've expanded the plant class and dragged and dropped some attributes of the plant class into the binding. Of course each workflow container element on the workflow side needs to be matched to a task container element on the task side - so the above binding is not complete. I'm missing is a suitable container element (aka parameter) in the task to pass it to. Which I could easily create in the task as described earlier in this blog.
What about if your attribute is a reference to another ABAP OO Class? Can you pass it to a more generic or more specific class reference? Yes of course. Look closely at the binding window again. Between the workflow container element and the task container element it has been assigned to you will see a blue arrow (giving the binding direction) and a button with a filled in arrowhead on it. Press the button and you should see a window like this.

If you want to pass an ABAP OO Class reference to a more generic reference (widening cast) you don't have to even look at this window. But if you want to pass an ABAP OO Class reference to a more specific reference (narrowing cast), all you have to do is check the Handle Errors as Warning checkbox and you will pass your class without problem. Of course it's still up to you to make sure the two references are compatible.
But what about the performance implications of calculated attributes?
I know some of you are well aware that just because you might need an attribute for one particular task or scenario doesn't mean you want to code it in a CONSTRUCTOR method. Particularly if that attribute is resource intensive. So what's the best way to handle this scenario? Functional methods - which of course are the topic of the next blog.
- SAP Managed Tags:
- SAP Business Workflow
12 Comments
You must be a registered user to add a comment. If you've already registered, sign in. Otherwise, register and sign in.
Labels in this area
-
ABAP CDS Views - CDC (Change Data Capture)
2 -
AI
1 -
Analyze Workload Data
1 -
BTP
1 -
Business and IT Integration
2 -
Business application stu
1 -
Business Technology Platform
1 -
Business Trends
1,661 -
Business Trends
87 -
CAP
1 -
cf
1 -
Cloud Foundry
1 -
Confluent
1 -
Customer COE Basics and Fundamentals
1 -
Customer COE Latest and Greatest
3 -
Customer Data Browser app
1 -
Data Analysis Tool
1 -
data migration
1 -
data transfer
1 -
Datasphere
2 -
Event Information
1,400 -
Event Information
64 -
Expert
1 -
Expert Insights
178 -
Expert Insights
274 -
General
1 -
Google cloud
1 -
Google Next'24
1 -
Kafka
1 -
Life at SAP
784 -
Life at SAP
11 -
Migrate your Data App
1 -
MTA
1 -
Network Performance Analysis
1 -
NodeJS
1 -
PDF
1 -
POC
1 -
Product Updates
4,577 -
Product Updates
329 -
Replication Flow
1 -
RisewithSAP
1 -
SAP BTP
1 -
SAP BTP Cloud Foundry
1 -
SAP Cloud ALM
1 -
SAP Cloud Application Programming Model
1 -
SAP Datasphere
2 -
SAP S4HANA Cloud
1 -
SAP S4HANA Migration Cockpit
1 -
Technology Updates
6,886 -
Technology Updates
407 -
Workload Fluctuations
1
Related Content
- SAP HANA Cloud Vector Engine: Quick FAQ Reference in Technology Blogs by SAP
- Empowering Retail Business with a Seamless Data Migration to SAP S/4HANA in Technology Blogs by Members
- New features for Documents in SAP Cloud ALM in Technology Blogs by SAP
- Trigger a process in SAP Build Process Automation from SAP Build Apps without using API [Sneak Peek] in Technology Blogs by SAP
- Add Custom attribute value on top of Task in Signavio in Technology Q&A
Top kudoed authors
| User | Count |
|---|---|
| 13 | |
| 10 | |
| 10 | |
| 7 | |
| 7 | |
| 6 | |
| 5 | |
| 5 | |
| 5 | |
| 4 |