
- SAP Community
- Products and Technology
- Additional Blogs by SAP
- Message Splitting Using the Graphical Mapping Tool
Additional Blogs by SAP
Turn on suggestions
Auto-suggest helps you quickly narrow down your search results by suggesting possible matches as you type.
Showing results for
claus_wallacher
Active Participant
Options
- Subscribe to RSS Feed
- Mark as New
- Mark as Read
- Bookmark
- Subscribe
- Printer Friendly Page
- Report Inappropriate Content
06-29-2006
8:24 PM
1 The Problem
We receive one big file (for example containing purchase orders or accounting documents) with thousands of line items and need to map them to another interface that only allows a certain number of line items per document. To make matters more complicated, we can assume that our source file also allows multiple documents within the file while the target file requires separate messages for each document.
As of SP14 of XI 3.0 it is possible to create 1:n mappings for message splits (as long as the adapter is part of the adapter engine), which allows us to tackle this problem using the graphical mapping tool. The use of 1:n mappings also is the answer you usually get for this type of problems, but there is much more to consider once you really drill down into the problem. This weblog tries to give you an answer on how to solve this problem in all details using the graphical mapping tool. On a high level we need to take care of the following issues:
- Allow the creation of multiple messages out of one source message (1:n mapping)
- Split the source message into separate messages for each document contained in the source message
- Split the source message into separate messages if the number of line items exceeds a predefined number
Since it is always easier to describe a solution in form of an example we use one example that addresses all the issues mentioned above.
2 An Example
In our example we receive a source message containing purchase orders in a flat format and where this message can contain multiple purchase orders with an unlimited number of line items.
The target structure is limited to one purchase order per document and also limited to a maximum number of line items per message.
2.1 The Source Message
The structure of the source message is defined as in the following picture:

We use the following message as an input for our mapping example:
<Source>
<Line>
<PONumber>490000</PONumber>
<Item>010</Item>
<Material>Bread</Material>
</Line>
<Line>
<PONumber>490000</PONumber>
<Item>020</Item>
<Material>Cheese</Material>
</Line>
<Line>
<PONumber>490001</PONumber>
<Item>011</Item>
<Material>Water</Material>
</Line>
<Line>
<PONumber>490001</PONumber>
<Item>021</Item>
<Material>Beer</Material>
</Line>
<Line>
<PONumber>490001</PONumber>
<Item>031</Item>
<Material>Wine</Material>
</Line>
<Line>
<PONumber>490001</PONumber>
<Item>041</Item>
<Material>Juice</Material>
</Line>
</Source>
2.2 The Target Messages
The structure of the target message is defined as in the following picture:

3  The Solution
To solve this problem for our specific example we need to take care of two issues:
- The message needs to be set up for a message split. That means that we need to allow the creation of multiple target messages out of one source message.
- The field mappings need to be defined in such a way that the message split takes place at the correct places and that the correct information is transferred to the target messages.
3.1  The Message Split
To allow the message split, the occurrence of the complete target message need to be changed. This can be done via the following steps (we assume that the basic message mapping - but not yet the mappings of the fields - has been created already):
- Within the message mapping go to the tab Messages.
- Change the occurrence of the target message to 0..unbounded.

- Save the changes.
3.2  The Field Mappings
We need to define a field mapping for the following fields (as shown in the picture below). The nodes Messages and Message1 have been added to the structure because of the message split.
 </p>
</p>
3.2.1  Mapping for PurchaseOrder
Since we allow multiple occurrences of the target message due to the message split we have to create a mapping for the structure PurchaseOrder itself.
We need to create new PurchaseOrder messages based on the conditions A and B defined above. Let's first have a look at the mapping and then let's try to understand how the mapping is dealing with these two conditions.

The following values need to be adjusted in this mapping:
- For field PONumber the context needs to be set to Source.
- For both occurrences of the function SplitByValue
the property Insert context change after needs to be set to Value changed.
- The properties of the function index need to be set to
Initial Value needs to be set to 0.
Increment needs to be set to 1.
Count indices in needs to be set to context.
The property Value of the function constant needs to be set to 3 (the maximum number of line items allowed in the document).
In our example we need to create 3 target documents based on the rules A and B from above. Now let's check how these rules are being applied in the mapping for this segment.

The mapping circled in red checks the condition A. Using the function SplitByValue a context change is created each time a new purchase order number occurs. This context change can be utilized later in this mapping to ensure the creation of a new document for each purchase order number.
The mapping circled in blue checks for condition B in the following way:
- With the function index the number of occurrences of each purchase order number is counted.
- With the function div we divide the actual counter by the maximum number of allowed line items with the result that each time the maximum number of line items is exceeded the calculated number jumps to the next full integer.
- With the function floor we eliminate the fraction of each calculated number. This way we prepare the output for the correct creation of context changes.
- With the function SplitByValue we create a context change each time the number in the output changes (i.e. each time the maximum number of line items was reached).
As the final step we need to take advantage of the context changes we created based on conditions A and B and eliminate all duplicates within one context. This can be done using the function collapseContext (see the picture below).
 </p>
</p>
3.2.2  Mapping for PurchaseOrderNumber
For each message that is created we need to provide the correct purchase order number. Again, let's first have a look at the complete mapping and then let's try to understand how this mapping gives us the proper purchase order number (the picture below is hard to read but you can see the complete mapping in the next two pictures as well).

The following values need to be adjusted in this mapping:
- For field PONumber the context needs to be set to Source.
- For the first two occurrences of the function SplitByValue
the property Insert context change after needs to be set to Value changed.
- For the last occurrence of the function SplitByValue
the property Insert context change after needs to be set to Each value.
- The properties of the function index need to be set to
Initial Value needs to be set to 0.
Increment needs to be set to 1.
Count indices in needs to be set to context.
The property Value of the function constant needs to be set to 3 (the maximum number of line items allowed in the document).
Now let's try to understand what this mapping does. Analogue to the mapping for the previous segment we need to determine the correct number of occurrences of the target message based on conditions A and B, but in this case we also need to determine the correct purchase order number for each occurrence.

The first part of the mapping (circled in blue) is identical to the first part of the mapping for the segment PurchaseOrder and results in the output as shown in the picture above.
The second part of the mapping ensures that the correct purchase order number is placed in the right position using the following steps:
- The function formatByExample takes the list of purchase order numbers and creates a context change based on the second input list (that already contains context changes based on conditions A and B).
- The function collapseContext eliminates all duplicates within one context since the purchase order number occurs only once per message.
- The function splitByValue adds the required context changes to the shortened list.
The result of these mappings can be seen in the picture below.
 </p>
</p>
3.2.3  Mapping for LineItem
For each PurchaseOrder message we need to ensure that the correct number of line items is being created. The mapping for the segment LineItem is almost identical to the mapping for the message PurchaseOrder, therefore we can utilize most of the mapping used for PurchaseOrder.
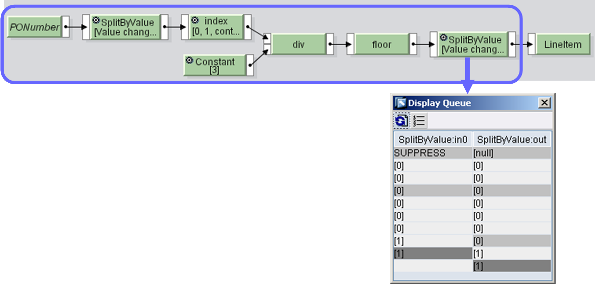
The following values need to be adjusted in this mapping:
- For field PONumber the context needs to be set to Source.
- For both occurrences of the function SplitByValue
the property Insert context change after needs to be set to Value changed.
- The properties of the function index need to be set to
Initial Value needs to be set to 0.
Increment needs to be set to 1.
Count indices in needs to be set to context.
The property Value of the function constant needs to be set to 3 (the maximum number of line items allowed in the document).
The part of the mapping circled in blue is identical to the first portion of the mapping for the message PurchaseOrder. If we look at the result of the mapping we see that we have within each context the correct number of line items listed. Therefore the mapping is already complete and no further manipulation is necessary.
3.2.4  Mapping for ItemNumber
The mapping for the field ItemNumber is trivial and simply looks as follows:
![]()
For the example used in this weblog the queue for this field then looks as follows:
 </p>
</p>
3.2.5  Mapping for Material
The mapping for the field Material is analogue to the mapping for the field ItemNumber.
4  Appendix
Some of the mappings described above use the arithmetic functions div and floor. Since the accuracy of arithmetic function can become an issue for large numbers, it is possible to replace these arithmetic functions with an advanced user defined function that we call limitLineNumber. This functions requires 2 input strings as shown in the picture below:

The coding for this user defined function looks as follows:
This new function limitLineNumber checks for condition B and can replace the check for this condition used in the mappings so far.
For example, the mapping for segment PurchaseOrder now looks as follows (using the new user defined function):

As we can see the complete block that have been circled in the original mapping as the part that checks for condition B can be replaced by this single user defined functions and returns the same result.
Similar we can use the user defined function limitLineNumber in the mappings for the other fields and segments as well.
10 Comments
Related Content
- Portfolio Management – Enhanced Financial Planning integration in Enterprise Resource Planning Blogs by SAP
- SAP Datasphere: Using Variable derivation for currency conversion measures within Analytic Model in Technology Blogs by SAP
- Same Mapping Different WSDL in Technology Q&A
- SAP Datasphere - Space, Data Integration, and Data Modeling Best Practices in Technology Blogs by SAP
- What’s New in SAP HANA Cloud – March 2024 in Technology Blogs by SAP