
- SAP Community
- Products and Technology
- Additional Blogs by SAP
- B2B Configuration (Part II) - Creating the configu...
Additional Blogs by SAP
Turn on suggestions
Auto-suggest helps you quickly narrow down your search results by suggesting possible matches as you type.
Showing results for
shailesh_mane
Participant
Options
- Subscribe to RSS Feed
- Mark as New
- Mark as Read
- Bookmark
- Subscribe
- Printer Friendly Page
- Report Inappropriate Content
06-29-2006
8:25 PM
Now that we have created the Integration Scenario (as described in B2B Configuration (Part I) - Creating an "Integration Scenario" of the weblog) we are ready to create the configuration in the Integration Repository. So the next step is to first login to the Integration Repository.
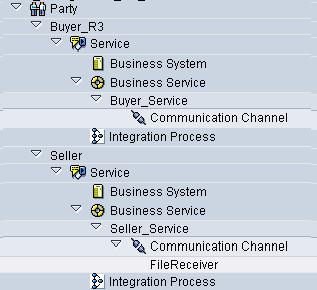
- Create Parties, Communication Channels and Business System Service: Before we can use the automated tool for generating the configuration, we have to create parties for the Buyer and Seller in XI and also create the necessary communication channels. Let us first create the following parties:
- Parties
- Party Buyer_R3 for the Buyer who has the R/3 backend system.
- Party Seller for the Seller party.

- Communication Channels
- A Communication Channel needs to be setup in order to be able to send messages to external parties. The type of the channel may vary according to the partners and also depending on the Industry Standard being used for communication. Thus I cannot cover the communication channel setup in detail here in this weblog.
- Many Industry Standards provide guidelines for setting up Communication Channel templates. If such a template has been defined then it could be defined in the Integration Scenario definition in the Integration Repository. The channel template could then be used by the automatic configuration tool to generate a basic communication channel.
- There is no need for setting up a communication channel in order to send messages from an SAP system to SAP XI. Note: However, in case your scenario is sending messages from SAP XI to a SAP backend system then an appropriate communication channel is needed e.g. IDoc channel, RFC channel etc.
- For my scenario I am using File Adapter to receive the messages. Thus I created a communication channel File Receiver which will receive my XML messages in a folder on the server where the File Adapter is running.
- Business System Service
- Business Service needs to be created for your backend system. E.g. For my backend system QW8 client 100 I have a Business System Service created QW8_100.
- Parties
- The next step is to use the automated tool to create the configuration. Execute the automated tool using the menu path: Tools -> Transfer Integration Scenario from Integration Repository as shown below.

- Select the Integration Scenario that you had created in the Integration Repository. The Integration Scenario Configurator window displays your Integration Scenario. Now we have to assign the corresponding parties and the communication channels in order to generate the configuration. Let us start by assigning the parties.

- Services for Buyer: Double click on the Buyer R/3 in order to display the Assign Services to Application Component popup window. As we can see from the tabs on this popup window, we have to create :
- Business System Services for A2A, and
- Business Services for B2B.

Create Business Service for B2B: By selecting the Create button you could create the Business Service for B2B service for the party Buyer_R3 the Service as Buyer_Service and the corresponding Business System as defined in the A2A tab. Please note that if such a service already exists then you could just reuse the service. The figure below shows the sample values for the B2B tab

- Services for the Seller: Similarly create the Business Service for the Seller. Note that the seller only has Business Service for B2B. The figure below shows the sample values.

- Next step is to add the Communication Channel. Double-click on Configure Connections or on the line connecting the two actions. Here you need to assign the communication channel that will be used to send the message to the partner. For my scenario I am using File Adapter.
- The final step in the automated tool is the Generate step. You could generate the configuration in the Generation Simulation mode if you want to see if any possible errors that may arise during actual generation. If everything seems ok in the simulation mode then you could proceed with the Generation mode in order to generate the configuration.

- You are now done with the Configuration. Review the generated configuration and Activate your changes. You can now send messages from the R/3 backend to your partners. A simple way to test the scenario is as below:
- Send the IDoc from the backend system (using transaction WE19) to SAP XI.
- In XI you could use the monitoring transaction (SXMB_MONI) to see if any errors occurred in routing the message or during mapping.
- If everything is ok in XI then you could then verify if the message was sent successfully sent to your partner. For my case since I am using File Adapter as my partner system and thus I can check in the receiving folder if the XML payload is received.
3 Comments
Related Content
- New 1H 2024 SAP Successfactors Time (Tracking) Features in Human Capital Management Blogs by SAP
- Mileage Rate- UK in Spend Management Q&A
- License Type Configuration Vs. Item Category in Enterprise Resource Planning Q&A
- Advanced Shipping and Receiving Simplifying the Connectivity in Supply Chain Management Blogs by Members
- Post payload to CPI iFlow from UI5 - Internal Server Error in Technology Q&A