
- SAP Community
- Products and Technology
- Additional Blogs by SAP
- BSP Custom Elements: Open Source JavaScript Part 3
Additional Blogs by SAP
Turn on suggestions
Auto-suggest helps you quickly narrow down your search results by suggesting possible matches as you type.
Showing results for
Developer Advocate
Options
- Subscribe to RSS Feed
- Mark as New
- Mark as Read
- Bookmark
- Subscribe
- Printer Friendly Page
- Report Inappropriate Content
01-06-2005
11:12 AM
Introduction
Welcome to Part 3 of our look at adapting general JavaScript elements to be BSP Custom Elements. In [Part 1 | https://www.sdn.sap.com/irj/sdn/weblogs?
blog=/pub/wlg/1104] we looked a simple example that showed the basics of creating our custom bsp element and adapting our JavaScript example to fit that framework. In Part 2 (BSP Custom Elements: Open Source JavaScript Part 2) we took things one step further and had an example that required a JavaScript Include File and more than one BSP element.
In this part we are going to take a walk on the wild side and do something slightly dangerous. We are going to take a SAP Standard BSP element and add to its functionality.The need for today's example came about as I was using someone else's website. I had to enter some text into a textedit box. There was a warning above the textedit box that my input was limited to 200 characters. However as I typed there was no indicator as to how many characters I had already used. I typed along, lost in thought and oblivious to how many characters I had already consumed. Then mid-thought I of course hit the limit on the number of characters. I was frustrated because I then had to restructure my input to match my best guest as to what the limit was. I decided not to aggravate my users in the same way. Therefore I wanted a size limited textEdit box that would show the amount of text that I had remaining. But why write it myself. Chances are that someone had already done the work for me.
The JavaScript
A quick search on Google and I had today's example JavaScript. The original author of the JavaScript is
Ron Jonk, but I found this slightly modified version on Dynamic Drive (http://www.dynamicdrive.com/dynamicindex16/limitinput2.htm). Actually I found several examples of textBoxes with limited input and some visual measurement of how much area still remains. I liked this particular version for a couple of reasons. First I like the visual implementation. I found the percent complete instead of number of characters typed to be more helpful. This particular example also had very good cross-browser support. Finally the way the sample was implemented, fit very nicely with what I wanted to demonstrate in this weblog. The following is a screen shot of this element looks like in action.

The Header Script
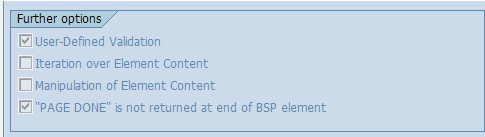
Just like in Part 2 of this weblog we have a JavaScript example that requires code in to different locations (the Document Header and the Body). I have decided to split it into two different BSP elements again. The first one, which I called formFieldprogressHeader, will be used to include the JavaScript functions that will count our number of characters. We will ultimately place this element in our document header.For the element properties, we want to set BSP Elements and Static HTML and only choose "PAGE DONE" is not returned at the end of BSP element. We have no attributes so there is no reason to do any User- Defined Validation.


As far as the coding of our element goes, we will only be redefining the DO_AT_BEGINNING method. Like the coding of our earlier element, we will simply create our HTML and output it using the inherited print_string method. You can see that we are creating one CSS Style and two JavaScript functions.
method if_bsp_element~do_at_beginning . data html type string. concatenate html`
`.progress{`
`width: 1px;`
`height: 14px;`
`color: white;`
`font-size: 12px;`
`overflow: hidden;`
`background-color: navy;`
`padding-left: 5px;`
`}`
``
`
`
/**********************************************
Form Field Progress Bar- By Ron Jonk- http://www.euronet.nl/~jonkr/
Modified by Dynamic Drive for minor changes
Script featured/ available at Dynamic Drive- http://www.dynamicdrive.com
Please keep this notice intact
***********************************************/
`function textCounter(field,counter,maxlimit,linecounter) {`
`if (field != null) {`
* // text width//
`var fieldWidth = parseInt(field.offsetWidth);`
`var charcnt = field.value.length;`
* // trim the extra text
`if (charcnt > maxlimit) {`
`field.value = field.value.substring(0, maxlimit);`
`}`
`else { `
* // progress bar percentage
`var percentage = parseInt(100 - (( maxlimit - charcnt) *
100)/maxlimit) ;`
`document.getElementById(counter).style.width = parseInt
((fieldWidth*percentage)/100)+"px";`
`document.getElementById(counter).innerHTML="Limit:
"+percentage+"%";`
* // color correction on style from CCFFF -> CC0000`
`setcolor(document.getElementById(counter),percentage,"background-
color");`
`}`
`}`
`}`
`function setcolor(obj,percentage,prop){`
`obj.style[prop] = "rgb(80%,"(100-percentage)"%,"+(100-
percentage)+"%)";`
`}`
``
into html.
me->print_string( html ).
clear html.
rc = co_element_done.
endmethod.
*The *Body Script
We are ready to start on the script elements that will appear in the body of our document. What I want to do is modify the existing SAP HTMLB textEdit control and extend it with our new JavaScript functionality. Therefore my BSP element, which I named textEditProgress, will really server as a wrapper for the SAP textEdit.Properties
The BSP element properties are very similar to the header element. However we will have several attributes that we will want to validate so we will activate User-Defined Validation.
Attributes
We are going to take every attribute of the SAP HTMLB textEdit and use them in out element as well. Even if the attributes aren't directly related to our element processing, we want to be able to pass them through to the underlying SAP element. This does mean that if SAP enhances the element that you are wrapping around by adding new attributes, you will have to update your elements as well. Note that once again we are using string types even when the allowed values are integer. We also have the required id attribute so that we can have multiple instances of the same element on the same page. You might also notice that just like the underlying HTMLB element, we marked the text attribute as bindable. We wouldn't want to loose such a nice feature as Model View Binding. Later in the element coding I will point out the code that will be necessary to pass this binding into the inner SAP element.

User Defined Validation
You can see part one of this weblog if you need a refresher on how and why to implement the user defined validation. Most of this validation is copied right from the SAP coding of the HTMLB textEdit element. This allows us to catch problems before they are even passed to the SAP element. You can also see in the example that we have a couple of new types of validation - Enumerators and Boolean checks. There is also a compile time deprecation warning for the font attribute. The following is the code for the two different types of validation.
method if_bsp_element~compile_time_is_valid . validator->warning_deprecated( 'font' ). validator->to_enum( name = 'wrapping' enums = me->c_textedit_wrappings ). validator->to_integer( name = 'cols' ). validator->to_integer( name = 'maxLength' ). validator->to_integer( name = 'rows' ). validator->to_boolean( name = 'disabled' ). valid = validator->m_all_values_valid.endmethod.
method if_bsp_element~runtime_is_valid . if runtime_parms is initial. return. endif. if runtime_parms = '//' or runtime_parms cs 'wrapping'. me->wrapping = m_validator->to_enum( name = 'wrapping' value = me->wrapping enums = me->c_textedit_wrappings ). endif. if runtime_parms = '//' or runtime_parms cs 'cols'. me->cols = m_validator->to_integer( name = 'cols' value = me->cols ). endif. if runtime_parms = '//' or runtime_parms cs 'maxLength'. me->cols = m_validator->to_integer( name = 'maxLength' value = me->maxlength ). endif. if runtime_parms = '//' or runtime_parms cs 'rows'. me->rows = m_validator->to_integer( name = 'rows' value = me->rows ). endif. if runtime_parms = '/*/' or runtime_parms cs 'disabled'. me->disabled = m_validator->to_boolean( name = 'disabled' value = me->disabled ). endif.endmethod.
Coding
The following is the main coding selection of this element. This is where things get interesting. First of all we need to be able to render a SAP HTMLB element inside our own coding. We do this by creating an instance of the HTMLB ABAP class (Cl_HTMLB_TEXTEDIT). Every BSP element is designed to be creatable via code by calling its factory method. This factory method also lets you set values for all the attributes of an element.There are two important aspects that I want to point out about this call to the factory method.
First is the id_postfix. Our element requires a unique ID for itself. Most of SAP elements also require unique IDs. Therefore you might be creating one or more of SAP's elements inside your own. You wouldn't want all the inner elements to necessarily have the same ID. This could lead to many problems. This is why the factory class exposes the id_postfix parameter. When the factory method creates the inner element it will combine the calling elements ID together with what string is in the id_postfix to create a new unique ID.
The second aspect is the use of two text parameters in the factory method call. One is called text and one is called text. This is because we set data binding for this attribute. When you set data binding on a BSP element attribute, the inner classes will always generate two elements. The first unprefixed attribute expects the actual value to be passed to. The underscore attribute is the one that is expecting a data binding string. You can see in my coding I actually pass my text attribute into both. The SAP element is smart enough to try the binding string first. If it a valid reference to a model class is found, it will use this for binding. However if it can't bind, it will fall back to the direct value supplied in the first attribute. This is nice because it simplifies the coding of wrapper elements like this. However it also leads to problems if your binding reference isn't correct. Instead of producing an error, the system simply interprets the binding string as the value you want to display in the BSP element. Because this error isn't caught at compile time or runtime, it has to be found through interactive testing.</p><p>We complete the rendering of our textEdit element with a while/endwhile loop on the mpage_context->element_process. This while loop forms the beginning/ending action of the tag as if it were being used in a view or page. If a BSP element can have inner elements, you would render these elements within this while/endwhile loop.So we have our HTMLB element, but we haven't done anything yet to alter its rendering. We need to add event handlers for onkeydown, onkeyup, and onfocus that will trigger our new JavaScript function. To do this we will use the indispensable BSP Find and Replace element (I have no idea how we would live without this little gem!). This element allows us to change the rendered output mid stream. Therefore we will find the closing brackets of the textEdit element and add on the event handlers. We create the BSP findAndReplace just like we did the textEdit - using the ABAP class (cl_bsp_find_and_replace) and its factory method.
METHOD if_bsp_element~do_at_beginning . DATA html TYPE string. DATA: find TYPE string. DATA: replace TYPE string. find = `">`. CONCATENATE `" onkeydown="textCounter(this,'` me->id `',` me->maxlength `)"` `onkeyup="textCounter(this,'` me->id `',` me->maxlength `)"` `onfocus="textCounter(this,'` me->id `',` me->maxlength `)"` `>` INTO replace.***Create the Find and Replace DATA: find_replace TYPE REF TO cl_bsp_find_and_replace. find_replace ?= cl_bsp_find_and_replace=>factory( find = find replace = replace mode = `FIRST_OCCURRENCE` ).*Render the Find and Replace WHILE m_page_context->element_process( element = find_replace ) = co_element_continue.***Create the Text Edit DATA: textedit TYPE REF TO cl_htmlb_textedit. textedit ?= cl_htmlb_textedit=>factory( id = me->id id_postfix = '_progress' cols = me->cols disabled = me->disabled font = me->font height = me->height rows = me->rows text = me->
text
text = me->text
tooltip = me->tooltip
width = me->width
wrapping = me->wrapping ).
***Render the Text Edit
WHILE m_page_context->element_process( element = textedit ) =
co_element_continue.
ENDWHILE. "End Text Edit Render
ENDWHILE. "End Find and Replace Render
CONCATENATE html
`
`
`
`
`me->maxlength `)`
INTO html.
me->print_string( html ).
CLEAR html.
rc = co_element_done.
ENDMETHOD.
Example<br />The following simple example in a BSP application shows how both the header and the body parts of the elements work together in the same page. You also see how a single header element supports more than one body elements on the same page, as long as they each have a unique ID.</p><p><textarea cols="79" rows="18"><%@page language="abap" %>
<%@extension name="htmlb" prefix="htmlb" %>
<%@extension name="ZKEG" prefix="ZKEG" %>
<htmlb:content design="design2003" >
<htmlb:document>
<htmlb:documentHead>
<ZKEG:formFieldProgressHeader/>
</htmlb:documentHead>
<htmlb:form>
<ZKEG:textEditProgress id = "Text1"
maxLength = "40">
<br>
<ZKEG:textEditProgress id = "Text2"
maxLength = "100">
</htmlb:form>
</htmlb:document>
</htmlb:content>
</textarea></p><p>Your resulting page should look something like this:</p><p>!https://weblogs.sdn.sap.com/weblogs/images/1918/textbox5.jpg|height=343|alt=image|width=406|src=http...!</body>
9 Comments
Related Content
- Empowering Retail Business with a Seamless Data Migration to SAP S/4HANA in Technology Blogs by Members
- Navigation with filters inside a Fiori Elements oData v4 app in Technology Q&A
- Unlocking Full-Stack Potential using SAP build code - Part 1 in Technology Blogs by Members
- SAP Build - create Full-Stack application CAP+FIORI by using Joule. in Technology Blogs by Members
- SAP Build Code - Speed up your development with Generative AI Assistant - Joule in Technology Blogs by SAP