
- SAP Community
- Products and Technology
- Additional Blogs by SAP
- Sending E-Mail from ABAP - Version 610 and Higher ...
Additional Blogs by SAP
Turn on suggestions
Auto-suggest helps you quickly narrow down your search results by suggesting possible matches as you type.
Showing results for
Developer Advocate
Options
- Subscribe to RSS Feed
- Mark as New
- Mark as Read
- Bookmark
- Subscribe
- Printer Friendly Page
- Report Inappropriate Content
09-08-2004
2:13 AM
*Introduction* There seems to be a lot of requests in the forums for tips on how to send E-Mail from ABAP. Based upon these requests, I thought I would pull together some resources and samples on the subject. The setup and samples are quite different on different releases. Yesterday I posted a weblog for releases <=46D that used the API function modules. This weblog focuses on releases 610 and higher. There are many changes in this release. For one there is no longer any reliance on external executables to send the mail. The SAP Kernel now contains native SMTP processing capabilities in the Internet Connection Manager (ICM). Also we have a new ABAP interface that can be used called the Business Communication Services (BCS). All samples came from a 620 system. *Configuration* Before we start with any ABAP coding, we first have to setup and configure a few things. Much of this configuration may have already been completed by your Basis group. *ICM Setup* Unlike in release 46D and lower, we have no external executables to setup. There is no need to configure the Internet Mail Gateway or create any RFC destinations. However there is some setup that needs to be done to the ICM to activate and configure SMTP processing. OSS Note 455140 gives an excellent step-by-step guide to configuring SMTP. I will just give you a quick check list here without going into all the configuration details provided by this note. 1. If you are one release 610 only, you must add the SMTP Plug-In entry in your instance profile. This is not needed as of release 620 because the system is delivered with SMTP as an integrated part of the ICM. 2. In the instance profile, specify the TCP/IP port that SMTP will listen on. Port 25 is the default. 3. If you have multiple clients in your SAP system, you will want to setup a virtual host for each client. 4. Verify in transaction SICF that you have a SMTP node and that it is activated. It should look something like the following:  *SAPConnect* Well we are finished with all the low level setup. Now we need to connect the lowest layer (the ICM) to SAP's middle message layer: SAPConnect. SAPConnect sits between the application layer (such as SAP Office) and the lowest layer hiding all the technical details. All of the SAPConnect monitoring and configuration can be reached from one transaction called SCOT. First SCOT has several different views that can be used. One shows the Jobs that have been setup, the other shows setup by routings, etc. I prefer to start SCOT in System Status View. This shows a tree with the communication types, the nodes setup for each type and the number of messages in each status. The following is a screen shot of this view:
 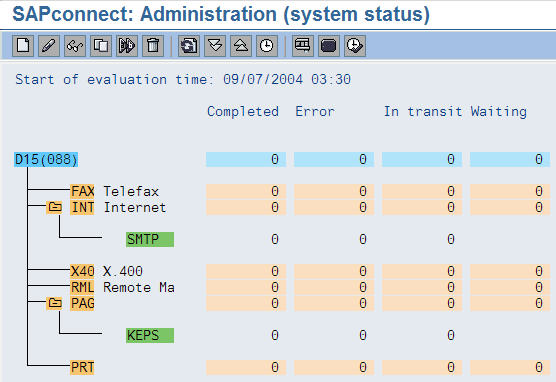 We want to create a new node in SAPConnect for our E-Mail. As of release 46C you have a quite nice Wizard that walks you through the process. However you can also control all settings directly in a dialog maintenance window. This is a screen shot of our Email Node.
 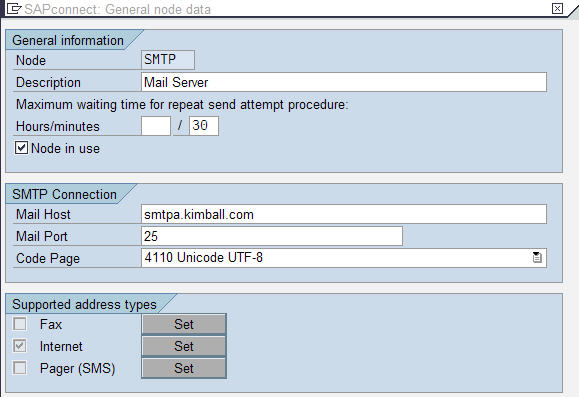 You can see that to setup this node all we have to do is specify the connection information for an external mail server. In our case we give the host name for our Corporate Microsoft Exchange Server. Also at this level we can specify the code page that we want all messages converted to before they are sent. I choose Unicode UTF-8 because we have an MDMP system that contains English, German, Spanish, Thai, and Polish languages. By converting to UTF-8 we get around the problem described in OSS note 331418. You do NOT have to have a Unicode system or kernel to support this functionality. Please refer to OSS Note 633265 for the necessary support package levels for this functionality to be complete. Now lets look at the configuration on our only configured address type: Internet. We don't do any outbound filtering to different nodes. Therefore the address areas is set to the wildcard '*'. To comply with the Unicode setup we have all output formats being converted to PDF as OSS note 633265 suggests.
  Next we need to schedule a job that will transmit out E-mails. Normally E-Mails will only go out when this job runs, so you probably want to schedule it quite frequently. (Later in my code example, I will show you how using the BCS interface you can send E-mails immediately as well). In our production system we run this job every 5 minutes. The job setup can also be done from SCOT. Switch your view to JOBS. You can then hit CREATE to start the process of scheduling a new Send Job. *Running a Test* We are just about ready to run our first test. The only other requirement is that the sender of any E-mail, must have their return address setup in their user master. If you don't maintain this data, you will get a send error. If you want an SAP program to generate these addresses for you, have a look at OSS note 104263. Also in 46C and higher you have the option to configure the system to generate the sender address on the fly. OSS note 320443 gives you the details of this solution. You can see from the following screen shot the field that must be maintained in the user master:
  Let's try a test now. I like to start by testing using the SAP short message functionality. You will want to use menu System->Short Message. From here we will prepare a short test message. If you don't want to wait for your batch job to run to find out if your message went through, just jump back to transaction SCOT. From the System Status view you can choose Ctrl+F7 or the Execute Icon to start the send process for a communication type. You should receive your test message if everything is setup fine. *Trouble Shooting* Let's say that everything didn't go fine. Where do we start trouble shooting? Once again start with the transaction SCOT. The system status shows us our status overview. You can see the number of messages in Error or Waiting. If you have a lot of messages in Waiting status, your send job probably isn't scheduled. The overview screen is nice, but you probably want more details. From SCOT you can choose Utilities->Overview of Send Orders (Or Tcode SOST). This transaction will give a detailed report by Address type, status, date, time and sender. For each message we can view the transmission history, the message itself, and the trace log. You can also try and resubmit the message from here. If you need to activate tracing, you want to return to transaction SCOT. You then choose Utilities->Trace->Internal Trace. You can also view all traces from here without having to go through SOST. *ABAP Coding* If everything has worked up to this point, then you are ready to start writing your own E-mail calls in ABAP. The example I am going to share with you is actually a function module that we wrote. We wanted to write a function module that would really simplify the process of sending E-mail for our newer ABAP developers. We wanted them to just specify a few parameters and be off and running without having to understand the BCS classes. Hopefully you will find this function module helpful as well as being a good tutorial on how to use the BCS classes. *Function Interface* The function module Interface is quite simple in that it only has 3 input parameters.
  The first is an optional parameter used to set what requested statuses types will be returned. You can specify N for No Statuses, E for Only Error Statuses, or A for All Statuses. The second parameter is an internal table that will hold all of our document parts. The following is the line type that defines this internal table type:
  The first entry in this table will become our E-Mail Body. All other parts will become attachments in the email. For each record in this table you must specify the document type as a value defined in the foreign key table TSOTD. You can also supply the subject line (or attachment name) in the subject field. You can then specify the content of this document part in either the CONTENT_TEXT (ASCII text) or CONTENT_HEX (Binary data such as PDFs). You will notice that the structure of these two content areas match those used by the API function modules in 46D and lower. This makes for a very easy change from the API function modules to the BCS Classes. The third parameter is another internal table that will hold all of our recipients. The following is the line type that defines this internal table type:
  The calling program has the choice of setting a full email address directly into the C_ADDRESS field or just specifying an SAP User ID in the UNAME field. If the calling program chooses to use the UNAME field, the function module will lookup the user's E-Mail address from their user master record. Finally there are several flags that can be set per recipient such as No Forward, Express Message, etc. The function module has no Exporting, Changing, or table parameters. The only exception that is returned is the BCS Exception class itself: CX_BCS.
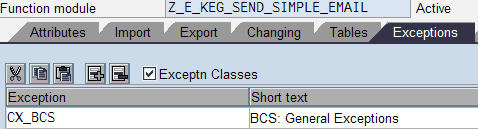
*SAPConnect* Well we are finished with all the low level setup. Now we need to connect the lowest layer (the ICM) to SAP's middle message layer: SAPConnect. SAPConnect sits between the application layer (such as SAP Office) and the lowest layer hiding all the technical details. All of the SAPConnect monitoring and configuration can be reached from one transaction called SCOT. First SCOT has several different views that can be used. One shows the Jobs that have been setup, the other shows setup by routings, etc. I prefer to start SCOT in System Status View. This shows a tree with the communication types, the nodes setup for each type and the number of messages in each status. The following is a screen shot of this view: We want to create a new node in SAPConnect for our E-Mail. As of release 46C you have a quite nice Wizard that walks you through the process. However you can also control all settings directly in a dialog maintenance window. This is a screen shot of our Email Node. You can see that to setup this node all we have to do is specify the connection information for an external mail server. In our case we give the host name for our Corporate Microsoft Exchange Server. Also at this level we can specify the code page that we want all messages converted to before they are sent. I choose Unicode UTF-8 because we have an MDMP system that contains English, German, Spanish, Thai, and Polish languages. By converting to UTF-8 we get around the problem described in OSS note 331418. You do NOT have to have a Unicode system or kernel to support this functionality. Please refer to OSS Note 633265 for the necessary support package levels for this functionality to be complete. Now lets look at the configuration on our only configured address type: Internet. We don't do any outbound filtering to different nodes. Therefore the address areas is set to the wildcard '*'. To comply with the Unicode setup we have all output formats being converted to PDF as OSS note 633265 suggests. Next we need to schedule a job that will transmit out E-mails. Normally E-Mails will only go out when this job runs, so you probably want to schedule it quite frequently. (Later in my code example, I will show you how using the BCS interface you can send E-mails immediately as well). In our production system we run this job every 5 minutes. The job setup can also be done from SCOT. Switch your view to JOBS. You can then hit CREATE to start the process of scheduling a new Send Job. *Running a Test* We are just about ready to run our first test. The only other requirement is that the sender of any E-mail, must have their return address setup in their user master. If you don't maintain this data, you will get a send error. If you want an SAP program to generate these addresses for you, have a look at OSS note 104263. Also in 46C and higher you have the option to configure the system to generate the sender address on the fly. OSS note 320443 gives you the details of this solution. You can see from the following screen shot the field that must be maintained in the user master: Let's try a test now. I like to start by testing using the SAP short message functionality. You will want to use menu System->Short Message. From here we will prepare a short test message. If you don't want to wait for your batch job to run to find out if your message went through, just jump back to transaction SCOT. From the System Status view you can choose Ctrl+F7 or the Execute Icon to start the send process for a communication type. You should receive your test message if everything is setup fine. *Trouble Shooting* Let's say that everything didn't go fine. Where do we start trouble shooting? Once again start with the transaction SCOT. The system status shows us our status overview. You can see the number of messages in Error or Waiting. If you have a lot of messages in Waiting status, your send job probably isn't scheduled. The overview screen is nice, but you probably want more details. From SCOT you can choose Utilities->Overview of Send Orders (Or Tcode SOST). This transaction will give a detailed report by Address type, status, date, time and sender. For each message we can view the transmission history, the message itself, and the trace log. You can also try and resubmit the message from here. If you need to activate tracing, you want to return to transaction SCOT. You then choose Utilities->Trace->Internal Trace. You can also view all traces from here without having to go through SOST. *ABAP Coding* If everything has worked up to this point, then you are ready to start writing your own E-mail calls in ABAP. The example I am going to share with you is actually a function module that we wrote. We wanted to write a function module that would really simplify the process of sending E-mail for our newer ABAP developers. We wanted them to just specify a few parameters and be off and running without having to understand the BCS classes. Hopefully you will find this function module helpful as well as being a good tutorial on how to use the BCS classes. *Function Interface* The function module Interface is quite simple in that it only has 3 input parameters. The first is an optional parameter used to set what requested statuses types will be returned. You can specify N for No Statuses, E for Only Error Statuses, or A for All Statuses. The second parameter is an internal table that will hold all of our document parts. The following is the line type that defines this internal table type: The first entry in this table will become our E-Mail Body. All other parts will become attachments in the email. For each record in this table you must specify the document type as a value defined in the foreign key table TSOTD. You can also supply the subject line (or attachment name) in the subject field. You can then specify the content of this document part in either the CONTENT_TEXT (ASCII text) or CONTENT_HEX (Binary data such as PDFs). You will notice that the structure of these two content areas match those used by the API function modules in 46D and lower. This makes for a very easy change from the API function modules to the BCS Classes. The third parameter is another internal table that will hold all of our recipients. The following is the line type that defines this internal table type: The calling program has the choice of setting a full email address directly into the C_ADDRESS field or just specifying an SAP User ID in the UNAME field. If the calling program chooses to use the UNAME field, the function module will lookup the user's E-Mail address from their user master record. Finally there are several flags that can be set per recipient such as No Forward, Express Message, etc. The function module has no Exporting, Changing, or table parameters. The only exception that is returned is the BCS Exception class itself: CX_BCS.
252 Comments
- « Previous
-
- 1
- 2
- 3
- …
- 6
- Next »
Related Content
- Quick Start guide for PLM system integration 3.0 Implementation in Product Lifecycle Management Blogs by SAP
- The 1H 2024 Release of SAP SuccessFactors Learning – Release Highlights in Human Capital Management Blogs by Members
- How can I use Langsmith with SAP AI Core by selecting LLMs through what SAP provides me? in Technology Q&A
- Top Picks: Innovations Highlights from SAP Business Technology Platform (Q1/2024) in Technology Blogs by SAP
- SAP Document and Reporting Compliance - 'Colombia' - Contingency Process in Technology Blogs by SAP