
- SAP Community
- Products and Technology
- Technology
- Technology Blogs by SAP
- Use TPM, IA, CI to Efficiently Manage and Run Comp...
Technology Blogs by SAP
Learn how to extend and personalize SAP applications. Follow the SAP technology blog for insights into SAP BTP, ABAP, SAP Analytics Cloud, SAP HANA, and more.
Turn on suggestions
Auto-suggest helps you quickly narrow down your search results by suggesting possible matches as you type.
Showing results for
Product and Topic Expert
Options
- Subscribe to RSS Feed
- Mark as New
- Mark as Read
- Bookmark
- Subscribe
- Printer Friendly Page
- Report Inappropriate Content
12-02-2022
10:03 AM
B2B users have different levels of requirements for data exchange starting from the different kinds of communication protocols such as AS2, SFTP, etc. to the usage of different types of B2B standards such as ASC X12 or UN/EDIFACT or APIs. Trading Partner Management (TPM) helps you effectively manage B2B relationships with multiple trading partners. The easy-to-use user interface helps you cope with the complexity of B2B communication between trading partners. For more details on TPM, please read Announcement: SAP Trading Partner Management and B2B Monitoring brand new capabilities of SAP Integr...
Scenario
In this post, you will use Trading Partner Management (TPM), Integration Advisor (IA), and Cloud Integration (CI, aka CPI) in the Integration Suite to efficiently manage and run a complex B2B transaction:
We use IA to generate mapping artifacts MIG and MAG that can be used in your other business applications such as Cl and TPM. For example, SOAP to AS2. For more details, please read: Leverage Integration Advisor (IA) to Generate Mapping Artifacts for SAP Integration Solutions
We use TPM to maintain company-related information and define business transactions with MIG and MAG.
We use CI and the preprepared package that TPM provided to link the configuration of TPM together to finally run an E2E business scenario.
The sender side is set as SOAP, and the receiver side is set as AS2.
Concept
Inbound Direction
The inbound direction is the flow of the business message from the trading partner to the company in a business transaction step.
Outbound Direction
The outbound direction is the flow of the business message from the company to the trading partner in a business transaction step.
Interchange
An interchange is a part of the business transaction and covers all components necessary for exchanging the B2B-related payload data excluding the communication protocol data within a business transaction step. These are:
Interchange envelopes
Functional group envelopes
One or more business messages including the header and trailer information related to the business message
The assembly of an interchange depends on the rules and conditions of the type system, which is used for this interchange.
UN/CEFACT's Modeling Methodology
UN/CEFACT's modeling methodology(UMM), is a methodology that specifically captures the business requirements of collaborative business processes between companies that are represented by trading partners. UMM is developed by the international standardization body United Nations Center for Trade Faclilitation and Electronic Business. The main focus of UMM is the platform independent representation of these collaborative business processes so that the rights, obligations, and agreements between the trading partners will be unambiguously considered. These aspects will be covered in the B2B scenario, its choreography of business transactions and their quality of services.
Identifier
An identifier is used to identify the trading partner when exchanging messages. An identifier comprises of the following:
Agency
Defines the identification scheme and issues names for the trading partner to be identified.
Identification Scheme
Also referred as Scheme, this constitutes the reference framework within which objects are uniquely identified by names.
Identification
A name or value that identifies the trading partner within the given identification scheme.
To know more about the terms and glossaries used in the application, see Terminology & Glossary for SAP Trading Partner Management
Steps
Step 1: Create Iflow with AS2 Adapter in CI to Act as Receiver
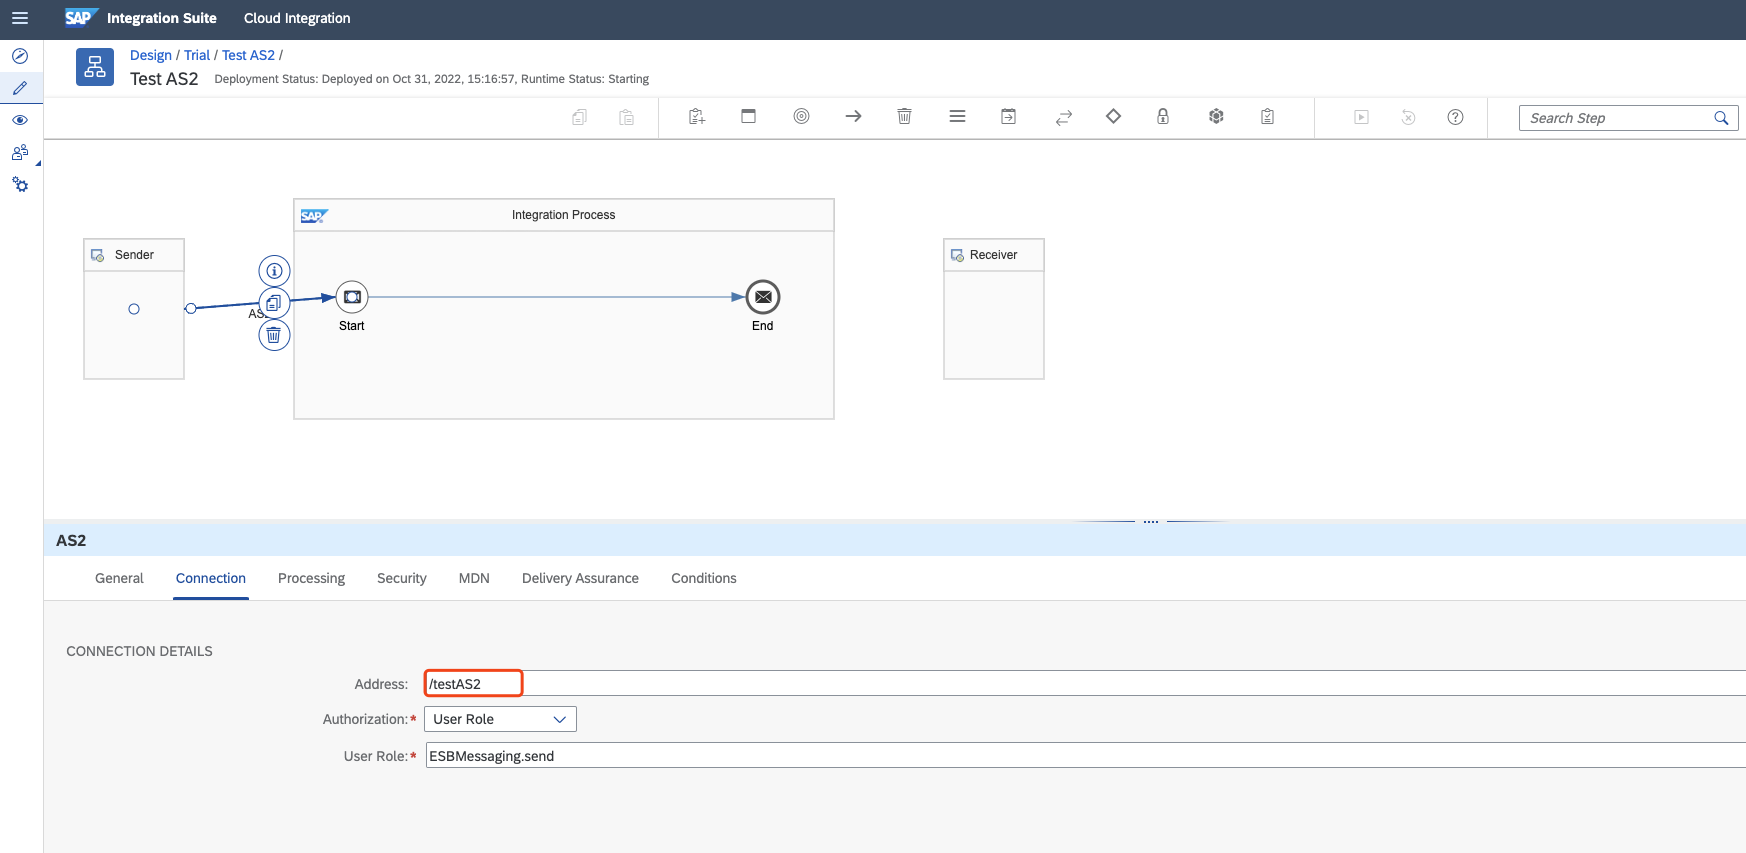
Deploy it and get the endpoint that would be used.

Step 2: Create Security Material of Iflow in CI for TPM Use
Maintain the credential information got from the Integration runtime instance service key, which will be used.

Step 3: Create a Company Profile with TPM
Login to your CI application. Choose Design.

Select the tab Company Profile and choose Create Profile.
The application can have only one company profile.
Under the Overview tab, maintain the following fields under the Details section

Navigate to the Identifier tab and choose Create. In the resulting dialog box, enter the following details:

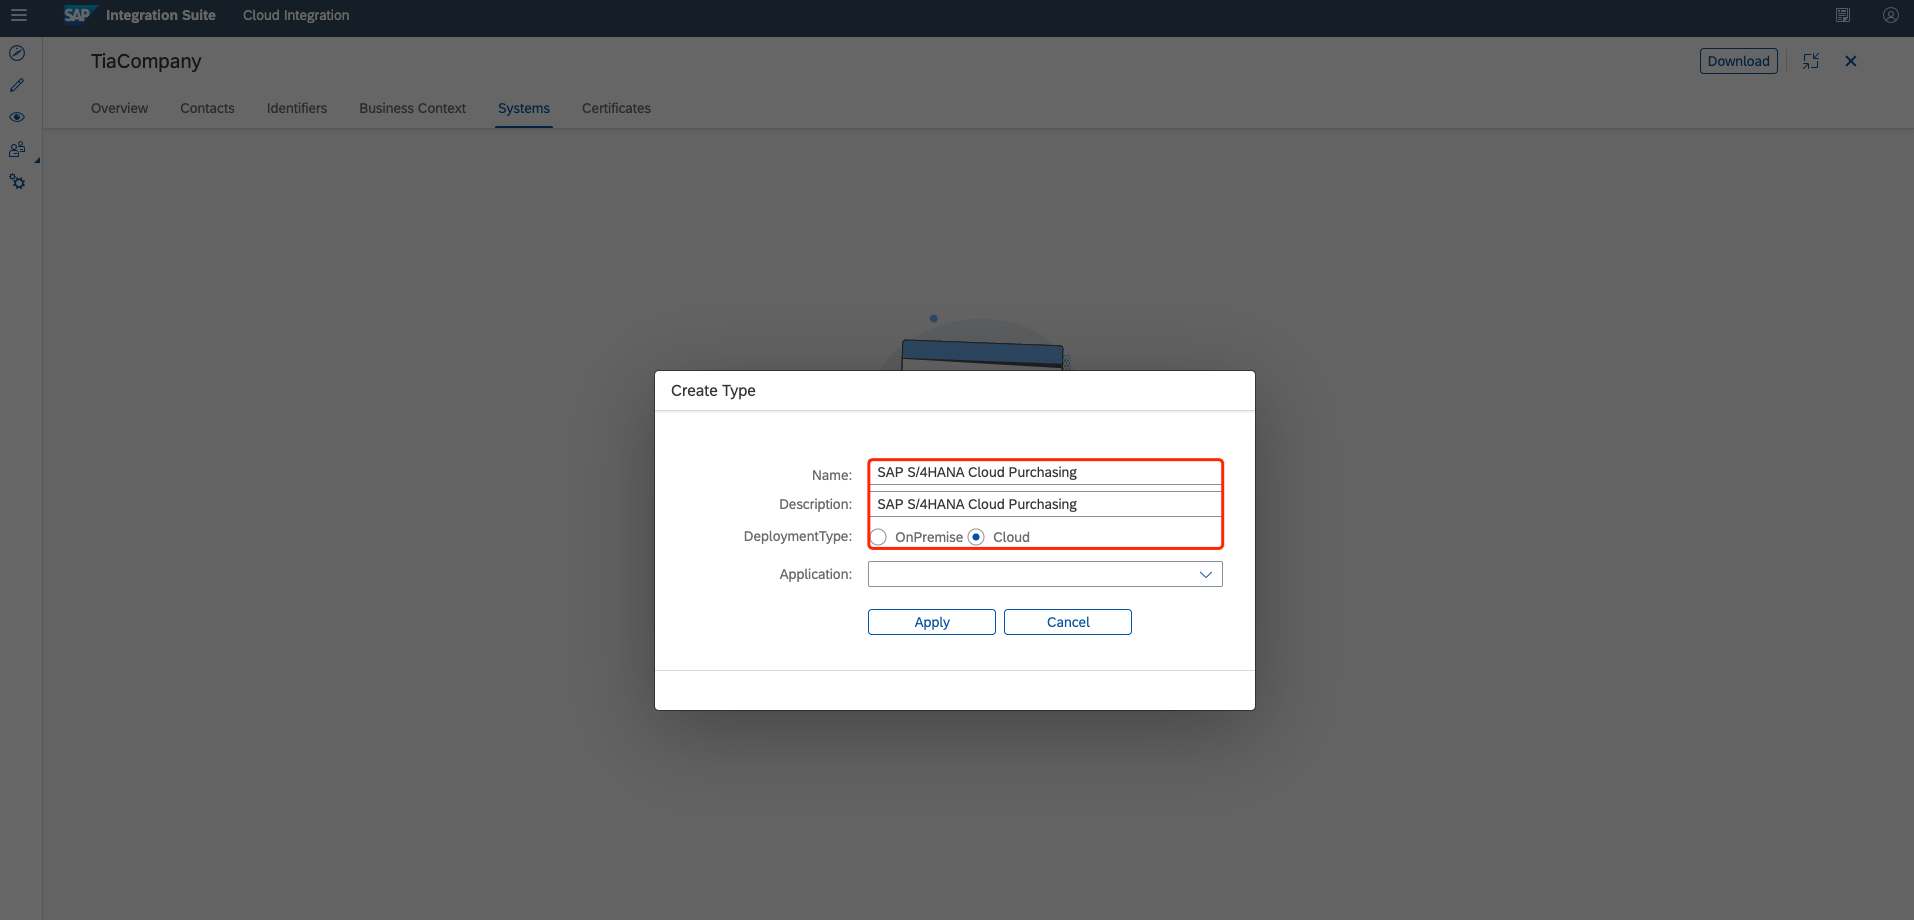
Choose Save and navigate to the Systems tab. Choose Create to add the system details. Enter a valid name of the system in the Name field and choose the system type under the Type field. If your system type is not available in the list, choose + and enter the details of the new system and choose Apply. The newly created system will be selected now in the Type field. Set the purpose of your system under the Purpose. Choose Save. The system gets created successfully.
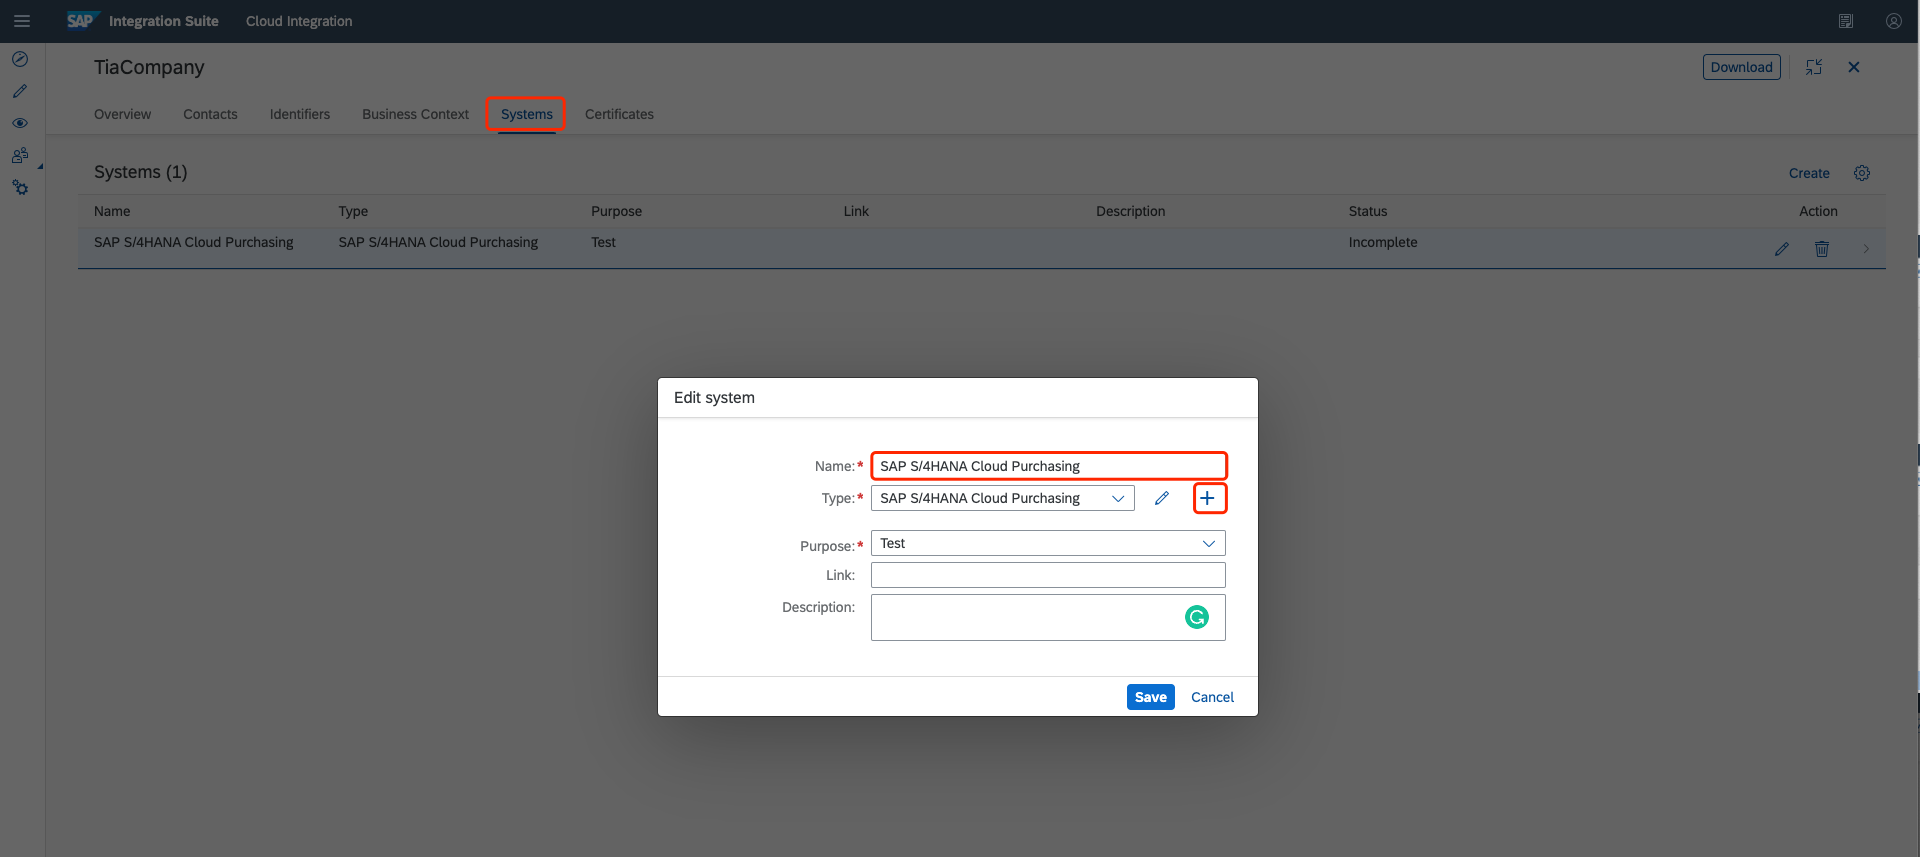
You also need to configure the type system and communication channel details for the newly created company profile and hence its Status is set to Incomplete.

To do so, select the newly created system and under the Type Systems tab, choose Create Type System.

In the Create Type System dialog, select the Name and Version of the type system from the drop-down list.

Choose Save. The type system is added successfully.

Navigate to the Communications tab and choose Create Communication.

Maintain the following fields:

For more details, please read: Creating a Company Profile
Step 4: Create a Trading Partner Profile with TPM
A trading partner is a company, organization, or subsidiary that conducts e-business (B2B) with other companies, organizations, or subsidiaries.
Log in to your application and navigate to Trading Partners tab. Choose Create Trading Partner to add a new trading partner.

Under the Overview tab, maintain the following fields under the Details section:

Navigate to the Identifier tab and choose Create. In the resulting dialog box, enter the following details:

Choose Save and navigate to the System tab. Choose Create to add the system details. Enter a valid name of the system in the Name field and choose the system type under the Type field. You also need to configure the type system and communication channel details for the newly created company profile and hence its Status is set to Incomplete.

To do so, select the newly created system and under the Type Systems tab, choose Create. In the Create Type System dialog, select the Name and Version of the type system from the drop-down list. Choose Save. The type system is added successfully.

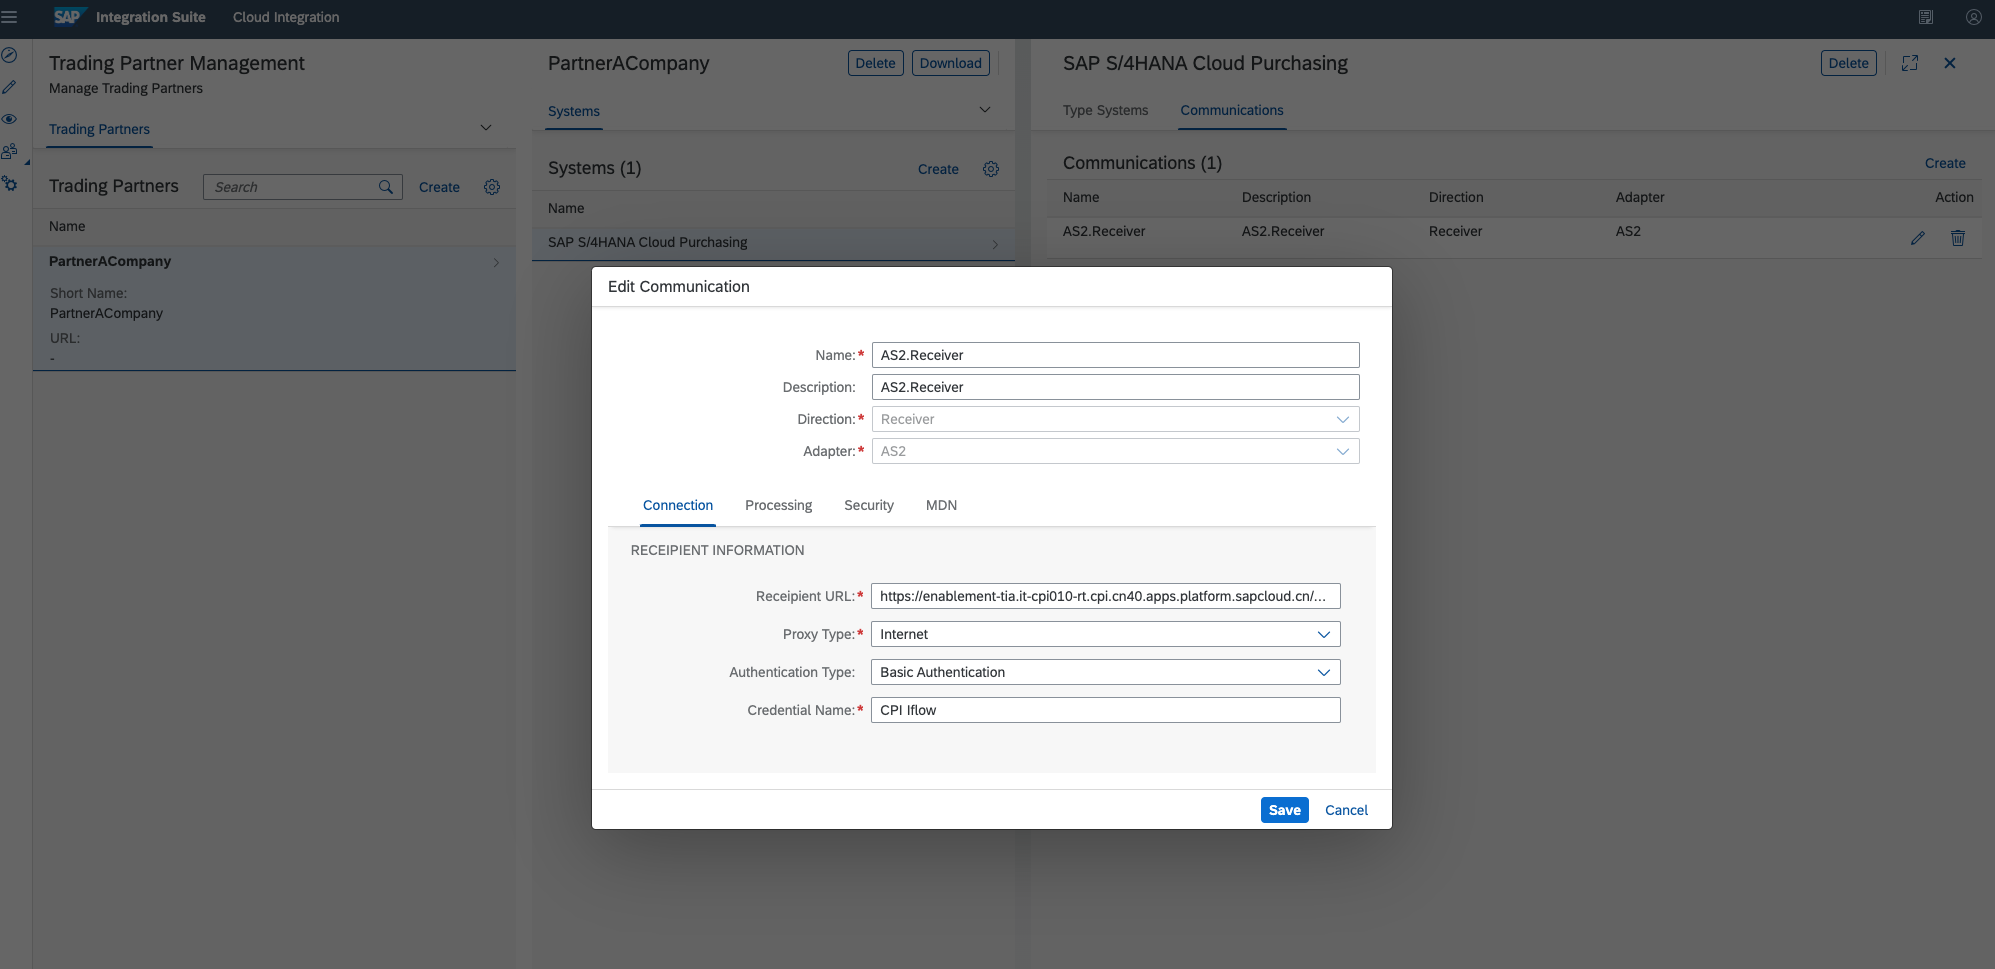
Navigate to the Communications tab and choose Create. Maintain the following fields. And in out scenario, you should select the Adapter as AS2 for the receiver. More tabs like Connection, Processing and Security appear when you choose AS2 as the receiver adapter.
In the Connection tab, set the Receipient URL field with the endpoint of the Iflow you created and deployed in the step 1. For example: https://enablement-tia.it-cpi010-rt.cpi.cn40.apps.platform.sapcloud.cn/as2/as2/testAS2. Set the Proxy Type as Internet. Set the Authentication Type as Basic Authentication. Set the Credential Name with the security material you created in the step 2. For example: CPI Iflow.
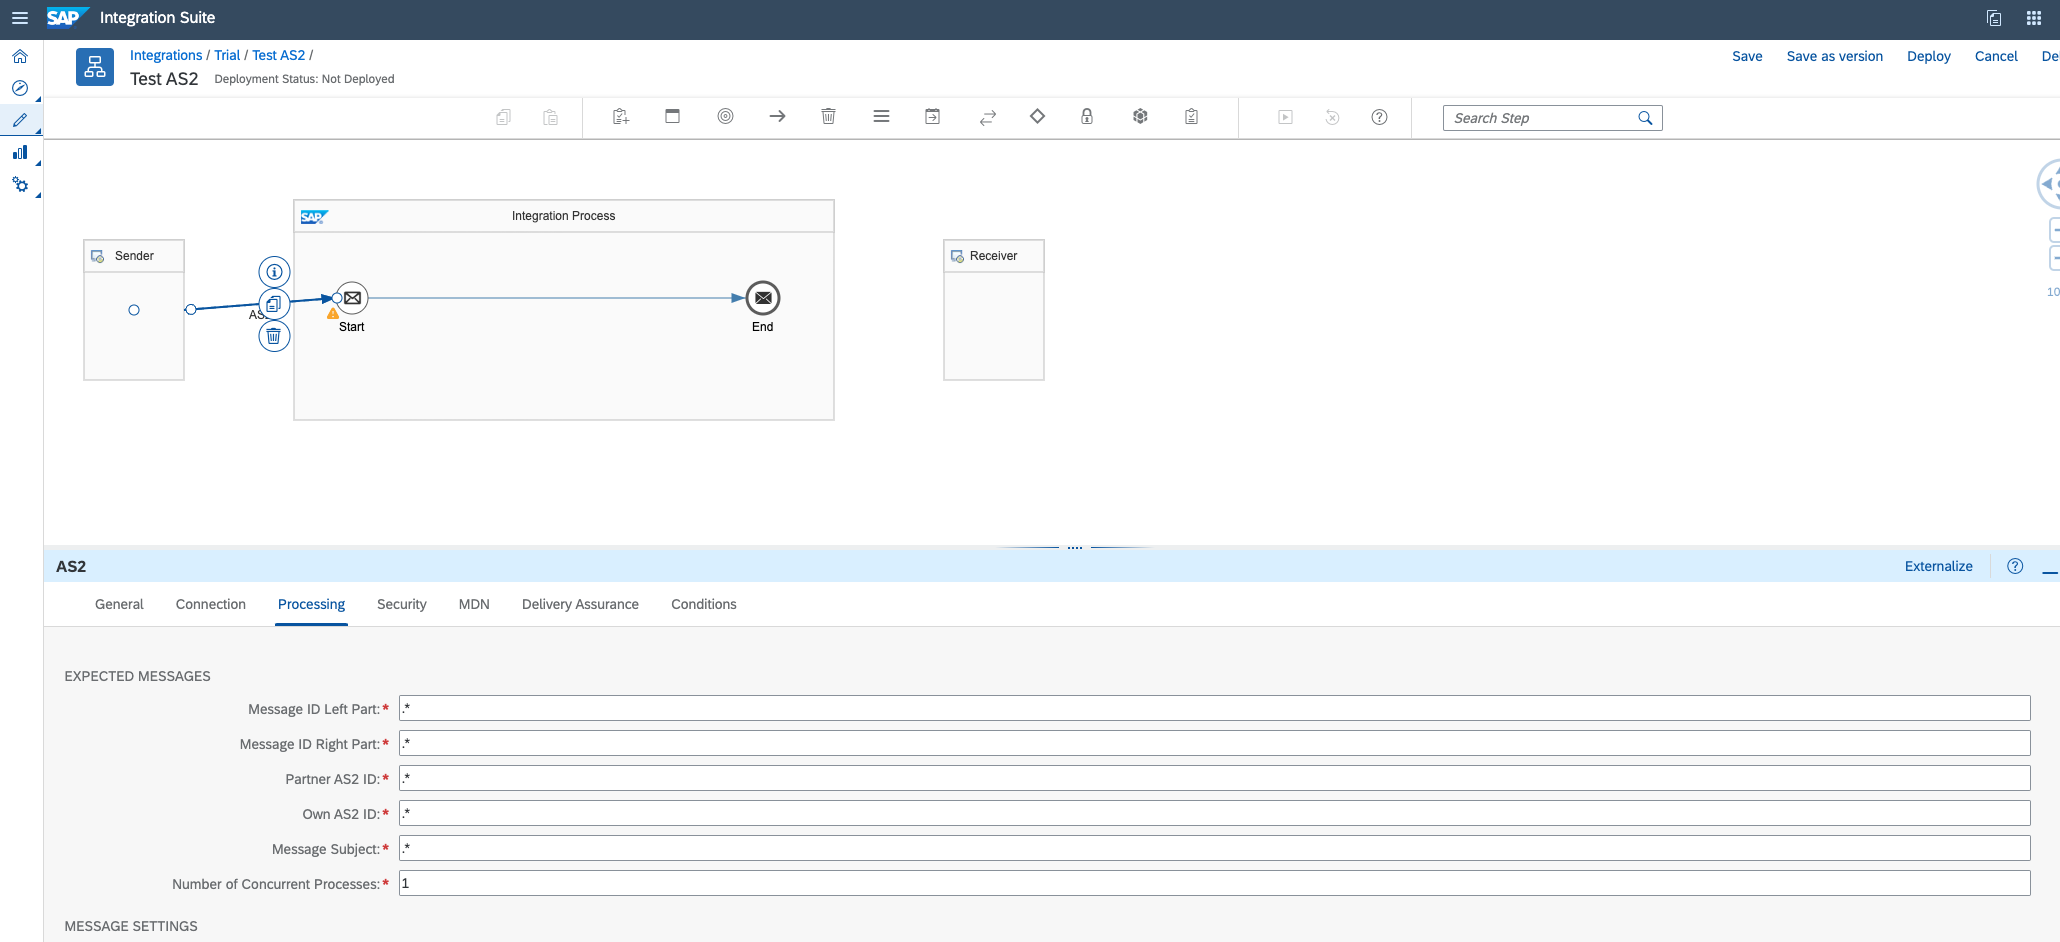
In the Processing tab, maintain the following fields. For example:

For more details, please read: Creating a Trading Partner Profile
Step 5: Create an Agreement Template with TPM
A Trading Partner Agreement Template consists of one or more business transactions. In each business transaction, we can define the general configuration on our company side that Trading Partner Agreement can reuse the configuration on our company side in the Trading Partner Agreement Template. In another word, the configurations at the template level serve as defaults that can then be reused and overridden when creating the Trading Partner Agreement.
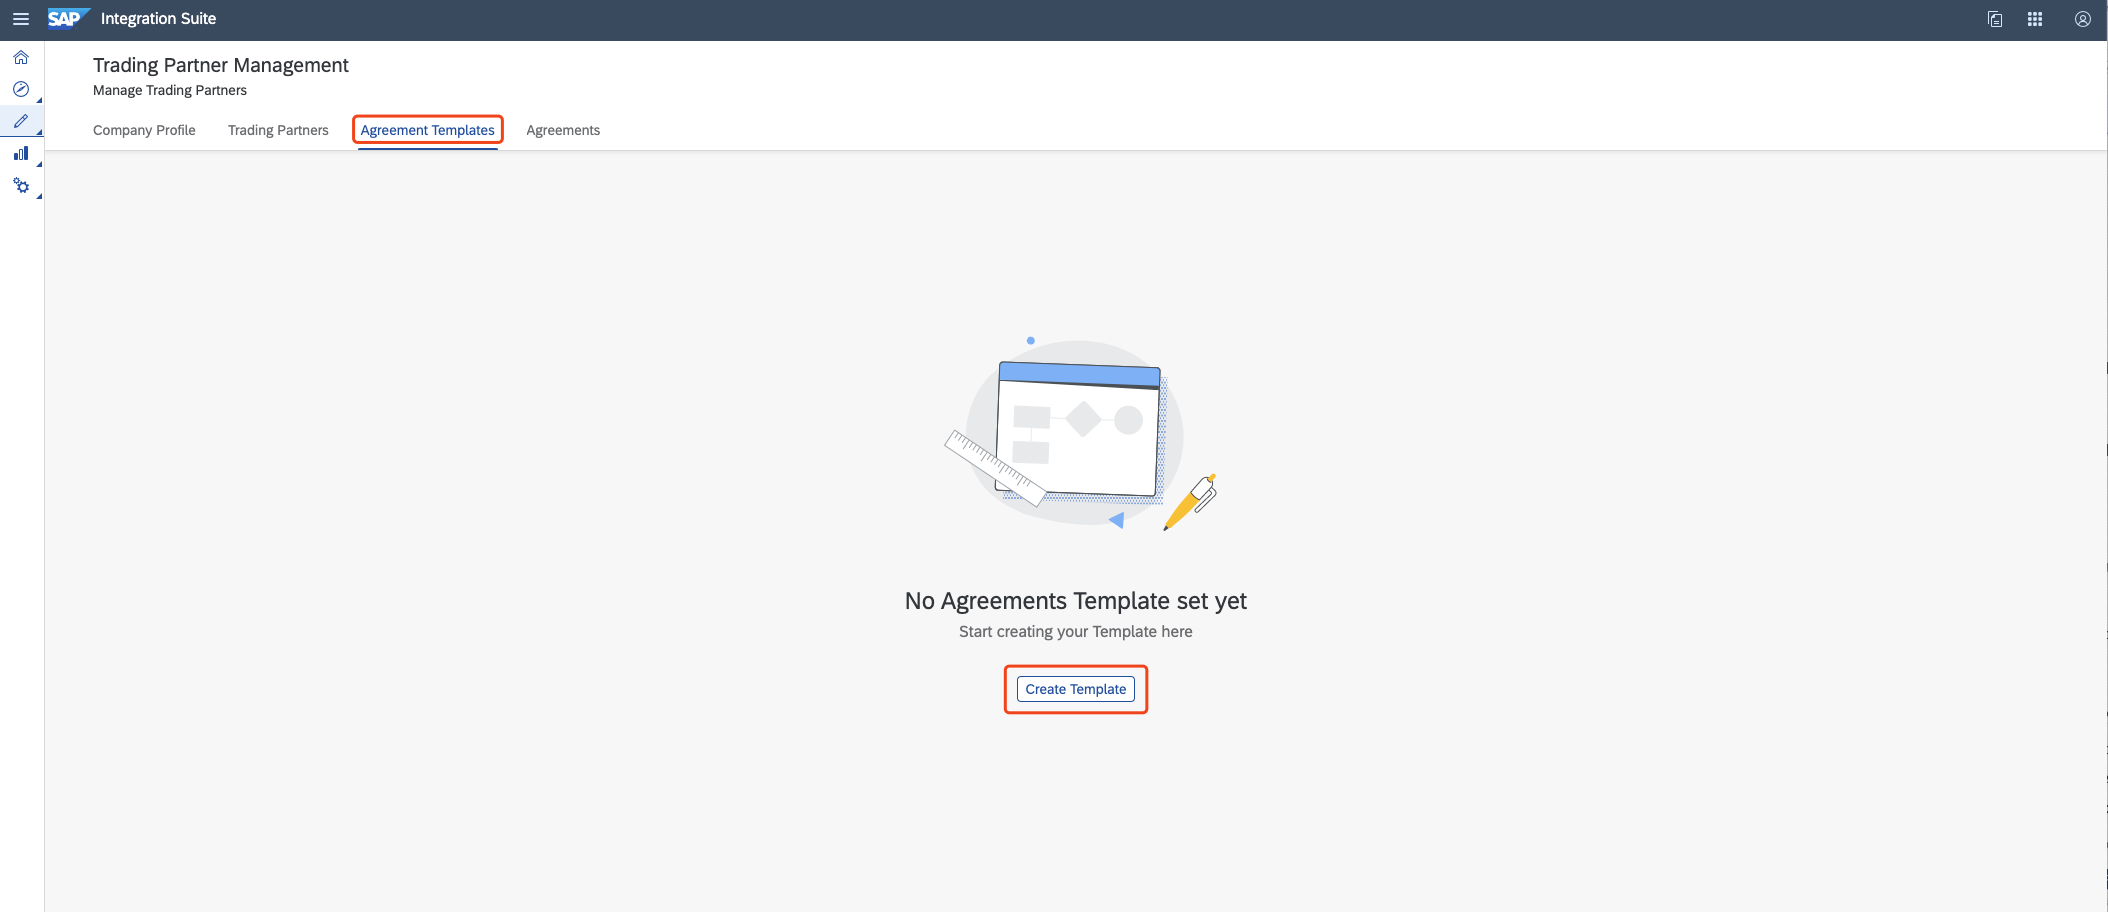
Log in to your application and navigate to the Agreement Templates tab. Choose Create Template.
In the Overview tab, enter the following details under the Details and My Company Details section:

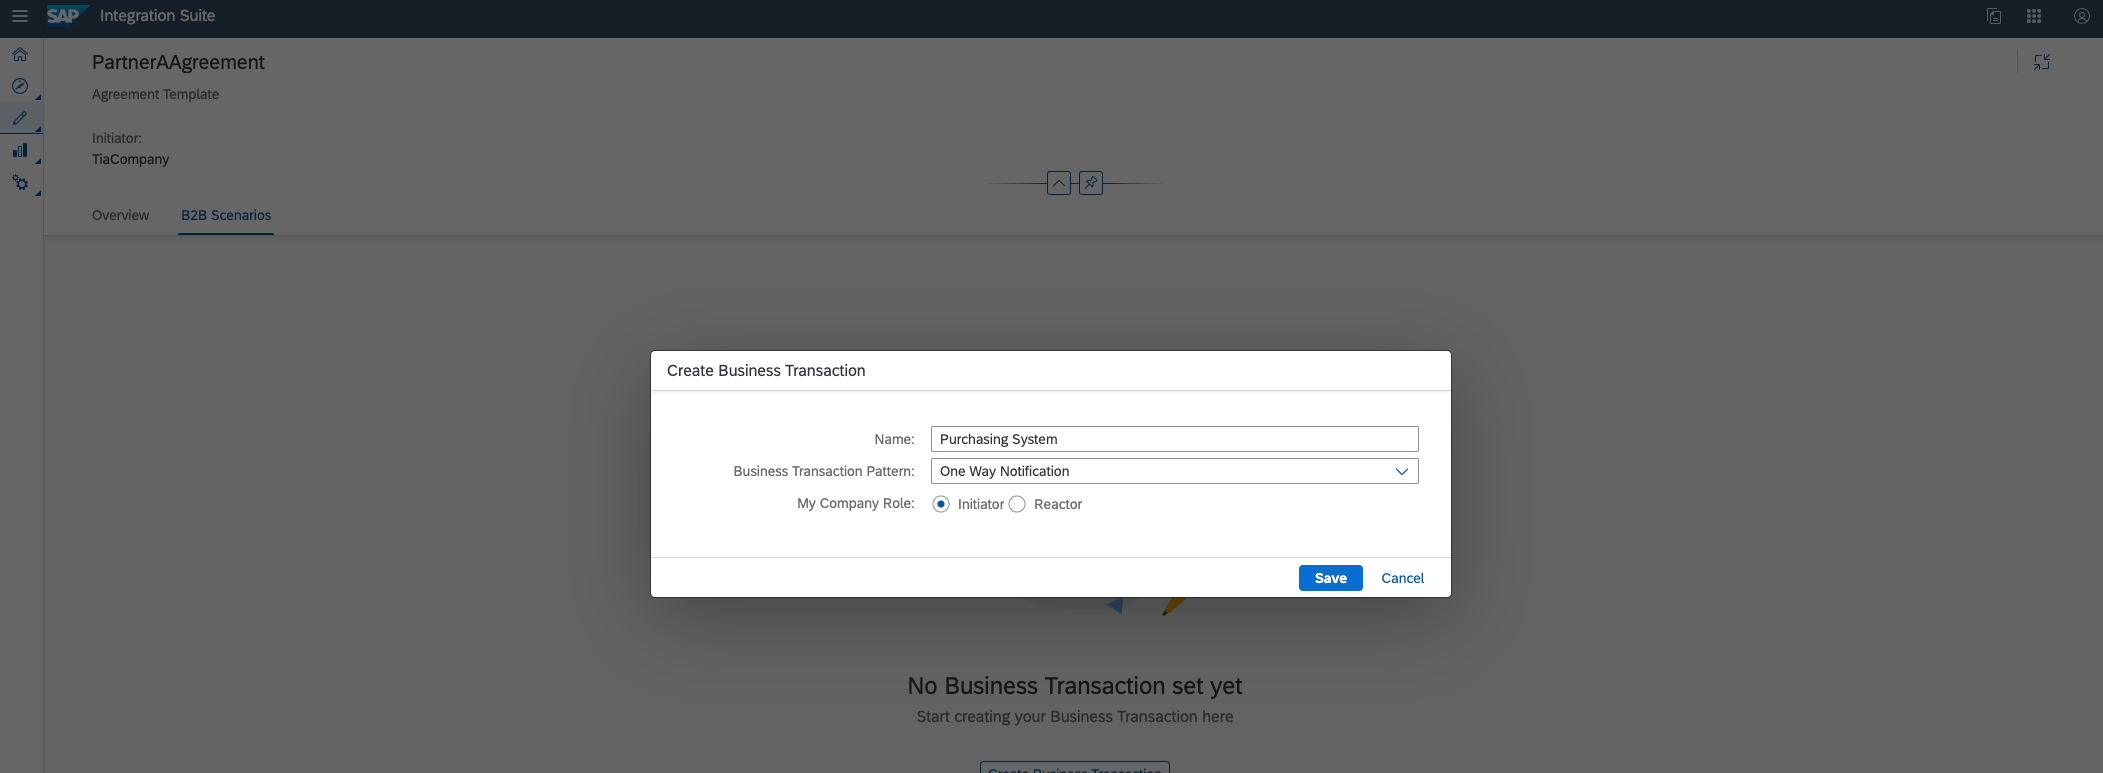
Navigate to the B2B Scenarios tab and choose Create Business Transaction.

Maintain the following details:
In the newly created transaction, choose the Communication step on the sender side and select the communication we created when creating the Company Profile in the step 3.

Select the Interchange step on the sender side.

Choose the value help provided for the Message Implementation Guideline (MIG) field. Select a MIG from the list along with the required version and select Choose.

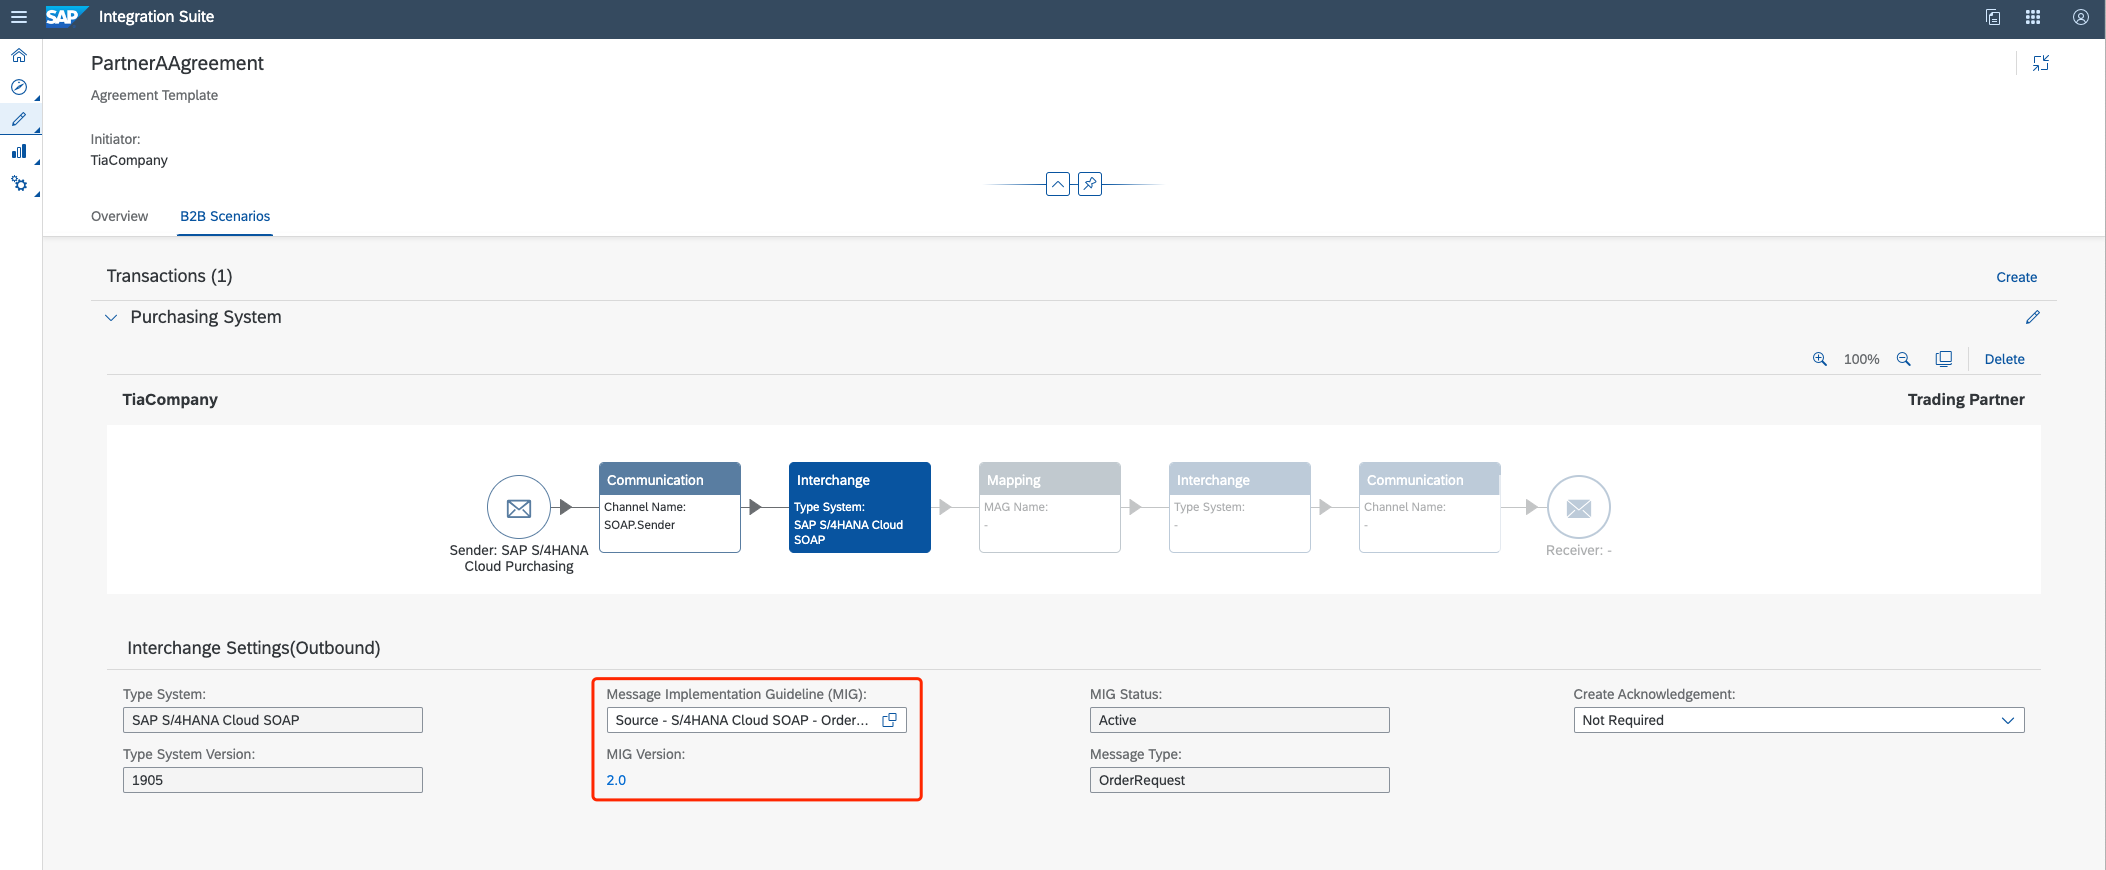
For more details, please read: Creating an Agreement Template
Step 6: Create an Agreement with TPM
A trading partner agreement is an agreement of a contract defined by two trading parties that have decided to exchange certain business data or items using a B2B scenario for fullfilling the agreed trading/business process in a given business context.
Creating an agreement is the last step in the design of a B2B transaction and consists of tow trading partners representing one type of transaction between those two partners.
Now, you can create an Agreement based on the Agreement Template you created in the last step.
Login to your application and navigate to Agreements tab. Choose Create Agreement. This will display a list of agreement templates available in the system. Select an agreement from the list and choose OK.

This will display a list of agreement templates available in the system. Select an agreement from the list and choose OK.

In the Overview tab, maintain the following fields under the Details, My Company Details and Trading Partner Details section.
For My Company Details section:
| Field | Description |
|---|---|
| System | Select a system from the drop-down list |
| Type System | Select a type system from the drop-down list |
| Type System Version | Select a type system version from the drop-down list |
| Identifier | Select an identifier using the value help provided. You can also create an identifier using the + button. |
| Identifier as Trading Partner | Select an identifier from your company that will be the trading partner. You can also create an identifier using the + button. |
For Trading Partner Details section:
| Field | Description |
|---|---|
| Name | Name of the trading partner |
| System | Select a system from the drop-down list |
| Type System | Select a type system from the drop-down list |
| Type System Version | Select a type system version from the drop-down list |
| Identifier | Select an identifier using the value help provided. You can also create an identifier using the + button. |
| Identifier as Company | Select an identifier from the trading partner for the company. You can also create an identifier using the + button. |

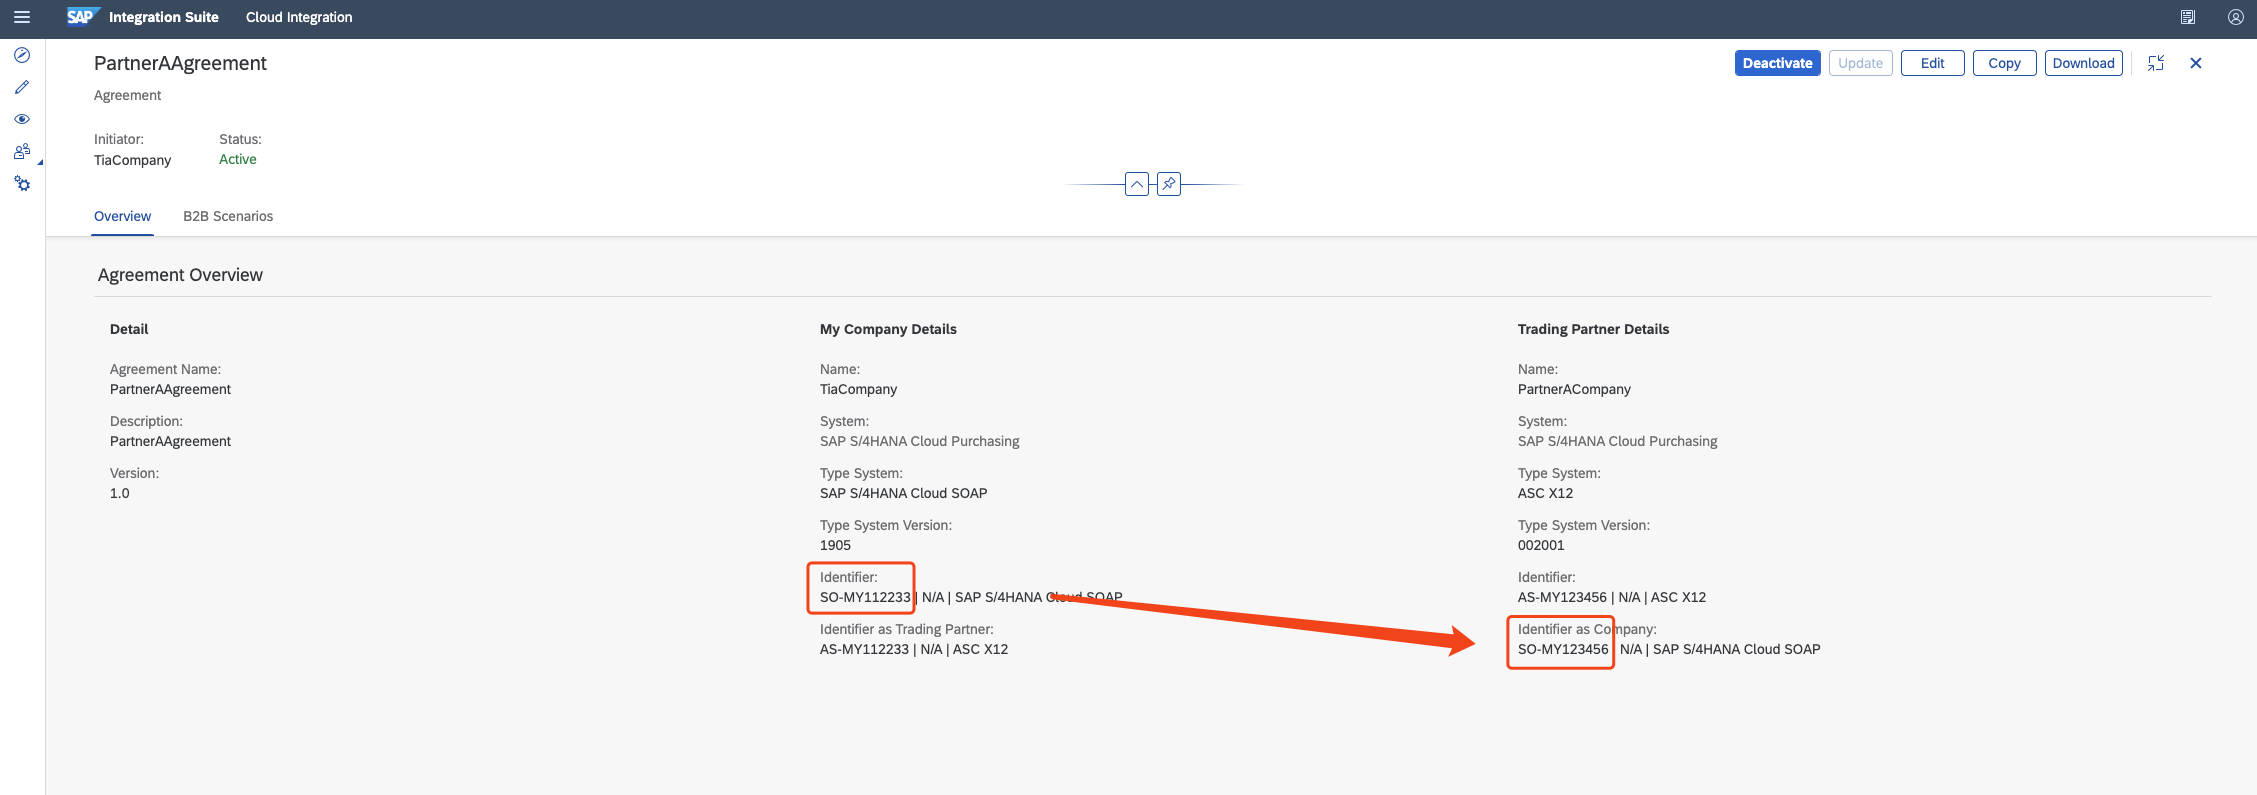
Choose Save. In our scenario, My Company acts as the sender as Trading Partner acts as a receiver. The following two Identifiers would be used when triggering the transaction.

Navigate to the B2B Scenarios tab. This tab displays the transactions that are created under the Agreement Template. Choose the Mapping step on the sender side. Select a mapping guideline using the value help provided for the field Mapping Guideline(MAG).

Choose the Communication on the receiver side and select a value from the drop-down list for the field Communication.

Select the Interchange shape on the receiver side. Choose the value help provided for the Message Implementation Guideline (MIG) field and select a MIG from the list and select Choose. Select a value from the drop-down list for the field Number Range.
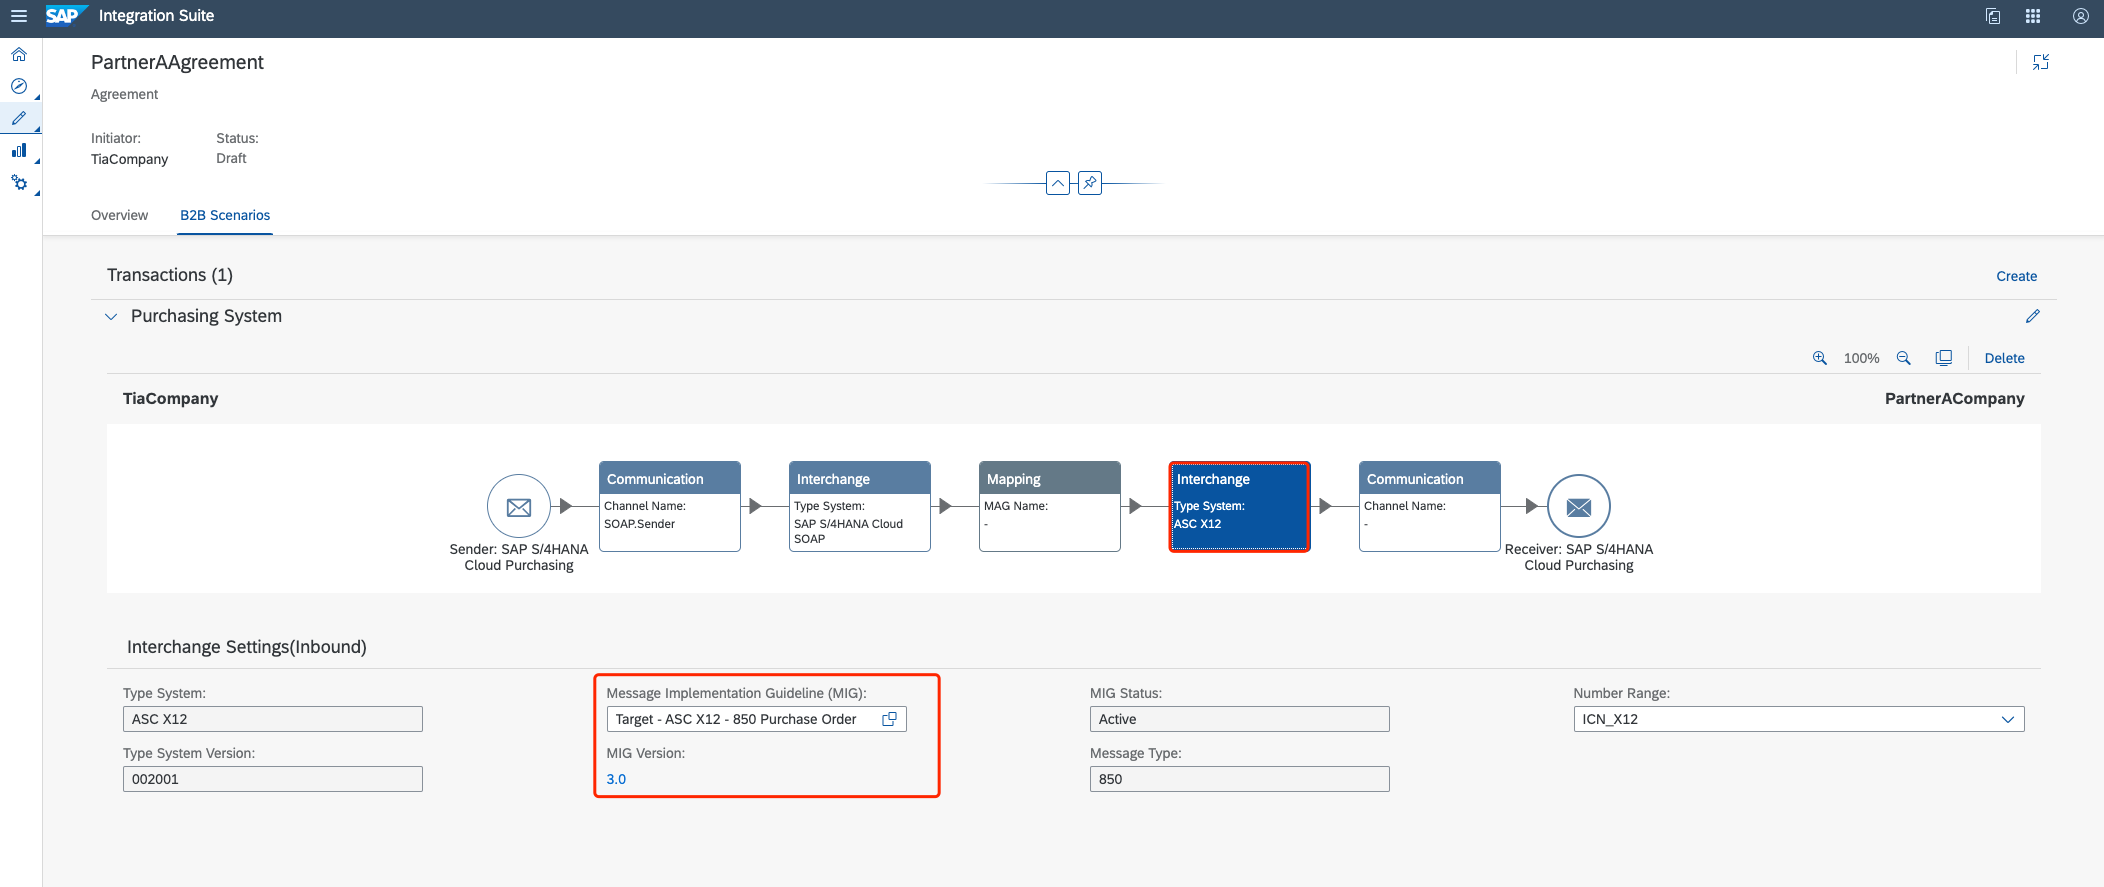
For more details, please read: Creating a Trading Partner Agreement
Step 7: Activate an Agreement with TPM
Activate your trading partner agreement to push the agreement details into the SAP Cloud Integration partner directory.
The Partner Directory is a tenant-specific storage option that allows you to store information on business partners that are connected to the tenant in the context of a larger business network. To know more, see Partner Directory Concepts.
Navigate to Agreements tab. Open the agreement that you just created. Choose Activate.


For more details, please read: Activating a Trading Partner Agreement
Step 8: Deploy TPM Package Without Configuration in CI
Before, you have provided all necessary informations on B2B transactions both in Sender side and Receiver side. Next, you need to link the both side together. TPM preprepared a common Cloud Integration package for you. With TPM as well as the package, you don't have to design from the scratch. To run an end to end business scenario, the only thing you need to do is to copy and deploy the integration flows.

To know more about the package, see Cloud Integration - Trading Partner Management .
.
Login to your Cloud Integration tenant. Under the Discover tab, search for and open the package Cloud Integration - Trading Partner Management.

In our scenario, please deploy the following four Ifows. Copy the endpoint of the Iflow starting with Step 1, which is the trigger point that would be used in the next step.
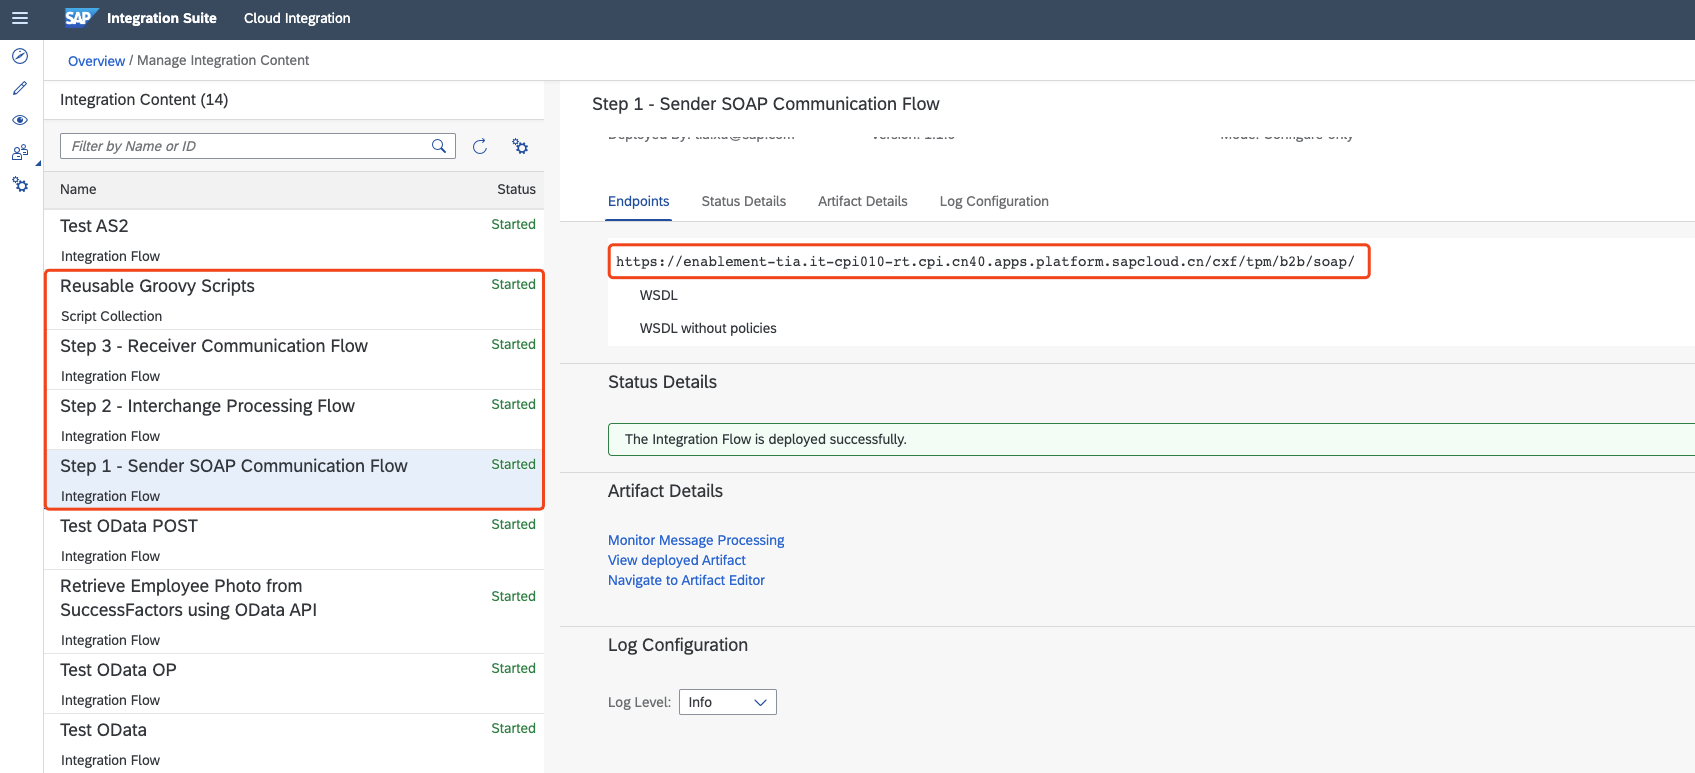
For more details, please read: Integration Flow Configuration
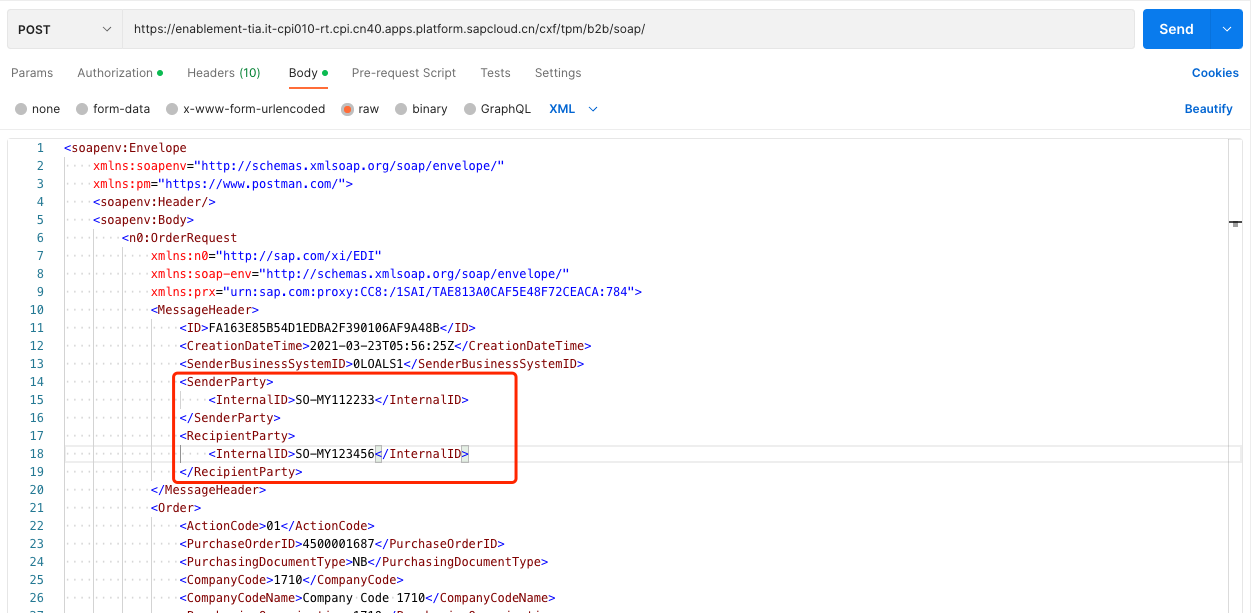
Step 9: Trigger and Test
Call the endpoint we get from the last step with the following configuration, where the Sender Party and Recipient Party can be found in the Agreement.
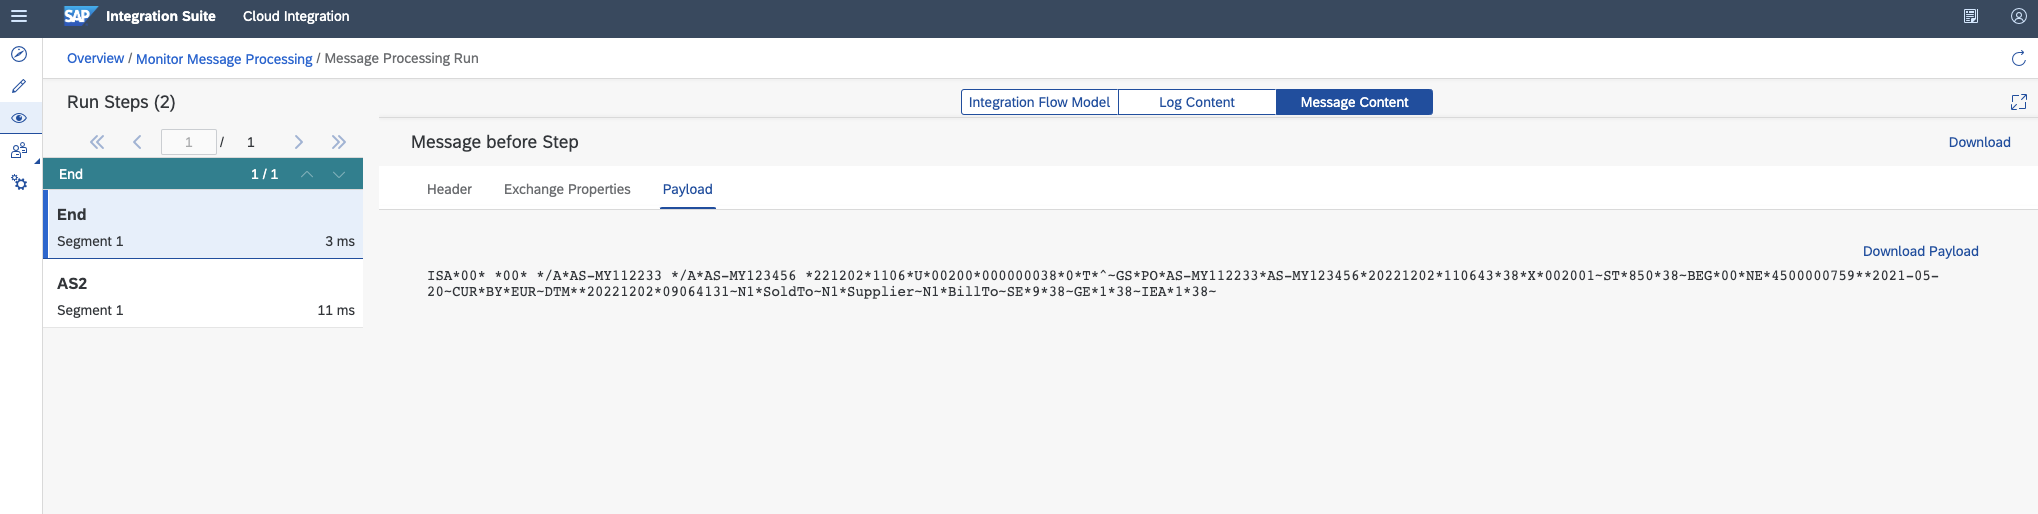
Then you can see the mapped and received AS2 payload:
- SAP Managed Tags:
- SAP Integration Suite,
- Cloud Integration,
- SAP Business Technology Platform
Labels:
12 Comments
You must be a registered user to add a comment. If you've already registered, sign in. Otherwise, register and sign in.
Labels in this area
-
ABAP CDS Views - CDC (Change Data Capture)
2 -
AI
1 -
Analyze Workload Data
1 -
BTP
1 -
Business and IT Integration
2 -
Business application stu
1 -
Business Technology Platform
1 -
Business Trends
1,658 -
Business Trends
92 -
CAP
1 -
cf
1 -
Cloud Foundry
1 -
Confluent
1 -
Customer COE Basics and Fundamentals
1 -
Customer COE Latest and Greatest
3 -
Customer Data Browser app
1 -
Data Analysis Tool
1 -
data migration
1 -
data transfer
1 -
Datasphere
2 -
Event Information
1,400 -
Event Information
66 -
Expert
1 -
Expert Insights
177 -
Expert Insights
295 -
General
1 -
Google cloud
1 -
Google Next'24
1 -
Kafka
1 -
Life at SAP
780 -
Life at SAP
13 -
Migrate your Data App
1 -
MTA
1 -
Network Performance Analysis
1 -
NodeJS
1 -
PDF
1 -
POC
1 -
Product Updates
4,577 -
Product Updates
341 -
Replication Flow
1 -
RisewithSAP
1 -
SAP BTP
1 -
SAP BTP Cloud Foundry
1 -
SAP Cloud ALM
1 -
SAP Cloud Application Programming Model
1 -
SAP Datasphere
2 -
SAP S4HANA Cloud
1 -
SAP S4HANA Migration Cockpit
1 -
Technology Updates
6,873 -
Technology Updates
419 -
Workload Fluctuations
1
Related Content
- Hack2Build on Business AI – Highlighted Use Cases in Technology Blogs by SAP
- Unify your process and task mining insights: How SAP UEM by Knoa integrates with SAP Signavio in Technology Blogs by SAP
- 10+ ways to reshape your SAP landscape with SAP Business Technology Platform – Blog 4 in Technology Blogs by SAP
- Understanding the Data Review steps in Onboarding and the impact on Employee Central in Technology Blogs by SAP
- UNVEILING THE INNOVATIONS OF ARTIFICIAL INTELLIGENCE in Technology Q&A
Top kudoed authors
| User | Count |
|---|---|
| 36 | |
| 25 | |
| 17 | |
| 13 | |
| 8 | |
| 7 | |
| 6 | |
| 6 | |
| 6 | |
| 6 |