
- SAP Community
- Products and Technology
- Supply Chain Management
- SCM Blogs by Members
- Setting up Realignment in IBP
Supply Chain Management Blogs by Members
Learn about SAP SCM software from firsthand experiences of community members. Share your own post and join the conversation about supply chain management.
Turn on suggestions
Auto-suggest helps you quickly narrow down your search results by suggesting possible matches as you type.
Showing results for
kunalroy
Participant
Options
- Subscribe to RSS Feed
- Mark as New
- Mark as Read
- Bookmark
- Subscribe
- Printer Friendly Page
- Report Inappropriate Content
12-02-2022
7:53 AM
Introduction:
Realignment is one of the processes available in IBP to move/copy data. It is generally used to accommodate for changes in Master data within Supply Chain. Along with the change of Master Data, realignment also helps in copying key figure data from old planning objects to new ones. Realignment also provides option to get rid of old data after new data has been created. This blog is to highlight the basics of Realignment and how to configure it in the system using a simple example.
Business Case:
Let us say there is a clothing line customer “CUST_BFR” which has now decided to split into two separate entities- “CUST_1” for Women’s clothing products and “CUST_2” for Men’s clothing products. The supply chain needs to accommodate for this change in Master Data, Key Figure Data as well as Planning objects. This will be achieved in IBP using the Realignment functionality.
Let us look at Master Data, Key Figures & Planning Objects before Realignment:
Product Master Data-
Product IBP-100 is from the Product Family- “WOMEN CLOTHING” and IBP-200 from “MEN CLOTHING”. As mentioned above, CUST_1 is the new customer entity for women’s clothing while CUST_2 is for men’s clothing. Hence, all data for IBP-100 should be moved to CUST_1and that pertaining to IBP-200 should move to CUST_2.
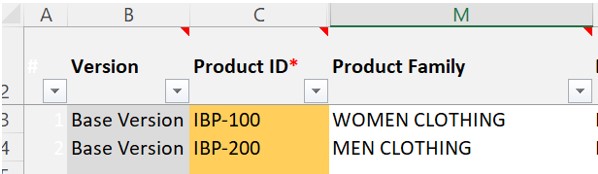
Fig.01- Product MD
Customer Master Data-
CUST_BFR is the existing Customer and CUST_1 & CUST_2 are the new ones. Since CUSTID is the attribute based on which realignment will be done, both Source & Target Customers must be created in the system before realignment. Other associated Master Data will automatically be created by the realignment process itself.

Fig.02- Customer MD
Customer Product Master Data-

Fig.03- Customer Product MD
Customer Source Master Data:

Fig.04- Customer Source MD
As you see, there are no ‘Customer Products’ or ‘Customer Sources’ pertaining to the new Customers CUST_1 and CUST_2. They will be created as part of the realignment process. See the comparison of “Before” and “After” realignment in the last section of this blog.
Key Figure Data- While data exists for CUST_BFR in several key figures, for simplicity, we are going to only realign “Actuals Qty” data in this example:

Fig.05- “Actuals Qty.” for existing planning combinations of CUST_BFR and IBP-100/IBP-200
Realignment Project:
Realignment Project is created in the “Manage Realignment Rules” app where all settings/conditions/filters related to realignment are maintained.

Fig.06- Manage Realignment Rules.

Fig.07- Manage Realignment Rules – Realignment Project- General Tab
After the “General” information for realignment project is updated, realignment steps need to be setup. We will create 2 realignment steps here. First step to realign data from CUST_BFR to CUST_1 for the product family “WOMEN CLOTHING”. See below screenshots to understand the configuration involved.

Fig.08- Manage Realignment Rules – Realignment Project- Realignment Steps- Step1
In the key figure section, you can choose the key figures that you want to copy data to. You can choose “All key figures” or “Selected key figures” (few other options are available as well). In this example, we will limit realignment to just one Key Figure- “Actuals Qty.”
NOTE: Only those key figures can be selected whose base planning level contains the attribute selected in the “Attribute Mapping” section as a root attribute. In our case, that attribute is CUSTID.

Fig.09- Manage Realignment Rules – Realignment Project- Realignment Steps- Step1(Contd.)
Second step would be to realign data from CUST_BFR to CUST_2 for the product family “MEN CLOTHING”. Every other setting is the same as that done in first step.
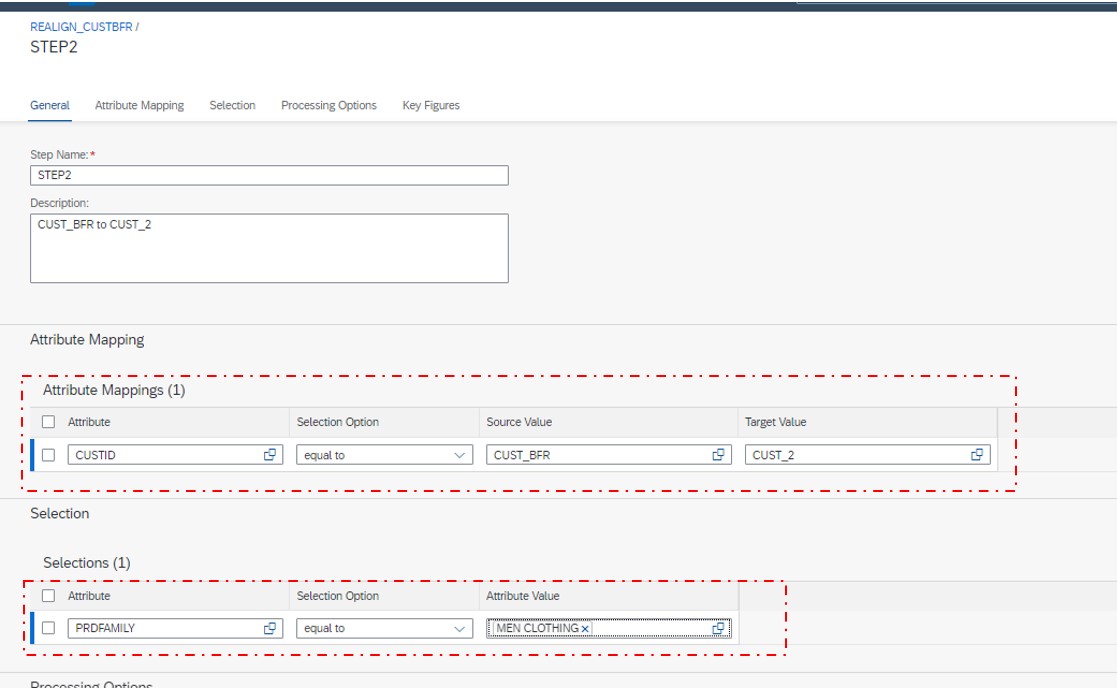
Fig.10- Manage Realignment Rules – Realignment Project- Realignment Steps- Step2
Once the settings are completed and saved, set the status of the realignment project to “Set to In Review.”

Fig.11- Manage Realignment Rules – Realignment Project- Status change to “Set to In Review”
Once the project is reviewed, the status of the project can be changed to “Approved.”

Fig.12- Manage Realignment Rules – Realignment Project- Status change to “Set to Approved”
Once the realignment step is approved, it is ready to be executed. Going back to the main page, you can see that the “Project Status” is “Approved.”

Fig.13- Manage Realignment Rules – Realignment Project- Project Status “Approved”
Executing Realignment Project:
Realignment can only be executed in background. For that, go to the “Application Jobs” app. Use the “Realign Planning Data” template to create a job to run realignment project in the background.
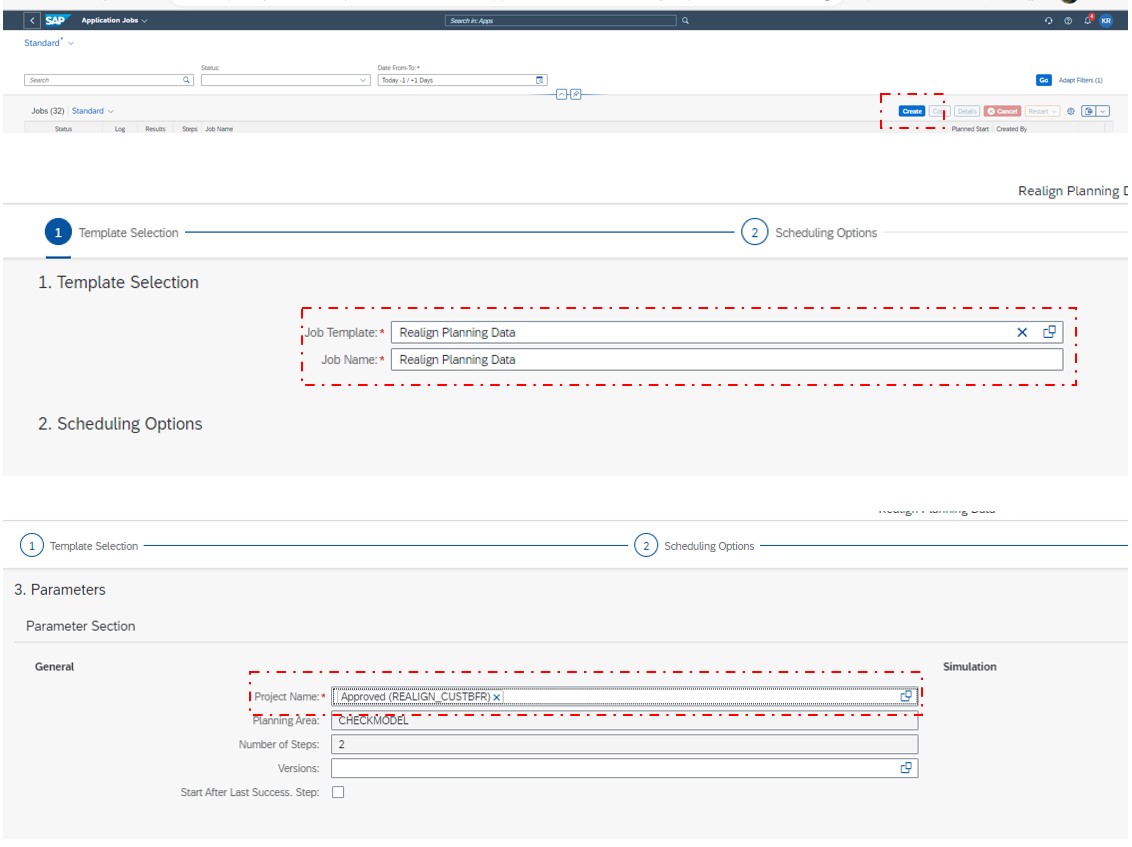
Fig.14- Application Jobs- Create and Schedule Realignment Job.
Once the job is successfully run, if you go back to “Manage Realignment Rules” app, you will see that the status the Realignment Step is changed to “Successfully executed.”

Fig.15- Manage Realignment Rules – Realignment Project- Project Status “Successfully Executed”
NOTE: Realignment can be run in simulation mode (in background though) and the results can be analyzed in the “Application Logs” app.
Master Data, Key Figure & Planning Object status before and after Realignment:

I hope the example shared above simplifies the understanding around “Realignment” process. You can read other posts relevant to IBP Demand at these links:
SAP Integrated Business Planning for demand | SAP | SAP Blogs
All Questions in SAP Integrated Business Planning for demand | SAP Community
Please feel free to share your feedback/thoughts.
2 Comments
You must be a registered user to add a comment. If you've already registered, sign in. Otherwise, register and sign in.
Labels in this area
-
aATP
1 -
ABAP Programming
1 -
Activate Credit Management Basic Steps
1 -
Adverse media monitoring
1 -
Alerts
1 -
Ausnahmehandling
1 -
bank statements
1 -
Bin Sorting sequence deletion
1 -
Bin Sorting upload
1 -
BP NUMBER RANGE
1 -
Brazil
1 -
Business partner creation failed for organizational unit
1 -
Business Technology Platform
1 -
Central Purchasing
1 -
Charge Calculation
2 -
Cloud Extensibility
1 -
Compliance
1 -
Controlling
1 -
Controlling Area
1 -
Data Enrichment
1 -
DIGITAL MANUFACTURING
1 -
digital transformation
1 -
Dimensional Weight
1 -
Direct Outbound Delivery
1 -
E-Mail
1 -
ETA
1 -
EWM
6 -
EWM - Delivery Processing
2 -
EWM - Goods Movement
3 -
EWM Outbound configuration
1 -
EWM-RF
1 -
EWM-TM-Integration
1 -
Extended Warehouse Management (EWM)
3 -
Extended Warehouse Management(EWM)
7 -
Finance
1 -
Freight Settlement
1 -
Geo-coordinates
1 -
Geo-routing
1 -
Geocoding
1 -
Geographic Information System
1 -
GIS
1 -
Goods Issue
2 -
GTT
2 -
IBP inventory optimization
1 -
inbound delivery printing
1 -
Incoterm
1 -
Innovation
1 -
Inspection lot
1 -
intraday
1 -
Introduction
1 -
Inventory Management
1 -
Localization
1 -
Logistics Optimization
1 -
Map Integration
1 -
Material Management
1 -
Materials Management
1 -
MFS
1 -
Outbound with LOSC and POSC
1 -
Packaging
1 -
PPF
1 -
PPOCE
1 -
PPOME
1 -
print profile
1 -
Process Controllers
1 -
Production process
1 -
QM
1 -
QM in procurement
1 -
Real-time Geopositioning
1 -
Risk management
1 -
S4 HANA
1 -
S4-FSCM-Custom Credit Check Rule and Custom Credit Check Step
1 -
S4SCSD
1 -
Sales and Distribution
1 -
SAP DMC
1 -
SAP ERP
1 -
SAP Extended Warehouse Management
2 -
SAP Hana Spatial Services
1 -
SAP IBP IO
1 -
SAP MM
1 -
sap production planning
1 -
SAP QM
1 -
SAP REM
1 -
SAP repetiative
1 -
SAP S4HANA
1 -
SAP Transportation Management
2 -
SAP Variant configuration (LO-VC)
1 -
SD (Sales and Distribution)
1 -
Source inspection
1 -
Storage bin Capacity
1 -
Supply Chain
1 -
Supply Chain Disruption
1 -
Supply Chain for Secondary Distribution
1 -
Technology Updates
1 -
TMS
1 -
Transportation Cockpit
1 -
Transportation Management
2 -
Visibility
2 -
warehouse door
1 -
WOCR
1
Related Content
- SAP Business Network For Logistics - Carrier Side ANSI-X12 EDI Setup and Testing for Road in Supply Chain Management Blogs by SAP
- SAP EWM FAQ Series: How to setup monitoring and alerts in Supply Chain Management Blogs by SAP
- DELIVERY SCHEDULE TARGET QUANTITY AND DIRECTORY OF SUPPLY SOURCES in Supply Chain Management Q&A
- How to use reorder point planning in SAP APO PP/DS in Supply Chain Management Blogs by SAP
- Hiring - SAP Solutions Analyst in Supply Chain Management Q&A
Top kudoed authors
| User | Count |
|---|---|
| 3 | |
| 2 | |
| 2 | |
| 2 | |
| 1 | |
| 1 | |
| 1 | |
| 1 | |
| 1 | |
| 1 |