
- SAP Community
- Products and Technology
- Technology
- Technology Blogs by SAP
- Outstretching SAP BTP with AppGyver - Part II
Technology Blogs by SAP
Learn how to extend and personalize SAP applications. Follow the SAP technology blog for insights into SAP BTP, ABAP, SAP Analytics Cloud, SAP HANA, and more.
Turn on suggestions
Auto-suggest helps you quickly narrow down your search results by suggesting possible matches as you type.
Showing results for
Advisor
Options
- Subscribe to RSS Feed
- Mark as New
- Mark as Read
- Bookmark
- Subscribe
- Printer Friendly Page
- Report Inappropriate Content
05-03-2021
7:55 AM

| Curious to implement an SAP E2E business scenario in AppGyver by integrating SAP BTP and other SAP modules? Let's implement this together! |
Hello folks, I hope you are enjoying working on AppGyver and I know how curious you would be to know how to integrate AppGyver to your CAP applications and BTP?
In this blog post, I will try to explain key integration points via a business use case of Water purifier as a service. You will learn about how to consume OData services in AppGyver and build an end-to-end SAP-specific use case.
Before we start, here is the quick recap from my last blog post and what we want to achieve-
A simple mobile and web application where users can subscribe to the water purifier on a need basis and also can monitor the health and other aspects of the filter in real-time via the application.
This has CAP module, IOT services as a backend, and OData which gets connected to AppGyver.
Refer Outstretching SAP BTP with AppGyver for the business use case explanation and motivation.
Develop CAP Application
Lets’ start by developing a CAP Project and OData services which we will consume in Appgyver (If this is your first CAP application, please refer to this for better understanding: https://community.sap.com/topics/cloud-application-programming ) -
Steps to develop a quick data model and expose the entities-
- Use BAS/VS studio for a development environment.
- Create a CAP project from a template.
- Add data model file under “db” folder and define the entities, in our case the entities are related to WPaaS.
using { managed, cuid } from '@sap/cds/common';

namespace wpaas;


entity WPModel {

    key SubsWPModeID: String(100);

    ModelName : String(100);

    Capacity : Integer;

    ManufacturingDate : Date;

    Price : Integer;

}


entity PlanDetails {

    key PlanTypeID: String(10);

    PlanTypeName : String(20);

}


entity SubscriptionDetails {

    key DeviceId : String(100);

    UserId : String(100);

    UserName : String(100);

    SubsWPModelD : String(10);

    PlanTypeID : String(10);

    SubsStartDate :Date;

    SubsEndDate : Date;

    InstallationDate : Date;

    SubsStatus : String(10);

    EngineerID : String(10);

    InstallationStatus : String(10);

    SubsPrice : String(10);

    CreditCardNumber : String(20);

    expiryDate : Date;

    CVV : String(10);


}


entity UserDetails {

    Key Id : String(100);

    Key UserName : String(100);

    Name : String(20);

    ContactNumber : String(20);

    EmailId : String(20);

    Address : String (100);

}


    // Data as provided by SAP IoT service

entity IoTData {

    key tenantId            : String(40);

    key capabilityId        : String(40);

    key sensorId            : String(40);

    key timestamp           : Double; // Unix timestamps

    gatewayTimestamp        : Double;

    measures: Composition of many {

        literconsumed :Integer;

        temperature : Integer;


    }

}- Create a service file under “srv” and expose the entities.
Service file -
using  wpaas from '../db/data-model';


service CatalogService @(path:'/api/v1') { //@(requires:'admin')


  entity WPModel as projection on wpaas.WPModel;

  entity PlanDetails as projection on wpaas.PlanDetails;

  entity SubscriptionDetails as projection on wpaas.SubscriptionDetails;

  entity UserDetails as projection on wpaas.UserDetails;

  entity IoTData as projection on wpaas.IoTData;


}- Build mta.yml file and deploy.
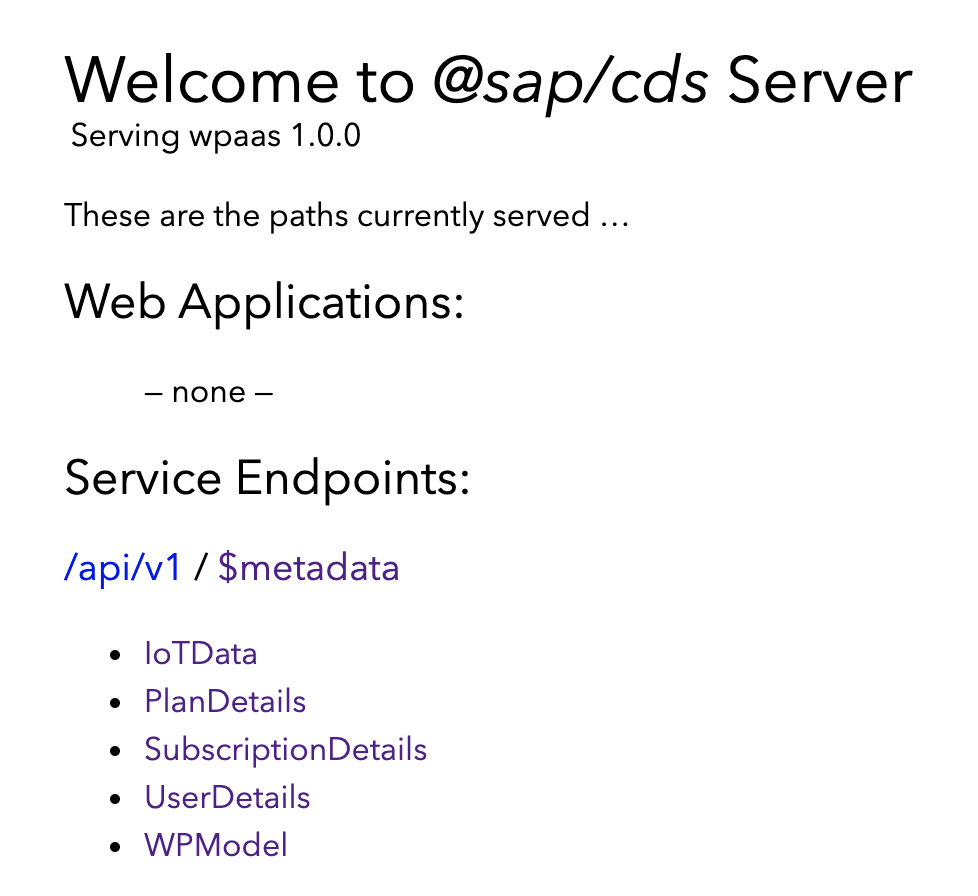
- Once you have your code ready, deploy the application and open the service endpoint.
Consume OData service in AppGyver – POST and GET
I would focus more on data binding topics and less on the editor and basic Appgyver functionalities in the below steps. If this is your first Appgyver application development, I would suggest referring to my Introduction to AppGyver blog post.
Create a new project in Appgyver via trial account and start the project-
Screen 1: Register/Login screen
This screen will be one of our entry points to the app -
Add the buttons and put navigation logic on "Register" button to open a new page.

Screen 2: Registration Screen – this screen will POST the user details to our HANA database
Place all the input controls and a “Register” button.
Open “Data” tab to start the POST functionality and start the integration!
Please follow the below screenshots-
 |  |  |  |
| Registration Screen | REST Integration | OData URL details | POST connection setup |
After adding the URL info of our OData service, time to test the connection.
Open the "test" tab and press on "test connection". Oops!! CORS Error!
Fix for CORS issue-
Create a "server.js" file in your CAP application and add the following code -
"use strict";


const cds = require("@sap/cds");

const cors = require("cors");

//const proxy = require("@sap/cds-odata-v2-adapter-proxy");


cds.on("bootstrap", app => app.use(cors()));


module.exports = cds.server;
Please refer blog post by Shibaji for more information on this issue and solution.
After adding the server.js file, deploy your CAP project again and test the connection.
Yes, it’s working!!! Now let’s set the schema.
 |  |  |  |  |
| Setting the schema | Create Record | Set custom object for POST | Data Variable | Binding the Inputs |
Open the preview on your phone/web and check the registration logic.
Hurray! Record is saved in our HANA database.
This is how our service looks after creating multiple records-
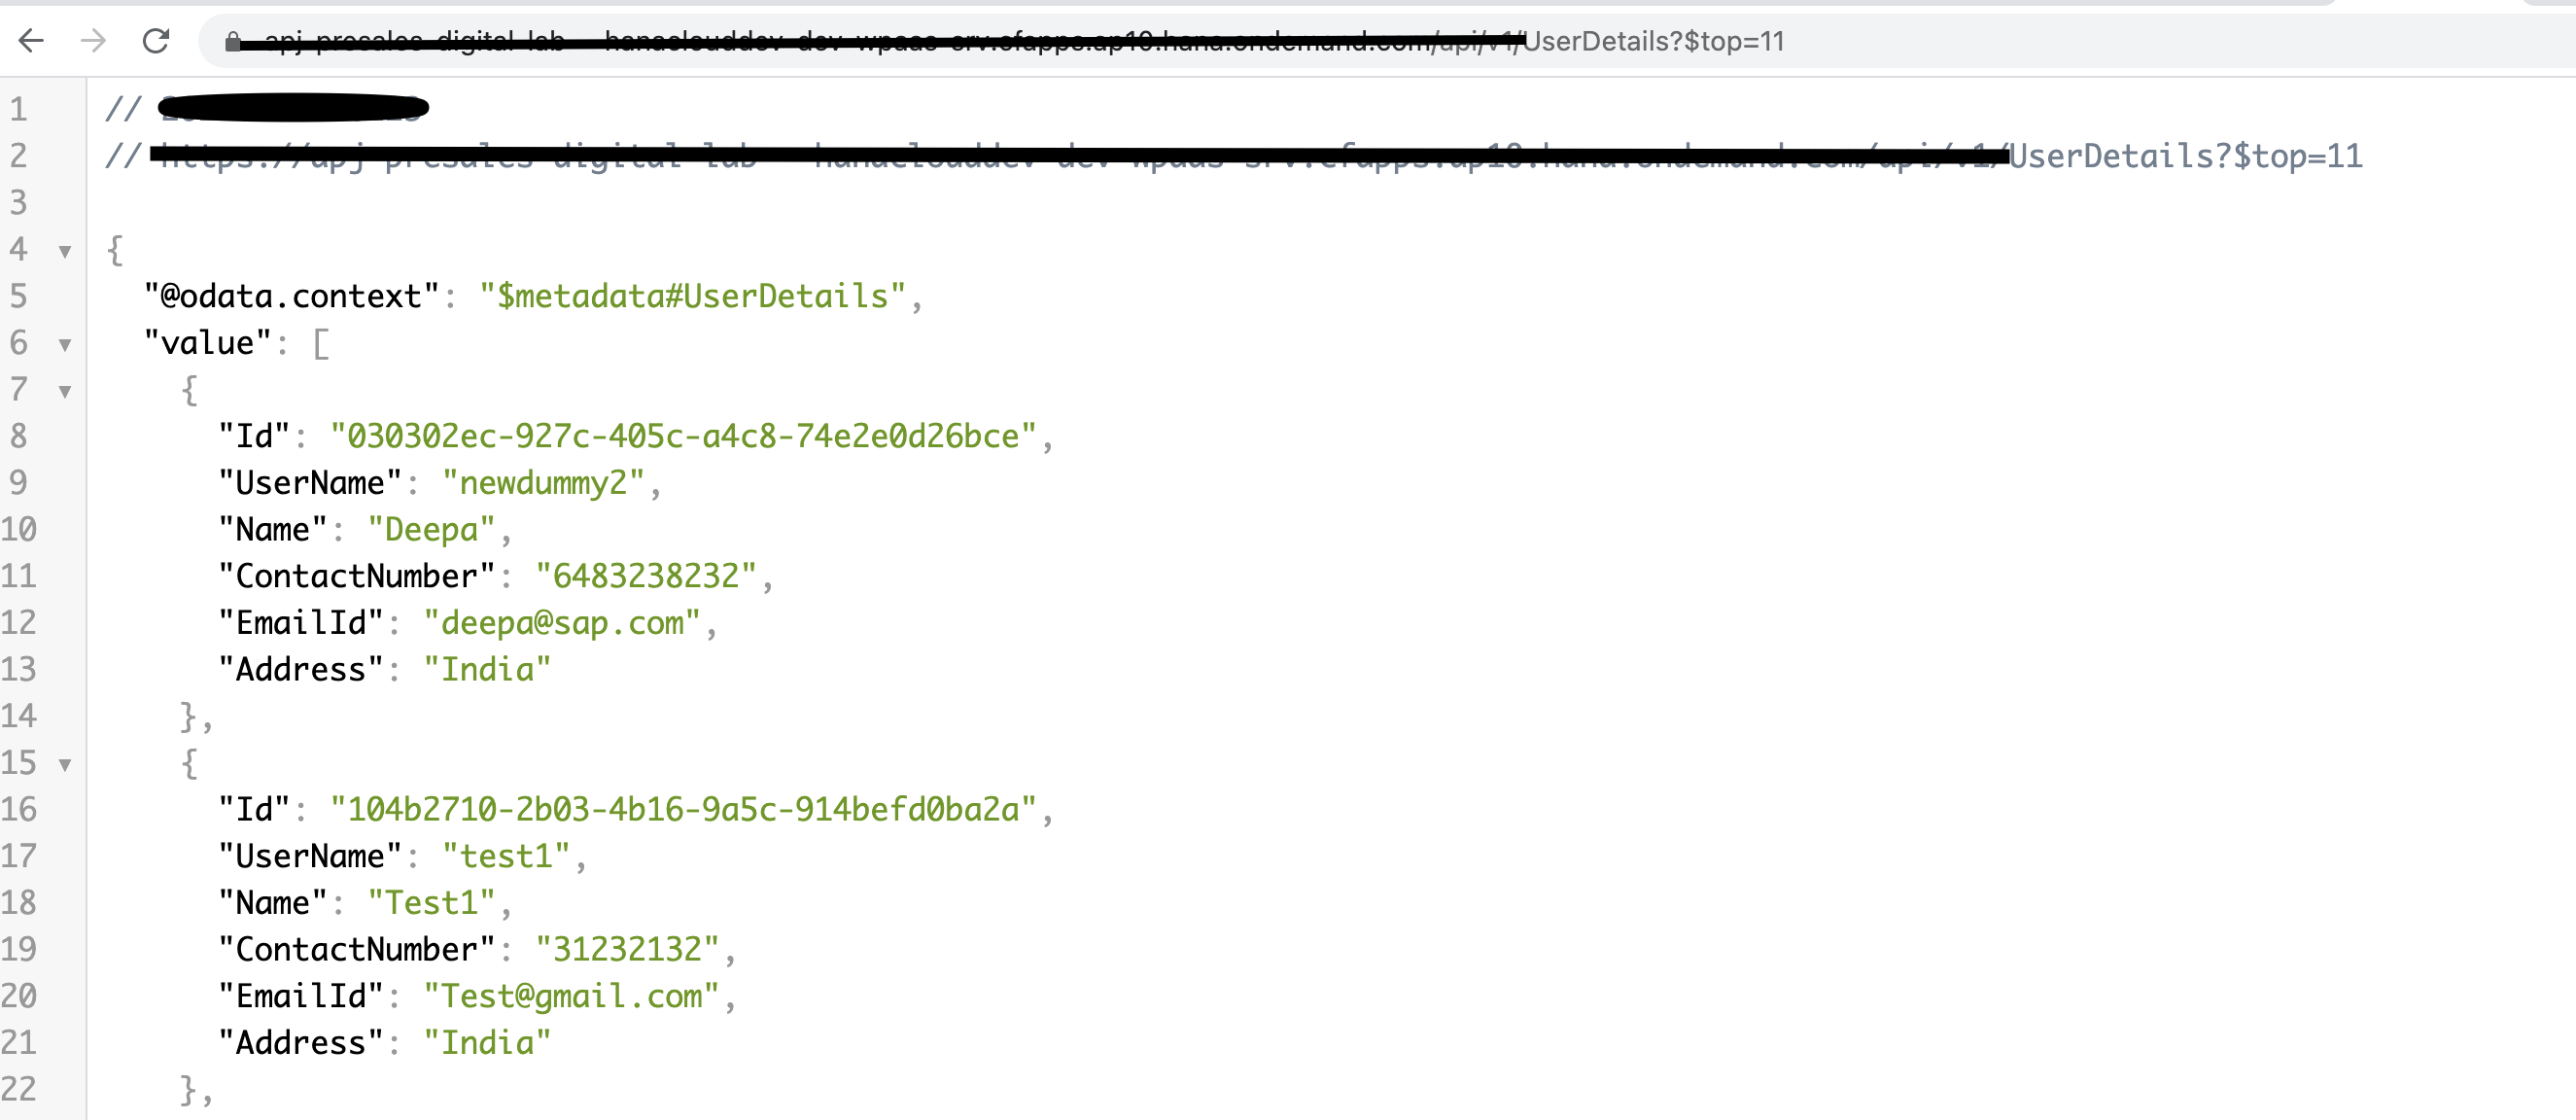
Screen 3: Now let’s move to create a simple page with a list of available water purifiers by getting the data from our HANA database via GET –
- Drag and drop the list and let’s start building this screen!
- Open the “data” panel
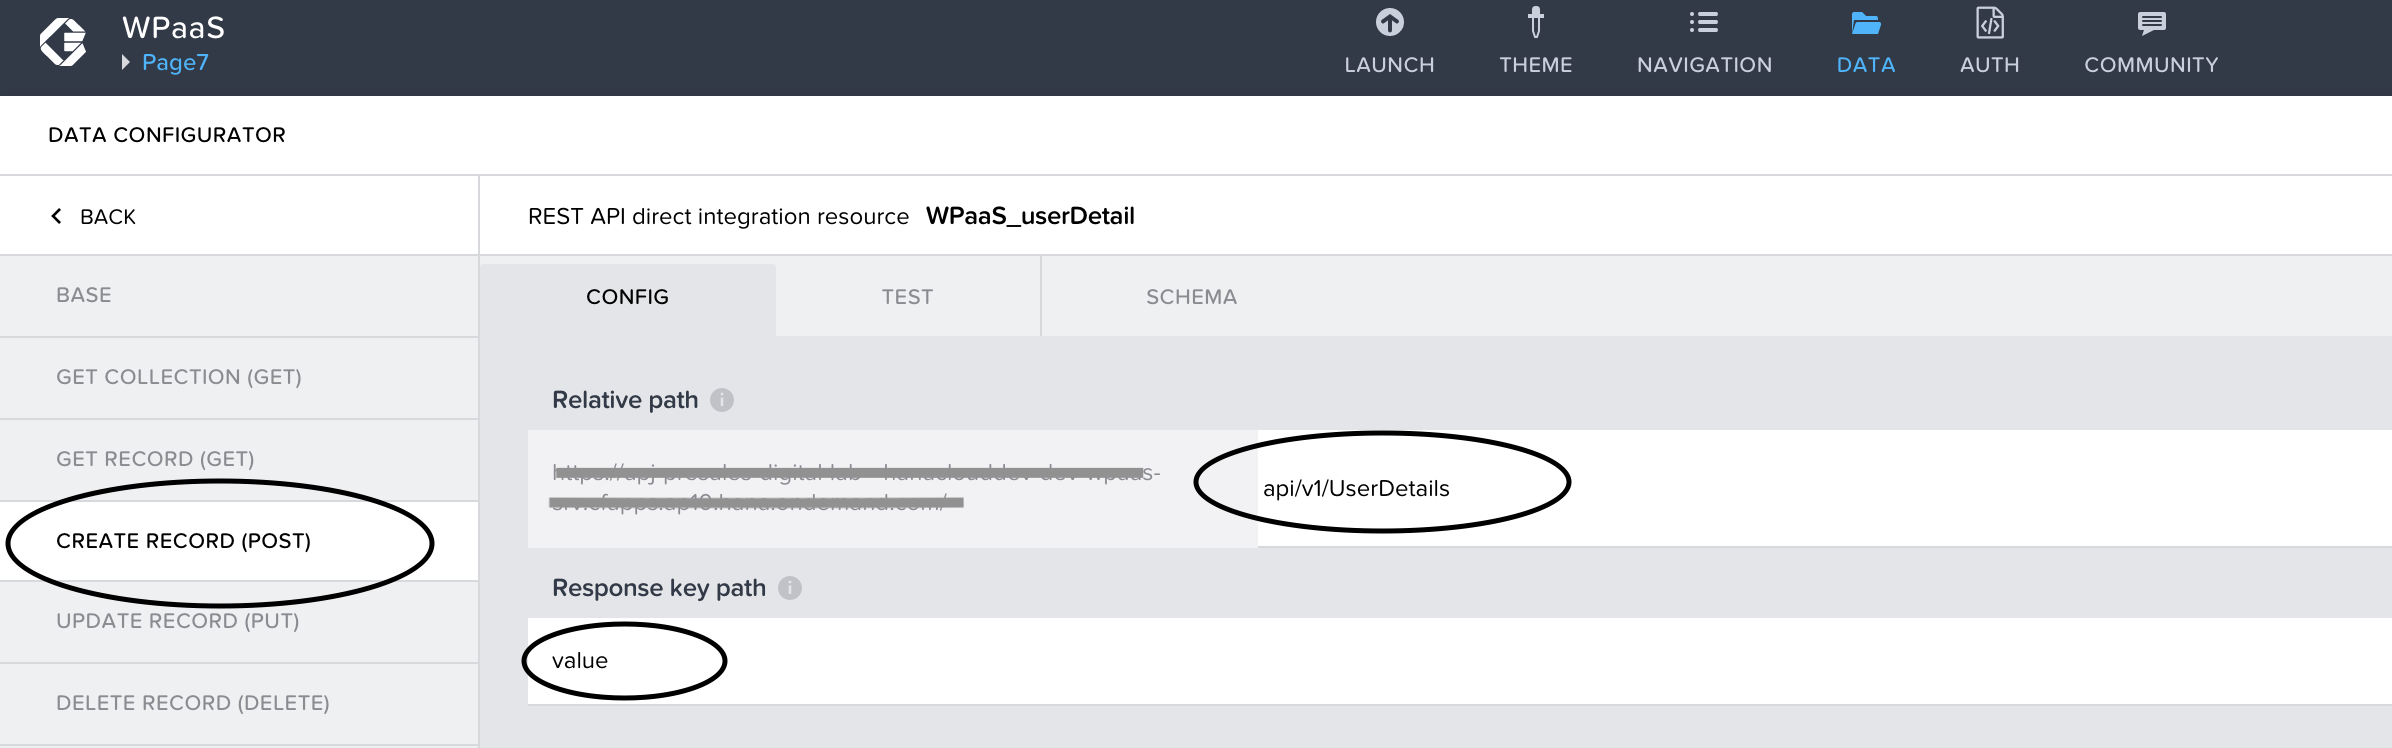
- Select “REST API Integration”
- Enter all the details as shown in the screenshot after adding the BASE details same as we did for the POST request.
 |  |  |  |  |
| List of Water Purifiers | Set the URL | Test Connection | Data Variable | Bind the List |
Screen 4: Subscription plan choose screen - POST data
In this screen, we will create a POST request to another service to store the plan details and also will use formulas and variables to fill subscription start and end dates based on the plan selected.
 |  | 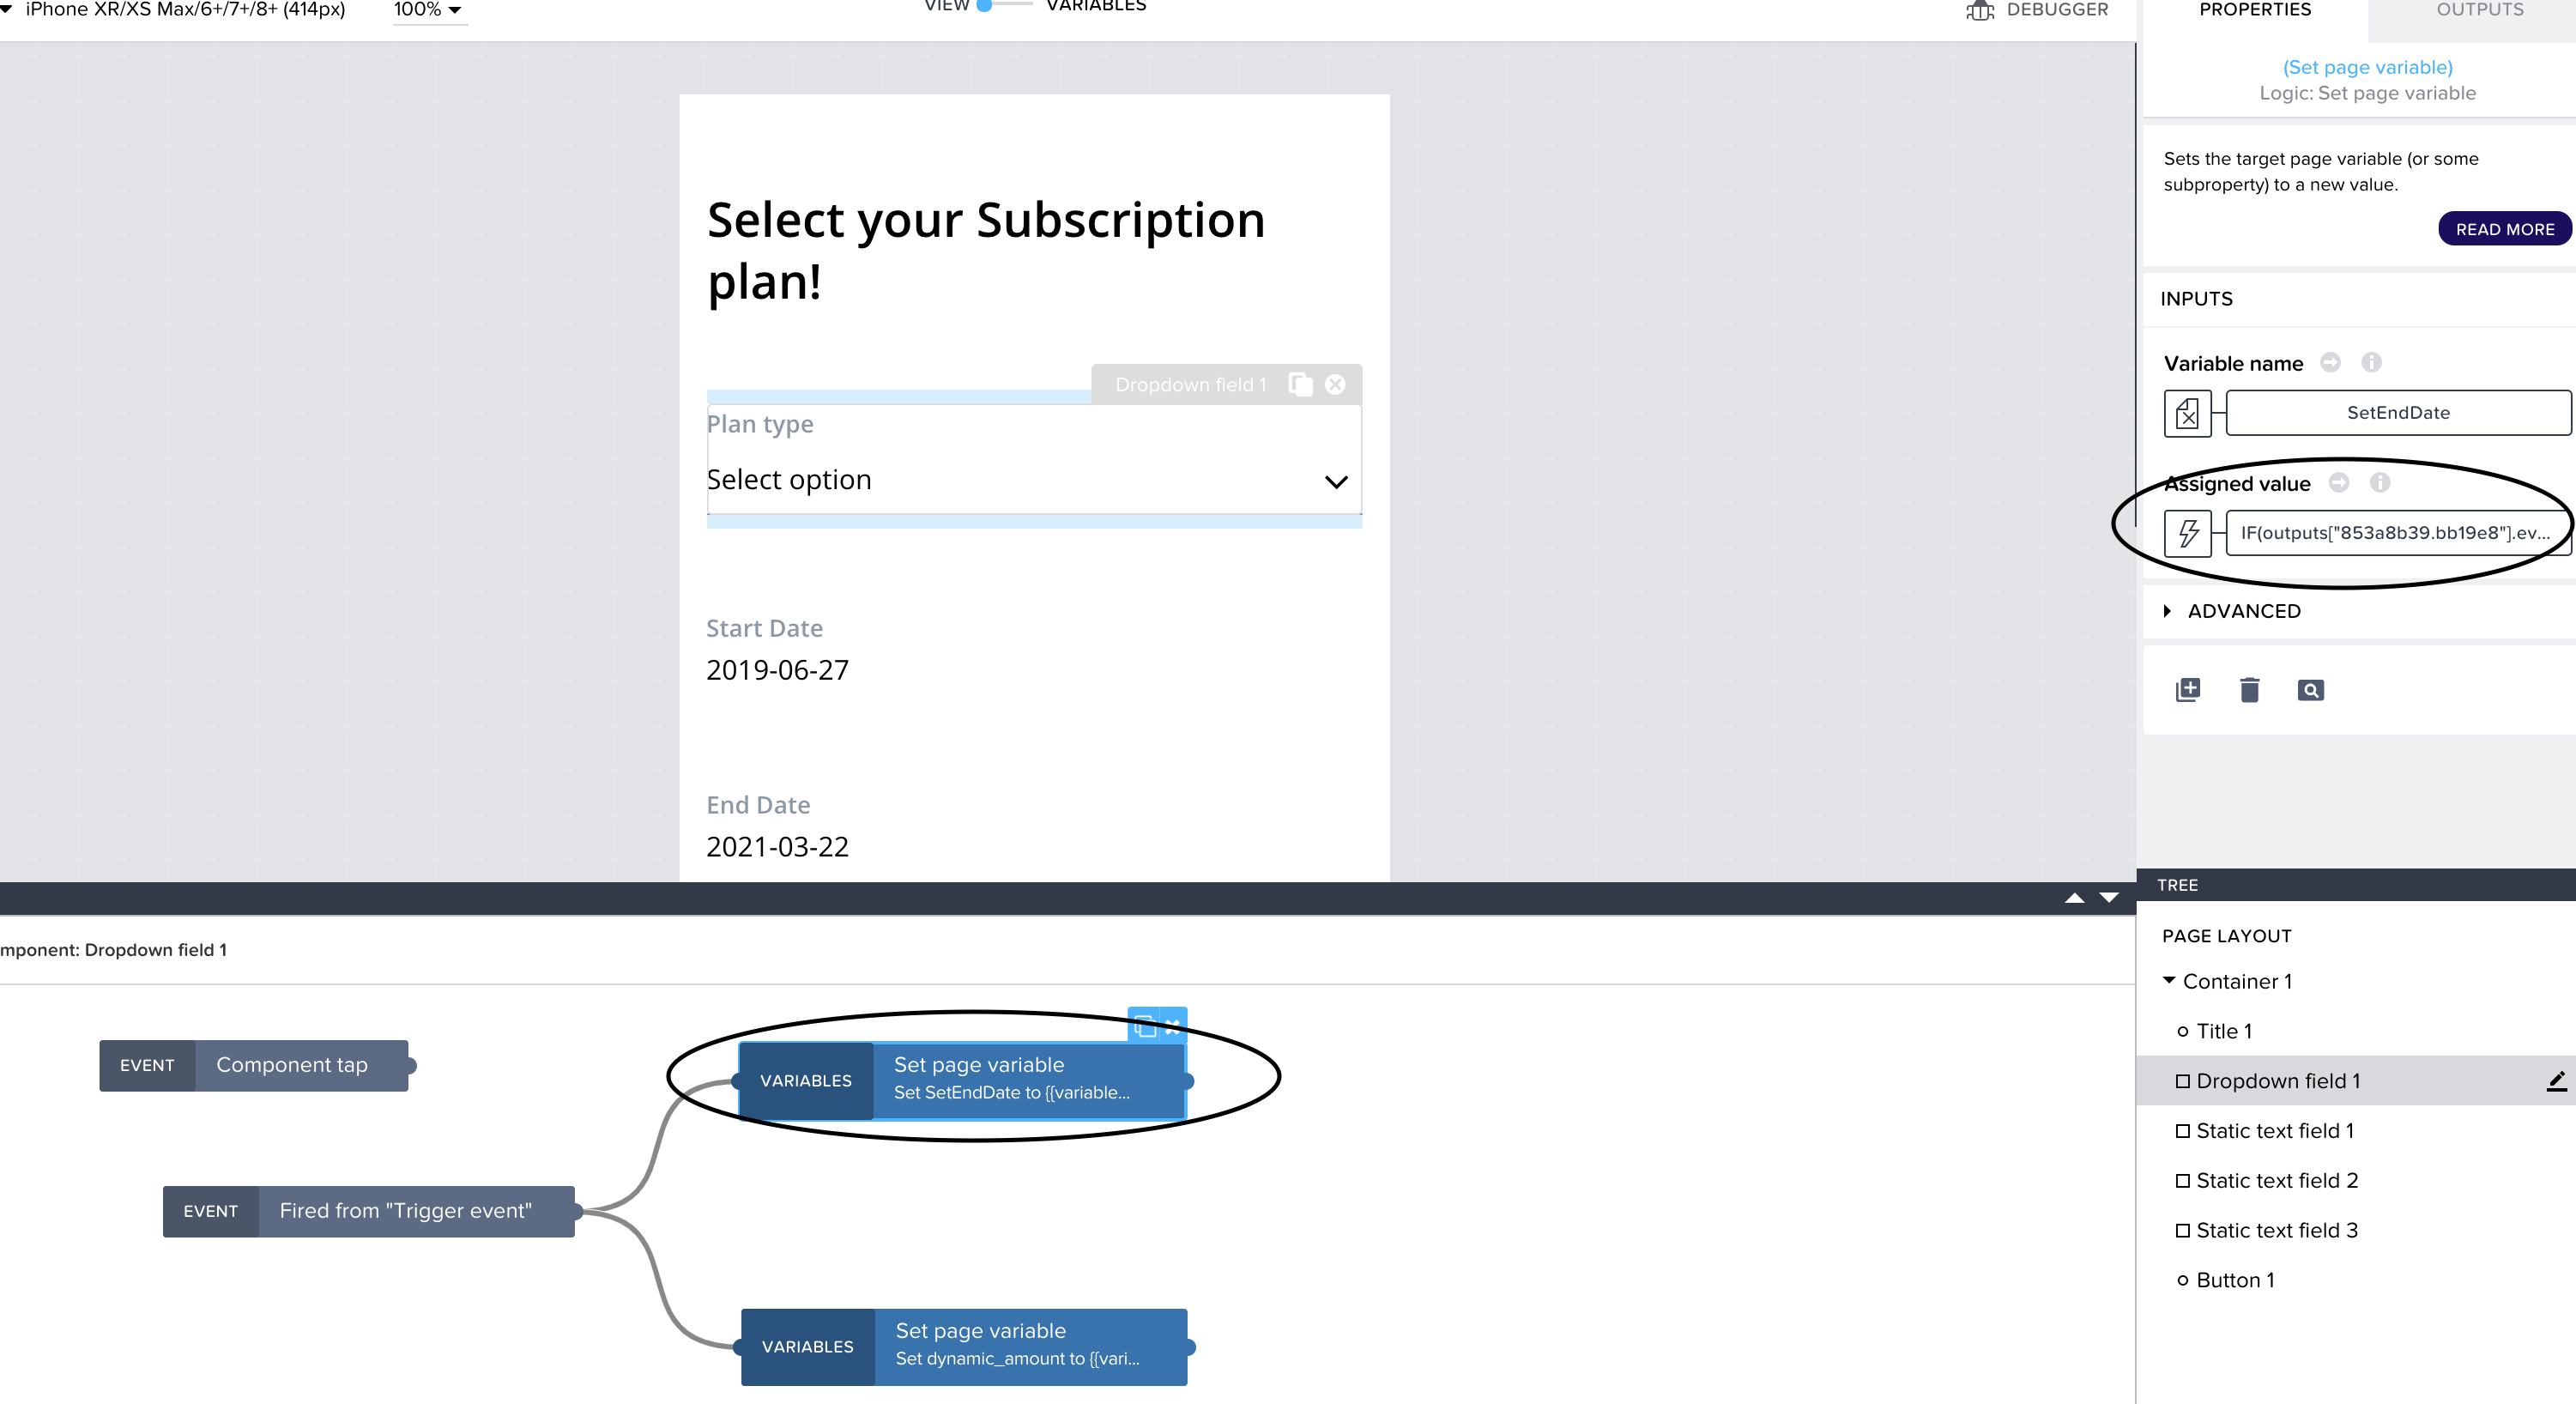 |  |
| Select Plan Screen | Dropdown Binding | Set Page Variable - End Date | Formula for page variable- End Date |
 |  |  |  |
| Set Page Variable - Amount | Formula for page variable- Amount | Connection for POST | Set custom object for POST |
Screen 5: confirmation screen
On the success of creating the record, we will just navigate to a new page with background image and success text.

And with this screen, our consumer flow is completed!
After the user is subscribed to a water purifier, the request will go to the technician or service engineer to process the request and install the device at the User's address.
Let's build a quick and simple app for that as well-
Service Engineer Application
Start another project in AppGyver and build these screens-
Screen 1 - Login and navigate to the list of subscriptions.
Screen 2 - Detail page with all the info about installment, QR Code functionality, and installation.
Please refer to the screenshots to understand the flow.
 |  |  |  |  |  |
| Log in screen | List of subscriptions | Set App Variables | Installation Details | QR code | Scan and display QR code value |
The installation flow looks complete!
Now the user is all set to use the water purifier dashboard screen. Open our first page from the consumer app we developed at the start-
Screen 1: User clicks on Login - navigate to a new page for login with username
Enter username and store in a variable that we will use to pass the filter to our service to show details of the logged-in user.
 |  |
| Login with username | Store the username in variable |
Screen 7: Dashboard screen
In this screen, we will show the IoT data, create an IoT device in the SAP IoT cockpit, and post the data to our HANA database via the data simulator.
Please check the entity code I added at the start of this blog post and focus on the IoT data entity, this will be the service that will have the IoT data.
IoT Data connection and IoT Data simulator - Refer to IoT Blog Post by jayadnure
POST from IoT to our HANA database - Refer to Blog post by gunteralbrecht
After the data is pushed to our OData service, Let's build the dashboard to show the data-
I have used two container control for dashboard screen layout, one is a simple container and a row container.
 |  |  |  |  |
| Dashboard screen | capacity left from simulated IoT data-GET | Test Connection | Set the schema and bind the text | formula to show the from our IoT device |
 |  |  |  | |
| OData filter | Formula tab | Filter health Binding | Formula- filter health |
Hurray, this brings us to the end of this blog post!
We covered the WPaaS(Water Purifier as a Service) use case with 2 end to end applications connected with SAP BTP, all developed without coding!
I hope you all got an overview with a working prototype and like me, you too are amazed how quickly we can develop a POC in AppGyver!
Please leave your questions/feedback in the comments section, Thanks for reading!
Reference Links -
- https://docs.appgyver.com/
- https://cap.cloud.sap/docs/
- https://community.sap.com/topics/cloud-application-programming
- https://blogs.sap.com/2020/05/27/water-purifier-as-a-service-with-sap-cloud-platform-internet-of-thi...
- https://blogs.sap.com/2020/08/31/e2e-sap-cloud-platform-internet-of-things-to-sap-analytics-cloud/
- https://blogs.sap.com/2021/03/22/6.-managing-back-end-calls/
Labels:
1 Comment
You must be a registered user to add a comment. If you've already registered, sign in. Otherwise, register and sign in.
Labels in this area
-
ABAP CDS Views - CDC (Change Data Capture)
2 -
AI
1 -
Analyze Workload Data
1 -
BTP
1 -
Business and IT Integration
2 -
Business application stu
1 -
Business Technology Platform
1 -
Business Trends
1,661 -
Business Trends
88 -
CAP
1 -
cf
1 -
Cloud Foundry
1 -
Confluent
1 -
Customer COE Basics and Fundamentals
1 -
Customer COE Latest and Greatest
3 -
Customer Data Browser app
1 -
Data Analysis Tool
1 -
data migration
1 -
data transfer
1 -
Datasphere
2 -
Event Information
1,400 -
Event Information
65 -
Expert
1 -
Expert Insights
178 -
Expert Insights
280 -
General
1 -
Google cloud
1 -
Google Next'24
1 -
Kafka
1 -
Life at SAP
784 -
Life at SAP
11 -
Migrate your Data App
1 -
MTA
1 -
Network Performance Analysis
1 -
NodeJS
1 -
PDF
1 -
POC
1 -
Product Updates
4,577 -
Product Updates
330 -
Replication Flow
1 -
RisewithSAP
1 -
SAP BTP
1 -
SAP BTP Cloud Foundry
1 -
SAP Cloud ALM
1 -
SAP Cloud Application Programming Model
1 -
SAP Datasphere
2 -
SAP S4HANA Cloud
1 -
SAP S4HANA Migration Cockpit
1 -
Technology Updates
6,886 -
Technology Updates
408 -
Workload Fluctuations
1
Related Content
- SAP Build Apps + Google Vertex AI API ( Gemini Pro ) + CAP - Get Gemini API inside SAP Build Apps.. in Technology Blogs by Members
- Show/Hide parts user roles Appgyver and Firebase in Technology Q&A
- [SAP BTP Onboarding Series] Joule – Getting Started with Joule and SAP SuccessFactors in Technology Blogs by SAP
- Top 10 takeaways #SAPTeched 2023 in Technology Blogs by SAP
- 5 years already? An interesting journey in Process Automation at SAP in Technology Blogs by SAP
Top kudoed authors
| User | Count |
|---|---|
| 13 | |
| 11 | |
| 10 | |
| 9 | |
| 9 | |
| 7 | |
| 6 | |
| 5 | |
| 5 | |
| 5 |