
- SAP Community
- Products and Technology
- Technology
- Technology Blogs by SAP
- Consuming SAP HANA data into SAP Analytics Cloud t...
Technology Blogs by SAP
Learn how to extend and personalize SAP applications. Follow the SAP technology blog for insights into SAP BTP, ABAP, SAP Analytics Cloud, SAP HANA, and more.
Turn on suggestions
Auto-suggest helps you quickly narrow down your search results by suggesting possible matches as you type.
Showing results for
Advisor
Options
- Subscribe to RSS Feed
- Mark as New
- Mark as Read
- Bookmark
- Subscribe
- Printer Friendly Page
- Report Inappropriate Content
02-05-2020
10:35 AM
Hello,
I am Venkata Saikrishna, working as part of Product Management in SAP Analytics Cloud area.
A lot of colleagues, partners and customers have been often asking me questions like following:
"How easy it is to configure the live connection between SAP Cloud platform HANA to SAP Analytics Cloud?"
What are those precise list of privileges to be assigned to the user to be able to create a connection and to be able to consume the SAP cloud platform HANA data live into SAP Analytics Cloud?
Can you show us a guide which describes end-to-end process of right from creating a SCP HANA Database until consuming that content into SAP Analytics Cloud?
After going through all these questions, I wanted to put up all these topics together with and end-to-end blog post to make it easy for our community, so that all of us could learn, how powerful SAP Analytics Cloud is and how easy it is to setup the whole interoperability.
Disclaimer: SAP does not recommend to use the trail version of SAP HANA or any trail versions of SAP products to be used by customers for any official purposes. This is purely to showcase the possibilities around live connectivity between SAP HANA and SAP Analytics Cloud.
This blog post would help you to give an end to end understanding of how live data from SAP HANA DB cloud can be consumed and all the technical aspects involved into it.
Pre-requisites:
The steps involved in this process of consuming the live SAP HANA data into SAP Analytics Cloud are:
Note: schema is automatically created in SAP HANA while creating the user.

Note: In SAP HANA, I am creating the user with name 'SAI' and I will be using this throughout the blog post.
3. Create Table: (Based on your data)

CREATE TABLE table_name(
Order_ID DOUBLE,
Date VARCHAR(100),
Sales_Agent_Last_Name VARCHAR(100),
Sales_Agent_First_Name VARCHAR(100),
Customer VARCHAR(100),
Customer_Segment VARCHAR(100),
Country VARCHAR(100),
Latitude DOUBLE,
Longtitude DOUBLE,
Customer_Status VARCHAR(100),
Product VARCHAR(100),
Product_Type VARCHAR(100),
No_Customer_Meetings DOUBLE,
Units_Sold DOUBLE,
Order_Value DOUBLE
);


4. Load data into the table:
Now to load the data into SAP HANA tables, I am figuring our different possible ways.
For my test purpose I have just converted the records into SQL statements and inserted them.
I will update this blog post with the other possibilities of loading the data, as soon as I have the exhaustive list.
5. Add necessary permissions to the SAP HANA user:
6. Create Calculation view:


Now that I am done with all the required configurations on SAP HANA, I will need to execute the further steps on SAP Analytics Cloud.
7. Create live connection:

8. Create model in SAP Analytics Cloud:


9. Create SAP Analytics Cloud story:


P.S. all the screenshots used above are the made by myself during the execution process of the end to end scenario
Conclusion:
So, it is this simple to consume the data from SAP HANA into SAP Analytics Cloud.
In case if there are any questions related to this blog post or in general about SAP Analytics Cloud, connectivity, please feel free to contact us through the community and we will try our best to get your questions answered asap.
Thanks for reading the blog post!
I am Venkata Saikrishna, working as part of Product Management in SAP Analytics Cloud area.
A lot of colleagues, partners and customers have been often asking me questions like following:
"How easy it is to configure the live connection between SAP Cloud platform HANA to SAP Analytics Cloud?"
What are those precise list of privileges to be assigned to the user to be able to create a connection and to be able to consume the SAP cloud platform HANA data live into SAP Analytics Cloud?
Can you show us a guide which describes end-to-end process of right from creating a SCP HANA Database until consuming that content into SAP Analytics Cloud?
After going through all these questions, I wanted to put up all these topics together with and end-to-end blog post to make it easy for our community, so that all of us could learn, how powerful SAP Analytics Cloud is and how easy it is to setup the whole interoperability.
Disclaimer: SAP does not recommend to use the trail version of SAP HANA or any trail versions of SAP products to be used by customers for any official purposes. This is purely to showcase the possibilities around live connectivity between SAP HANA and SAP Analytics Cloud.
This blog post would help you to give an end to end understanding of how live data from SAP HANA DB cloud can be consumed and all the technical aspects involved into it.
Pre-requisites:
- SAP Analytics Cloud tenant with admin access
- An SAP HANA DB.
The steps involved in this process of consuming the live SAP HANA data into SAP Analytics Cloud are:
- Create an SAP HANA DB
- Create user with necessary privileges.
- Create a Schema & Table
- Load data into the table
- Add permissions to the SAP HANA user
- Create calculation view
- Create the live connection in SAP Analytics Cloud
- Caution: Select the right environment during the connection creation
- Use the same DB user in connection dialog.
- Create a model
- Create stories on top of the model.
- Create a SAP HANA DB: I assume that you already have a SAP HANA DB created. If not, one must need to create a DB to execute the steps further
- Create user with necessary privileges:
- Login to the cockpit : https://account.hana.ondemand.com/cockpit/#/home/allaccounts
- Choose the SCP account
- From the menu at the left side, choose: "Databases & Schemas"
- Click on your DB name
- Now click on the "SAP HANA Web-Based Development Workbench"
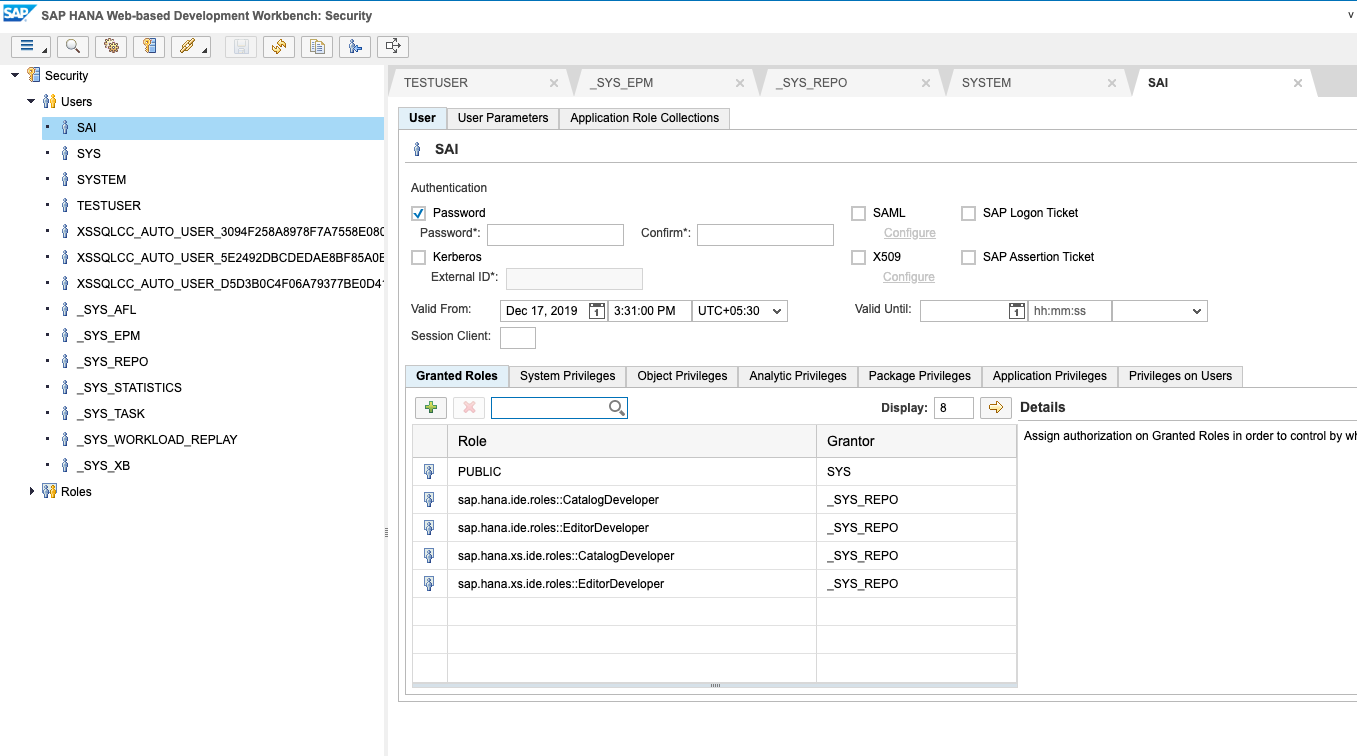
- Login to the security section in SAP HANA workbench with "system" user.
- Choose "Security" tab.
- Right click on "Users" -> "New user" -> Enter the user name of your choice along with the password.

Note: schema is automatically created in SAP HANA while creating the user.
- Below are the Privileges you will need to add to the user:
- Catalog privileges are to be able to create table
- Editor privileges are to be able to create Calculation views.
- Below are the Privileges you will need to add to the user:
Note: In SAP HANA, I am creating the user with name 'SAI' and I will be using this throughout the blog post.
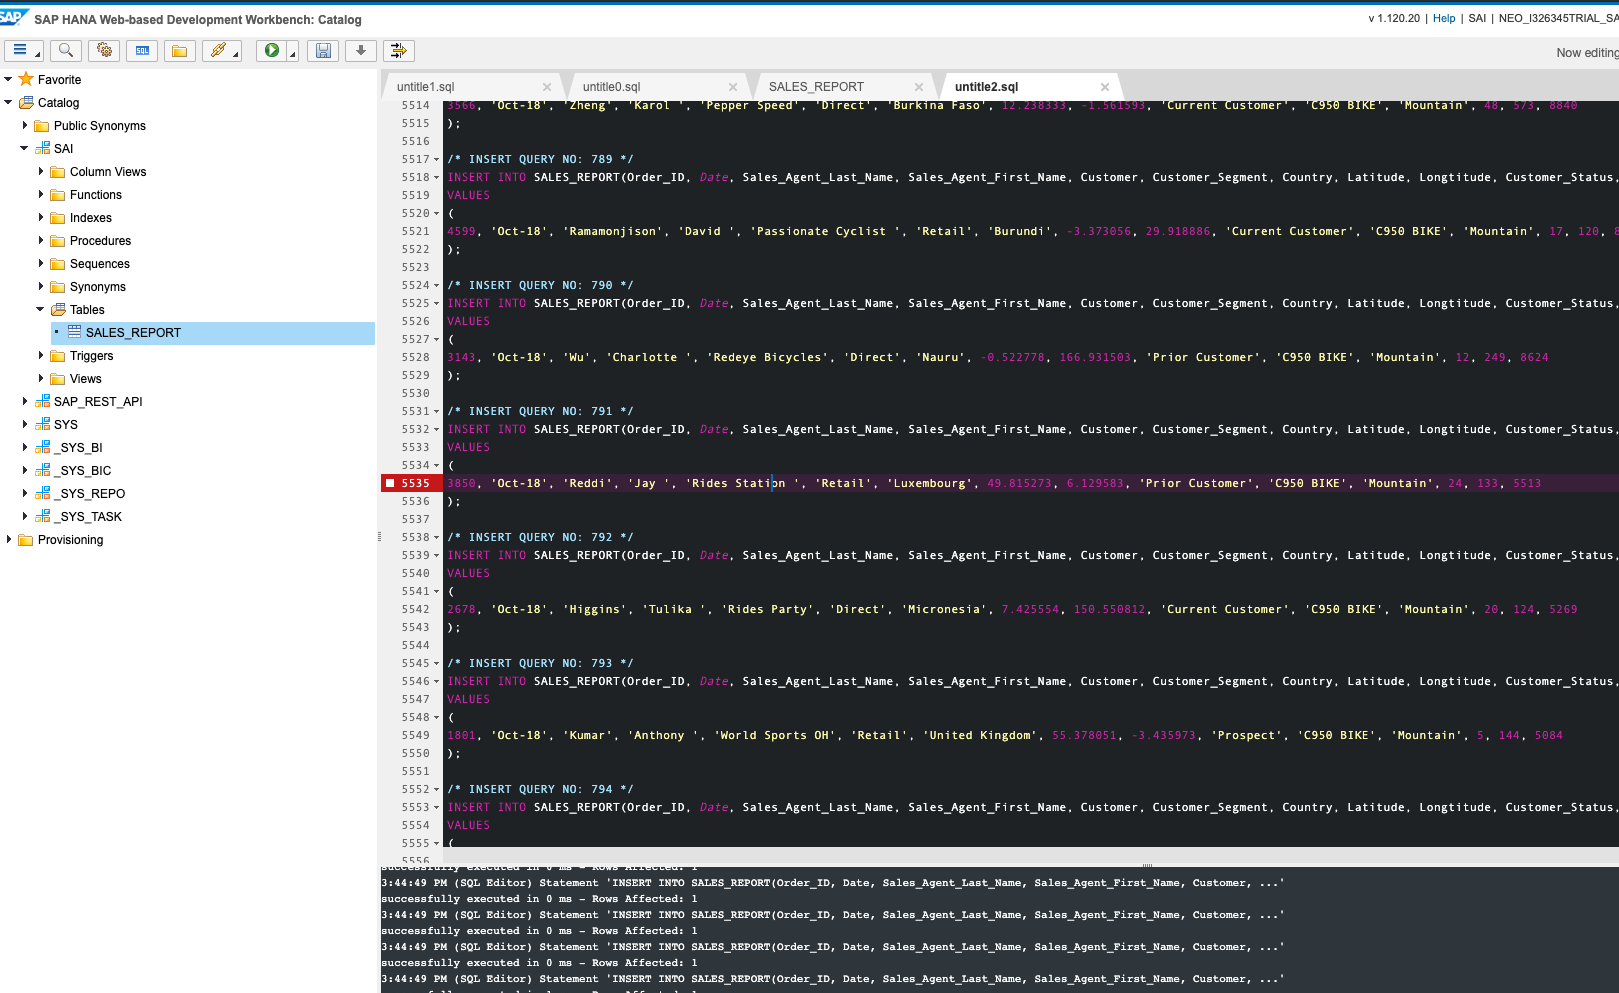
3. Create Table: (Based on your data)
- Go to Catalog in SAP HANA workbench. Login with the user created above.
- Below is an example SQL statement to create the table.
CREATE TABLE table_name(
Order_ID DOUBLE,
Date VARCHAR(100),
Sales_Agent_Last_Name VARCHAR(100),
Sales_Agent_First_Name VARCHAR(100),
Customer VARCHAR(100),
Customer_Segment VARCHAR(100),
Country VARCHAR(100),
Latitude DOUBLE,
Longtitude DOUBLE,
Customer_Status VARCHAR(100),
Product VARCHAR(100),
Product_Type VARCHAR(100),
No_Customer_Meetings DOUBLE,
Units_Sold DOUBLE,
Order_Value DOUBLE
);
- I have created the below table with the table name "SALES_REPORT".
4. Load data into the table:
Now to load the data into SAP HANA tables, I am figuring our different possible ways.
For my test purpose I have just converted the records into SQL statements and inserted them.
I will update this blog post with the other possibilities of loading the data, as soon as I have the exhaustive list.
5. Add necessary permissions to the SAP HANA user:
- Login to SAP HANA workbench with "SYSTEM" user.
- Go to security tab
- Add the below roles for "SYSTEM" user.
- Go to catalog now again (Make sure you are going to the catalog with system user)
- Execute the below SQL to assign INA role: (In this example, I am assigning all the necessary roles to the user SAI that I've created in the beginning.)
- Call GRANT_ACTIVATED_ROLE('sap.bc.ina.service.v2.userRole::INA_USER','SAI');
- grant MODELING SAI
- Execute the following SQL statements with SAI user.
- grant select, select metadata, execute on schema SAI to _sys_repo with grant option;
6. Create Calculation view:
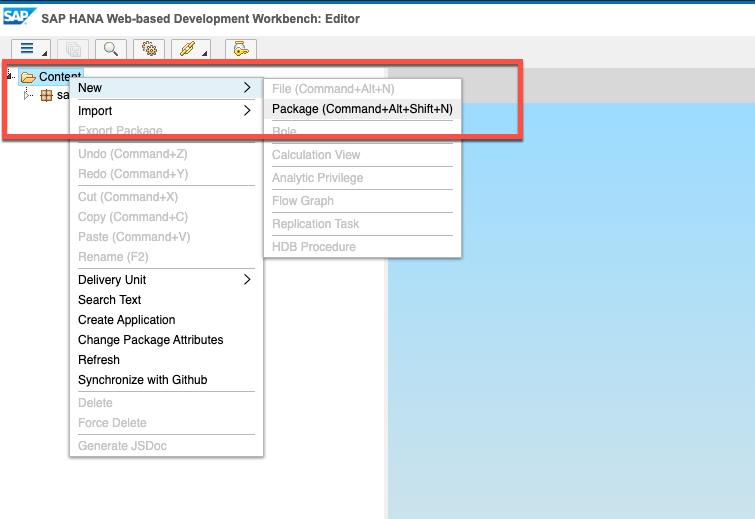
- Login to SAP HANA workbench with SAI user(SAP HANA user which is a non-system user).
- Go to editor section.
- Create a new package:
- Enter Package name:
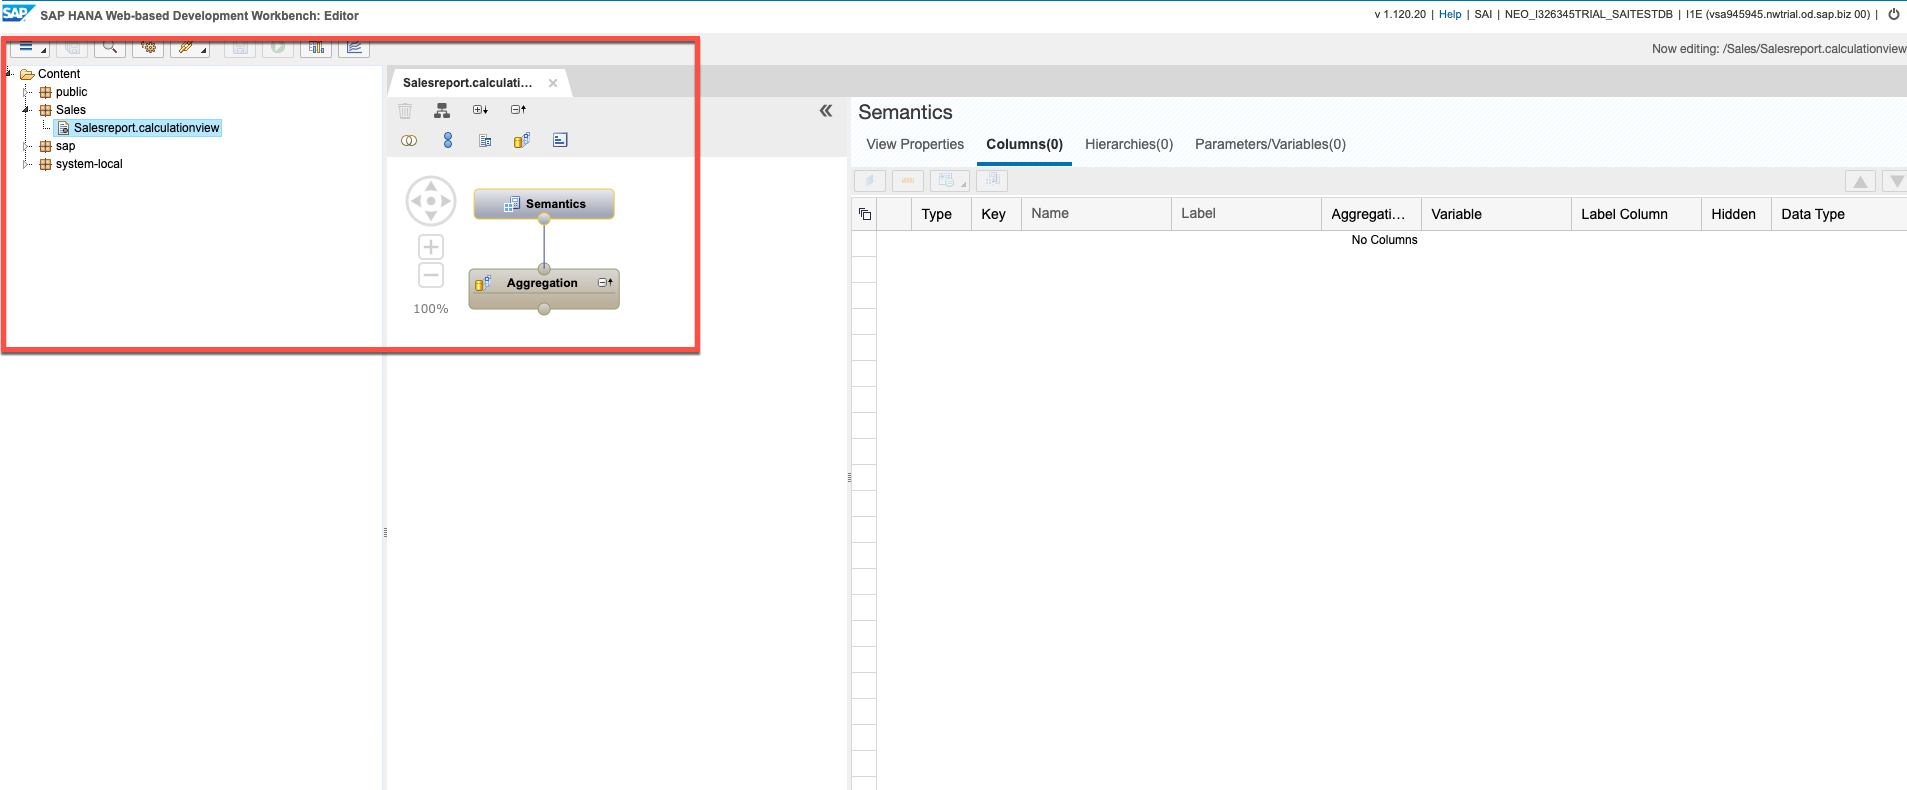
- Create a new Calc view:
- Calc view is now created:
- Under 'mapping', I have added the data source:
- Click on the calc view(e.g. sales report). It displays all the fields/data sources as shown below:
- Right click on "Calc view" (e.g. sales report) and choose "Add to output".
- It maps all the fields to output:
- Now Save the calc view
- Activate the calc view, by right clicking on the Calc view -> Activate:
Now that I am done with all the required configurations on SAP HANA, I will need to execute the further steps on SAP Analytics Cloud.
7. Create live connection:
- Login to the SAP Analytics Cloud tenant
- In the menu, go to Connections -> Click on '+' button to create a new onnection.
- Explore the "Connect to Live data"
- Choose "SAP HANA"
- Enter all the fields like shown below:
8. Create model in SAP Analytics Cloud:
- Using the live connection I have just created, I will now create a live model.
- Choose "Get from a data source" and then "SAP HANA". As the data source on the right side of the screen.
- Search for the data source. Here the data source is nothing but the calc view that I have created in the SAP HANA. (E.g. Sales report)
- Now the modeling page opens where the 'meta data' page can be seen. In case of live connection the data will stay in the data source itself and it would not be moved to SAP Analytics Cloud. Due to this fact, I can’t see the data in SAP Analytics Cloud live model, but only the meta data.
- Now save the model under a folder of your choice. Typically under public, you may create a folder with the name "Models' and save all the models here.
9. Create SAP Analytics Cloud story:
- Now let's create the story. Go to Menu -> Create -> Story.
- Choose "Add a Responsive Page"
- Insert a new graph and then go to designer to add the required dimensions/measures.
- I'm now good to go ahead and create any kind of visualizations to create a full story on top of the data that I have on my SAP HANA:
P.S. all the screenshots used above are the made by myself during the execution process of the end to end scenario
Conclusion:
So, it is this simple to consume the data from SAP HANA into SAP Analytics Cloud.
In case if there are any questions related to this blog post or in general about SAP Analytics Cloud, connectivity, please feel free to contact us through the community and we will try our best to get your questions answered asap.
Thanks for reading the blog post!
- SAP Managed Tags:
- SAP Analytics Cloud,
- SAP Analytics Cloud, connectivity,
- SAP HANA,
- SAP Business Technology Platform
Labels:
8 Comments
You must be a registered user to add a comment. If you've already registered, sign in. Otherwise, register and sign in.
Labels in this area
-
ABAP CDS Views - CDC (Change Data Capture)
2 -
AI
1 -
Analyze Workload Data
1 -
BTP
1 -
Business and IT Integration
2 -
Business application stu
1 -
Business Technology Platform
1 -
Business Trends
1,661 -
Business Trends
88 -
CAP
1 -
cf
1 -
Cloud Foundry
1 -
Confluent
1 -
Customer COE Basics and Fundamentals
1 -
Customer COE Latest and Greatest
3 -
Customer Data Browser app
1 -
Data Analysis Tool
1 -
data migration
1 -
data transfer
1 -
Datasphere
2 -
Event Information
1,400 -
Event Information
65 -
Expert
1 -
Expert Insights
178 -
Expert Insights
280 -
General
1 -
Google cloud
1 -
Google Next'24
1 -
Kafka
1 -
Life at SAP
784 -
Life at SAP
11 -
Migrate your Data App
1 -
MTA
1 -
Network Performance Analysis
1 -
NodeJS
1 -
PDF
1 -
POC
1 -
Product Updates
4,577 -
Product Updates
330 -
Replication Flow
1 -
RisewithSAP
1 -
SAP BTP
1 -
SAP BTP Cloud Foundry
1 -
SAP Cloud ALM
1 -
SAP Cloud Application Programming Model
1 -
SAP Datasphere
2 -
SAP S4HANA Cloud
1 -
SAP S4HANA Migration Cockpit
1 -
Technology Updates
6,886 -
Technology Updates
408 -
Workload Fluctuations
1
Related Content
- Unify your process and task mining insights: How SAP UEM by Knoa integrates with SAP Signavio in Technology Blogs by SAP
- I cannot cancel an import in SAP Analytics Cloud from SAP Hana. in Technology Q&A
- Consuming SAP with SAP Build Apps - Connectivity options for low-code development - part 2 in Technology Blogs by SAP
- CDS View: Hierarchy node sign reversal in Technology Blogs by SAP
- SAP Sustainability Footprint Management: Q1-24 Updates & Highlights in Technology Blogs by SAP
Top kudoed authors
| User | Count |
|---|---|
| 13 | |
| 11 | |
| 10 | |
| 9 | |
| 9 | |
| 7 | |
| 6 | |
| 5 | |
| 5 | |
| 5 |