
- SAP Community
- Products and Technology
- Technology
- Technology Blogs by SAP
- Set up the analytics adapter for SAP HANA XS Advan...
Technology Blogs by SAP
Learn how to extend and personalize SAP applications. Follow the SAP technology blog for insights into SAP BTP, ABAP, SAP Analytics Cloud, SAP HANA, and more.
Turn on suggestions
Auto-suggest helps you quickly narrow down your search results by suggesting possible matches as you type.
Showing results for
Employee
Options
- Subscribe to RSS Feed
- Mark as New
- Mark as Read
- Bookmark
- Subscribe
- Printer Friendly Page
- Report Inappropriate Content
10-15-2019
1:13 PM
Attention: The following blog post describes a rather old method how to deploy the analytics adapter and might not work on current versions on SAP HANA. Since the initial version of the blog post was published in 2019 a couple of things changed.
Both things are not considered in the pre-packaged archive provided on https://tools.hana.ondemand.com.
I recommend you to build your custom analytics adapter using the Cloud MTA Build Tool
In this blog post we will have a deeper look at the installation and configuration of the analytics adapter for SAP HANA extended application services, advanced model - sometimes called SAP HANA Analytics Adapter or HAA. In the end, it will support Single Sign-On with your SAP HANA 2.0 and your preferred analytics tool, such as SAP Analytics Cloud.
The widely used SAP HANA InformationAccess Service (or InA service) was introduced with HANA 1.0 and relies on the SAP HANA extended application services, classic model (XSC).
XSC was officially marked deprecated in 2017 after the introduction of its successor, the SAP HANA extended application services, advanced model (XSA). See SAP Note 2465027 for more info. While XSC might be removed in future versions of SAP HANA, it is already removed in the SAP HANA service on the SAP Cloud Platform. Therefore, some changes to the InA service and its dependencies to XSC were required to be still supported in the future.
The analytics adapter for XSA is the successor of the XSC-based InA service and is also leveraging the InA protocol under the hood to let your analytics tool speak with your SAP HANA. It generally works on on-premise installations, as well as the SAP HANA service running on the SAP Cloud Platform (Cloud Foundry).
Be aware that this blog post focuses on the installation and configuration with an on-premise installation only. If you are looking for instructions on how to use it with the SAP HANA service, I can recommend the excellent blog post and YouTube videos of my colleague philip.mugglestone.
The InA protocol requires that the SAP HANA provides the MultiDimensional Services (MDS). With SAP HANA 1.0, the MDS capabilities were directly built-in and ready to use by default. With SAP HANA 2.0 SP01, this plug-in became a separate system component, which must be now actively installed.
Make yourself ready for the future with XSA and follow along 😉
If you follow the steps described in this blog post, you should end up with a setup like the one shown in the picture below.
A single Identity Provider (IdP) will serve as the central component to maintain and verify your identity. It will authenticate you against SAP HANA, XSA and your analytics frontend, by only verifying your identity once. Well yes, that's basically how SSO works 😉
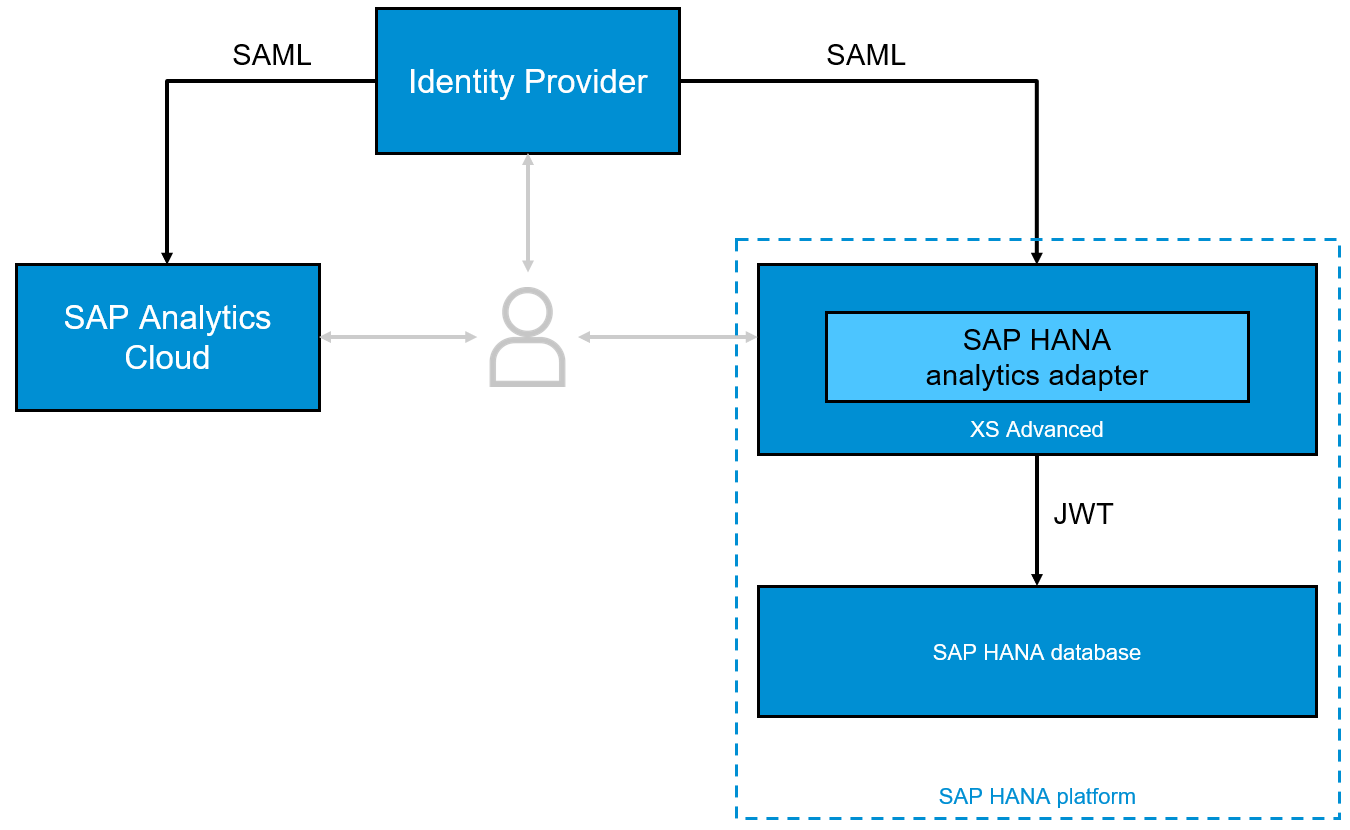
In my examples and screenshots I've used the SAP Cloud Platform Identity Authentication Service as the IdP and the SAP Analytics Cloud as my preferred analytics tool.
Before you start make sure that you and your systems meet the following prerequisites:
The adapter is offered as a WAR file, as well as a pre-built Multi-Target Application (MTA).
In this example, I will use the pre-built version of the adapter and do an adjustment directly in the archive to be able to use SSO. The MTA comprises a node.JS based application router, as well as a Java-based application to serve the requests.
To get started, visit https://tools.hana.ondemand.com/#hanatools and download the latest version of the xsahaa-onprem-*.zip archive and extract it.

Once extracted, open the MTAR file with WinRAR and navigate to the /approuter folder within the archive. Locate the xs-app.json file and open it with a text editor of your choice.
Change the specified route for the POST and GET requests in the file by setting the authenticationType from "basic" to "xsuaa".
Save the file after you have made the changes.
You should receive a prompt from WinRAR asking you whether you want to replace the file in the directory. Of course, we do 🙂

Before you continue with the deployment of the MTA, it is important that you familiarize yourself with your current XSA Tenant Configuration.
First, you need to make sure, that your Tenant DB is enabled for XSA.
Second, the space or the organization where you want to deploy the adapter should be mapped to the Tenant DB (and the correct one, in case you have multiple tenants). This is important because you will only be able to access the content of the tenant to which the space/organization is mapped.
You can check both things in the XSA Cockpit:

Now that you have the MTAR file prepared and an XSA space selected for deployment, let's get started.
Login with the XSA Command-Line Client
Change the target to your desired space, if necessary.
Deploy the MTAR file containing the analytics adapter to your space:
After some time, the deployment should be finished and you should see two new and started applications in your space.

Open the URL of the xsahaa-entry application to test the installation.

The pre-built adapter also contains an XSA role, which is required to use the adapter.
You need to create your own Role Collection in the XSA Cockpit …

.. and also add the adapter role to it:

These steps are required to map it to your IdP later.
As you just have the XSA CLI open, make some more changes to the deployed adapter to use it later with CORS.
You could have also done it before the initial deployment by using the WinRAR method, but the following method allows you to adjust your CORS entries at a later point of time without a redeployment of the entire adapter.
The CORS settings are stored in the environment variables of the xsahaa-entry application.
Retrieve the environment variables, by executing the following command:
Open the exported JSON file with a text editor of your choice and locate the JSON property "CORS".
Make sure you delete everything in the file, except the value of the "CORS" property, which should be a JSON array and the only thing left in the file.
Maintain your individual values for host and protocol within the allowedOrigin property. You don't need the port property, so just delete it.
Furthermore, there are some values maintained in the allowedMethods, allowedHeaders and exposeHeaders in the default template, which are not required and can be deleted.
Save your file and execute the following command to update the environment variables of your application.
The CORS argument after the application name indicates that the content from the file should be set as a value for that particular property.
Make the changes to take effect by executing
Congratulations, you've successfully installed the analytics adapter on your SAP HANA!!
Now let's take care of the IdP.
In this chapter, you will configure the trust between your Identity Provider and XSA. This allows XSA to "reuse" the identities from the IdP, instead of maintaining all reporting users as XSA users.
As a starting point, please download the SAML metadata of XSA. You can retrieve it simply from the browser. To construct the URL execute the following command in the XSA CLI first.
Locate the value for authorizationEndpoint and copy the value. Add /saml/metadata at the end and open the URL in your browser.
https://<<Your-Hostname>>:3<<Your-Instance-ID>>32/uaa-security/saml/metadata
An XML file containing the metadata will be downloaded.
As a next step, you can add XSA as an application within your IdP. As mentioned earlier, I use the SAP Cloud Platform Identity Authentication Service, but other SAML identity providers work as well.
Create a new application in your IdP by hitting the „+ Add“ button.

Upload the XML file in the section "SAML 2.0 Configuration" and save your changes.
Edit the "Assertion Attributes" and maintain an assertion attribute for "Groups" as shown below.
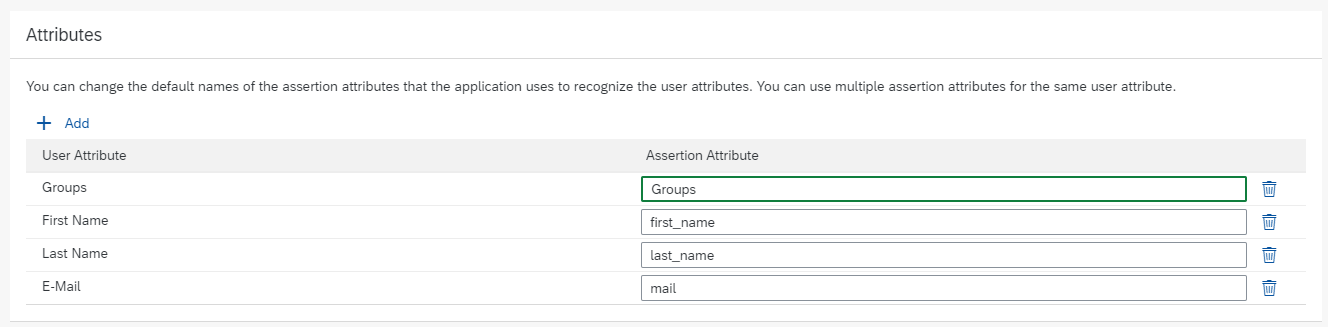
The capitalization of the attribute is important, so make sure it begins with an upper case.
I will leave the rest of the settings with their default values. Depending on your IdP and your current setup within your organization you might want to choose something different than the User ID as the Subject Name ID. Feel free to do so 😉
Furthermore, you need a Group within your IdP to let XSA know whether a user is allowed to use the analytics adapter or not. This group name will be passed to XSA via the previously configured assertion attribute "Groups".

After you have created the group, you can already assign it to your user via the User Management:

Before you head back to XSA, you need to download the SAML metadata of the IdP.
If you also use the SAP Cloud Platform Identity Authentication Service, you can get it via "Applications & Resources" -> "Tenant Settings" -> "SAML 2.0 Configuration".
In case you use a different IdP, please refer to the solution-specific help pages.
Add your IdP as Trusted Identity Provider to XSA
Back in the XSA Cockpit:
Go to "Security" -> "Trust Configuration" and add a new Trust Configuration.
Upload the metadata XML (the one from the IdP).

One last thing to do, before you finish the configuration of the IdP, is the mapping of the Role Collection for users of your analytics adapter.
For this, save your configuration, click the name of Trust Configuration and create a new mapping. The value of the mapping depends on the value you have maintained during the configuration of the IdP.

As XSA technically now knows who you are, you only need to make yourself - and any other user - known to the database.
Create a new database user with a JWT identity and grant the EXECUTE privilege for the SYS procedure EXECUTE_MDS. It's important to perform this on the Tenant DB.

You will get the name of your JWT Provider by executing the following SQL statement:
As an alternative, you can also perform the above-mentioned steps graphically via SAP HANA Cockpit 2.0.
That‘s it already. Now it's time to see if everything is configured correctly.
Find out the URL and the port of your xsahaa-entry application, either by using the XSA Cockpit or by using the XSA CLI.

Copy the URL to the browser and attach /sap/bc/ina/service/v2/HeartBeat at the end
As you are most likely logged in to XSA at this point of time, make sure you are either using the Incognito Mode or a different browser.
You should see your well-known XSA login screen. Instead of signing in with your credentials, choose your IdP to sign-in:

You will be redirected to the login screen of your IdP. Sign in.

If you see your previously created database user in the response you made it, well done!

Now it's time to consume live data in SAP Analytics Cloud via the analytics adapter.
Create a new connection to your SAP HANA and use the values (host and port) from the xsahaa-entry application. Choose "SAML Single Sign On" as authentication method.
When you hit OK, a new window for authentication will open.
Just press the name of your IdP (you may have to resize the window in order to see it)

Create a model on top of your database view.
Note: You need to grant additional privileges on data sources to your user.

Now, you can start to model stories in your SAP Analytics Cloud 😉

Every time you perform a new login to SAC and want to access from the database the first time, you have to manually choose the correct IdP from the XSA login screen.

In order to get rid of this manual step and provide a seamless user experience to your end users, you've to make two changes to the configuration in your xsuaaserver.ini.
This steps need to be performed in the SYSTEMDB.
Add the parameter saml_auto_redirect with the value true to the environment section.
Change the parameter uaa.oidc.enableoidc to value false in the section configuration.
You can either do it via SAP HANA Cockpit 2.0:

or via SQL:
Restart XSA (or the entire database) to make the changes take effect.
Please note that this will make the authentication via the built-in OIDC provider a bit uncomfortable.
If you would like to access XSA applications, for example the XSA Cockpit, through XSA-managed users, such as XSA_ADMIN, you must call the following URL directly and sign in with the credentials.
https://<<Your Hostname>>:3<<Your Instance ID>>32/uaa-security/login?origin=uaa
Afterwards, you will be able to launch the desired application with the verified identity from the OIDC.
I hope you you could follow along and can now use your SAP HANA with your analytics frontend and the analytics adapter for XSA.
Best,
Ingo
- Node.JS version 8 and below are not supported on SAP HANA extended application services, advanced model (XSA) anymore
- The tightened handling of Same-Site Cookies introduced by Google Chrome with version 80 requires special attention in the analytics adapter, which requires "@sap/approuter" in version 6.7.2 or higher.
Both things are not considered in the pre-packaged archive provided on https://tools.hana.ondemand.com.
I recommend you to build your custom analytics adapter using the Cloud MTA Build Tool
In this blog post we will have a deeper look at the installation and configuration of the analytics adapter for SAP HANA extended application services, advanced model - sometimes called SAP HANA Analytics Adapter or HAA. In the end, it will support Single Sign-On with your SAP HANA 2.0 and your preferred analytics tool, such as SAP Analytics Cloud.
Why do we need that adapter … What about the good, old InA service!?
The widely used SAP HANA InformationAccess Service (or InA service) was introduced with HANA 1.0 and relies on the SAP HANA extended application services, classic model (XSC).
XSC was officially marked deprecated in 2017 after the introduction of its successor, the SAP HANA extended application services, advanced model (XSA). See SAP Note 2465027 for more info. While XSC might be removed in future versions of SAP HANA, it is already removed in the SAP HANA service on the SAP Cloud Platform. Therefore, some changes to the InA service and its dependencies to XSC were required to be still supported in the future.
The analytics adapter for XSA is the successor of the XSC-based InA service and is also leveraging the InA protocol under the hood to let your analytics tool speak with your SAP HANA. It generally works on on-premise installations, as well as the SAP HANA service running on the SAP Cloud Platform (Cloud Foundry).
Be aware that this blog post focuses on the installation and configuration with an on-premise installation only. If you are looking for instructions on how to use it with the SAP HANA service, I can recommend the excellent blog post and YouTube videos of my colleague philip.mugglestone.
The InA protocol requires that the SAP HANA provides the MultiDimensional Services (MDS). With SAP HANA 1.0, the MDS capabilities were directly built-in and ready to use by default. With SAP HANA 2.0 SP01, this plug-in became a separate system component, which must be now actively installed.
Make yourself ready for the future with XSA and follow along 😉
What do we want to achieve by the end of this blog post?
If you follow the steps described in this blog post, you should end up with a setup like the one shown in the picture below.
A single Identity Provider (IdP) will serve as the central component to maintain and verify your identity. It will authenticate you against SAP HANA, XSA and your analytics frontend, by only verifying your identity once. Well yes, that's basically how SSO works 😉
In my examples and screenshots I've used the SAP Cloud Platform Identity Authentication Service as the IdP and the SAP Analytics Cloud as my preferred analytics tool.
Well, then let's start... No, wait!
Before you start make sure that you and your systems meet the following prerequisites:
- Your IdP is already configured in your SAP Analytics Cloud tenant
- If it is not the case, you can refer to the SAP Analytics Cloud Guided Playlist
- Note: You won't be able to do this with a trial account.
- The EPM-MDS system component is installed in the SAP HANA you want to connect
- Please follow SAP Note 2456225 if it is not installed.
- Note: The EPM-MDS component is installed by default with SAP HANA, express edition SP03 and above.
- XSA is configured to have a valid and signed (not self-signed) certificate as SAP Analytics Cloud will not accept self-signed certificates (anymore)
- You have admin access to the following components:
- SAML Identity Provider
- XSA Cockpit
- SAP HANA (at least to the Tenant DB)
- SAP Analytics Cloud
- You have the XSA Command-Line Client and WinRAR available on your local machine
Download the analytics adapter
The adapter is offered as a WAR file, as well as a pre-built Multi-Target Application (MTA).
In this example, I will use the pre-built version of the adapter and do an adjustment directly in the archive to be able to use SSO. The MTA comprises a node.JS based application router, as well as a Java-based application to serve the requests.
To get started, visit https://tools.hana.ondemand.com/#hanatools and download the latest version of the xsahaa-onprem-*.zip archive and extract it.
Adjust the MTA to support SSO
Once extracted, open the MTAR file with WinRAR and navigate to the /approuter folder within the archive. Locate the xs-app.json file and open it with a text editor of your choice.
Change the specified route for the POST and GET requests in the file by setting the authenticationType from "basic" to "xsuaa".
{

    "welcomeFile": "index.html",

    "routes": [

        {

            "source": "/sap/bc/ina",

            "destination": "xsahaa-java",

            "httpMethods": [

                "POST",

                "GET"

            ],

            "authenticationType": "xsuaa"

        },

        {

            "source": "/sap/bc/ina",

            "destination": "xsahaa-java",

            "httpMethods": [

                "OPTIONS"

            ],

            "authenticationType": "none"

        },

        {

            "source": "^/(.*)",

            "localDir": "resources"

        }

    ]

}
Save the file after you have made the changes.
You should receive a prompt from WinRAR asking you whether you want to replace the file in the directory. Of course, we do 🙂
Check your XSA Tenant Configuration
Before you continue with the deployment of the MTA, it is important that you familiarize yourself with your current XSA Tenant Configuration.
First, you need to make sure, that your Tenant DB is enabled for XSA.
Second, the space or the organization where you want to deploy the adapter should be mapped to the Tenant DB (and the correct one, in case you have multiple tenants). This is important because you will only be able to access the content of the tenant to which the space/organization is mapped.
You can check both things in the XSA Cockpit:
Deploy the analytics adapter to XSA
Now that you have the MTAR file prepared and an XSA space selected for deployment, let's get started.
Login with the XSA Command-Line Client
xs l -a <<Your XSA Controller Endpoint>>Change the target to your desired space, if necessary.
xs t -s <<Your XSA-Space>>Deploy the MTAR file containing the analytics adapter to your space:
xs deploy xsahaa-onprem-1.5.10.mtarAfter some time, the deployment should be finished and you should see two new and started applications in your space.
Open the URL of the xsahaa-entry application to test the installation.
Create a Role Collection for your analytics adapter users.
The pre-built adapter also contains an XSA role, which is required to use the adapter.
You need to create your own Role Collection in the XSA Cockpit …
.. and also add the adapter role to it:
These steps are required to map it to your IdP later.
Modify your instaled adapter instance for CORS access
As you just have the XSA CLI open, make some more changes to the deployed adapter to use it later with CORS.
You could have also done it before the initial deployment by using the WinRAR method, but the following method allows you to adjust your CORS entries at a later point of time without a redeployment of the entire adapter.
The CORS settings are stored in the environment variables of the xsahaa-entry application.
Retrieve the environment variables, by executing the following command:
xs env xsahaa-entry --export-json env.jsonOpen the exported JSON file with a text editor of your choice and locate the JSON property "CORS".
Make sure you delete everything in the file, except the value of the "CORS" property, which should be a JSON array and the only thing left in the file.
Maintain your individual values for host and protocol within the allowedOrigin property. You don't need the port property, so just delete it.
Furthermore, there are some values maintained in the allowedMethods, allowedHeaders and exposeHeaders in the default template, which are not required and can be deleted.
[ {

    "uriPattern" : "^/sap/bc/ina/(.*)$",

    "allowedOrigin" : [ {

      "host" : "xxxxxxxxx.eu10.sapanalytics.cloud",

      "protocol" : "https"

    } ],

    "allowedMethods" : [ "GET", "POST", "HEAD", "OPTIONS" ],

    "allowedHeaders" : [ "Accept", "X-Requested-With", "Content-Type", "Authorization", "X-Sap-Cid", "X-Csrf-Token" ],

    "exposeHeaders" : ["X-Csrf-Token"]

  } ]
Save your file and execute the following command to update the environment variables of your application.
xs set-env xsahaa-entry CORS --from-file env.jsonThe CORS argument after the application name indicates that the content from the file should be set as a value for that particular property.
Make the changes to take effect by executing
xs restage xsahaa-entryxs restart xsahaa-entryCongratulations, you've successfully installed the analytics adapter on your SAP HANA!!
Now let's take care of the IdP.
Configure XSA in your IdP
In this chapter, you will configure the trust between your Identity Provider and XSA. This allows XSA to "reuse" the identities from the IdP, instead of maintaining all reporting users as XSA users.
As a starting point, please download the SAML metadata of XSA. You can retrieve it simply from the browser. To construct the URL execute the following command in the XSA CLI first.
xs -vLocate the value for authorizationEndpoint and copy the value. Add /saml/metadata at the end and open the URL in your browser.
https://<<Your-Hostname>>:3<<Your-Instance-ID>>32/uaa-security/saml/metadata
An XML file containing the metadata will be downloaded.
As a next step, you can add XSA as an application within your IdP. As mentioned earlier, I use the SAP Cloud Platform Identity Authentication Service, but other SAML identity providers work as well.
Create a new application in your IdP by hitting the „+ Add“ button.
Upload the XML file in the section "SAML 2.0 Configuration" and save your changes.
Edit the "Assertion Attributes" and maintain an assertion attribute for "Groups" as shown below.
The capitalization of the attribute is important, so make sure it begins with an upper case.
I will leave the rest of the settings with their default values. Depending on your IdP and your current setup within your organization you might want to choose something different than the User ID as the Subject Name ID. Feel free to do so 😉
Furthermore, you need a Group within your IdP to let XSA know whether a user is allowed to use the analytics adapter or not. This group name will be passed to XSA via the previously configured assertion attribute "Groups".
After you have created the group, you can already assign it to your user via the User Management:
Before you head back to XSA, you need to download the SAML metadata of the IdP.
If you also use the SAP Cloud Platform Identity Authentication Service, you can get it via "Applications & Resources" -> "Tenant Settings" -> "SAML 2.0 Configuration".
In case you use a different IdP, please refer to the solution-specific help pages.
Add your IdP as Trusted Identity Provider to XSA
Back in the XSA Cockpit:
Go to "Security" -> "Trust Configuration" and add a new Trust Configuration.
Upload the metadata XML (the one from the IdP).
One last thing to do, before you finish the configuration of the IdP, is the mapping of the Role Collection for users of your analytics adapter.
For this, save your configuration, click the name of Trust Configuration and create a new mapping. The value of the mapping depends on the value you have maintained during the configuration of the IdP.
Create a database user and assign privileges
As XSA technically now knows who you are, you only need to make yourself - and any other user - known to the database.
Create a new database user with a JWT identity and grant the EXECUTE privilege for the SYS procedure EXECUTE_MDS. It's important to perform this on the Tenant DB.
CREATE USER <<YOUR_USER>> WITH IDENTITY '<<Subject Name ID according to your SAML configuration>>' FOR JWT PROVIDER <<JWT Provider Name>>;


GRANT EXECUTE SYS.EXECUTE_MDS to <<YOUR_USER>>;
You will get the name of your JWT Provider by executing the following SQL statement:
SELECT JWT_PROVIDER_NAME FROM JWT_PROVIDERS;As an alternative, you can also perform the above-mentioned steps graphically via SAP HANA Cockpit 2.0.
Perform your first test
That‘s it already. Now it's time to see if everything is configured correctly.
Find out the URL and the port of your xsahaa-entry application, either by using the XSA Cockpit or by using the XSA CLI.
Copy the URL to the browser and attach /sap/bc/ina/service/v2/HeartBeat at the end
As you are most likely logged in to XSA at this point of time, make sure you are either using the Incognito Mode or a different browser.
You should see your well-known XSA login screen. Instead of signing in with your credentials, choose your IdP to sign-in:
You will be redirected to the login screen of your IdP. Sign in.
If you see your previously created database user in the response you made it, well done!
Consume live data in SAP Analytics Cloud
Now it's time to consume live data in SAP Analytics Cloud via the analytics adapter.
Create a new connection to your SAP HANA and use the values (host and port) from the xsahaa-entry application. Choose "SAML Single Sign On" as authentication method.
When you hit OK, a new window for authentication will open.
Just press the name of your IdP (you may have to resize the window in order to see it)
Create a model on top of your database view.
Note: You need to grant additional privileges on data sources to your user.
Now, you can start to model stories in your SAP Analytics Cloud 😉
(optional) Redirect all login requests directly to your IdP
Every time you perform a new login to SAC and want to access from the database the first time, you have to manually choose the correct IdP from the XSA login screen.
In order to get rid of this manual step and provide a seamless user experience to your end users, you've to make two changes to the configuration in your xsuaaserver.ini.
This steps need to be performed in the SYSTEMDB.
Add the parameter saml_auto_redirect with the value true to the environment section.
Change the parameter uaa.oidc.enableoidc to value false in the section configuration.
You can either do it via SAP HANA Cockpit 2.0:
or via SQL:
ALTER SYSTEM ALTER CONFIGURATION ( 'xsuaaserver.ini', 'SYSTEM' ) SET ( 'environment', 'saml_auto_redirect' ) = 'true';

ALTER SYSTEM ALTER CONFIGURATION ( 'xsuaaserver.ini', 'SYSTEM' ) SET ( 'configuration', 'uaa.oidc.enableoidc' ) = 'false';
Restart XSA (or the entire database) to make the changes take effect.
Please note that this will make the authentication via the built-in OIDC provider a bit uncomfortable.
If you would like to access XSA applications, for example the XSA Cockpit, through XSA-managed users, such as XSA_ADMIN, you must call the following URL directly and sign in with the credentials.
https://<<Your Hostname>>:3<<Your Instance ID>>32/uaa-security/login?origin=uaa
Afterwards, you will be able to launch the desired application with the verified identity from the OIDC.
I hope you you could follow along and can now use your SAP HANA with your analytics frontend and the analytics adapter for XSA.
Best,
Ingo
- SAP Managed Tags:
- SAP Analytics Cloud,
- SAP Analytics Cloud, connectivity,
- SAP HANA,
- SAP HANA Info Access
Labels:
3 Comments
You must be a registered user to add a comment. If you've already registered, sign in. Otherwise, register and sign in.
Labels in this area
-
ABAP CDS Views - CDC (Change Data Capture)
2 -
AI
1 -
Analyze Workload Data
1 -
BTP
1 -
Business and IT Integration
2 -
Business application stu
1 -
Business Technology Platform
1 -
Business Trends
1,658 -
Business Trends
91 -
CAP
1 -
cf
1 -
Cloud Foundry
1 -
Confluent
1 -
Customer COE Basics and Fundamentals
1 -
Customer COE Latest and Greatest
3 -
Customer Data Browser app
1 -
Data Analysis Tool
1 -
data migration
1 -
data transfer
1 -
Datasphere
2 -
Event Information
1,400 -
Event Information
66 -
Expert
1 -
Expert Insights
177 -
Expert Insights
293 -
General
1 -
Google cloud
1 -
Google Next'24
1 -
Kafka
1 -
Life at SAP
780 -
Life at SAP
13 -
Migrate your Data App
1 -
MTA
1 -
Network Performance Analysis
1 -
NodeJS
1 -
PDF
1 -
POC
1 -
Product Updates
4,577 -
Product Updates
340 -
Replication Flow
1 -
RisewithSAP
1 -
SAP BTP
1 -
SAP BTP Cloud Foundry
1 -
SAP Cloud ALM
1 -
SAP Cloud Application Programming Model
1 -
SAP Datasphere
2 -
SAP S4HANA Cloud
1 -
SAP S4HANA Migration Cockpit
1 -
Technology Updates
6,873 -
Technology Updates
419 -
Workload Fluctuations
1
Related Content
- SAP Datasphere test tenant ? in Technology Q&A
- Issues with "SAP Analytics Cloud, add-in for Microsoft Excel" while working with SAP Datasphere in Technology Q&A
- SAP Analytics Cloud Excel Add In - Multiple Tables in Technology Q&A
- SAP Analytics Cloud, add-in for Microsoft Excel and SAP Datasphere connection in Technology Blogs by SAP
- Improvising Time Management in SAP S/4HANA Cloud: A Co-Innovation Solution in Technology Blogs by SAP
Top kudoed authors
| User | Count |
|---|---|
| 35 | |
| 25 | |
| 13 | |
| 7 | |
| 7 | |
| 6 | |
| 6 | |
| 6 | |
| 5 | |
| 4 |