
- SAP Community
- Products and Technology
- Technology
- Technology Blogs by SAP
- Create Process Definition for Business Process Mon...
Technology Blogs by SAP
Learn how to extend and personalize SAP applications. Follow the SAP technology blog for insights into SAP BTP, ABAP, SAP Analytics Cloud, SAP HANA, and more.
Turn on suggestions
Auto-suggest helps you quickly narrow down your search results by suggesting possible matches as you type.
Showing results for
jens-christoph_
Explorer
Options
- Subscribe to RSS Feed
- Mark as New
- Mark as Read
- Bookmark
- Subscribe
- Printer Friendly Page
- Report Inappropriate Content
10-14-2011
1:39 PM
While this is the fifth blog post in the series of "Business Process Monitoring & Analytics for Business Suite Processes (POB)”, it is my first blog post on this topic.
The previous posts of the series have been Introducing New Component: Business Process Monitoring and Analytics for Business Suite Processes (P..., explaining the Architecture of Business Process Monitoring and Analytics for Business Suite Processes (POB), and have given an example in Monitor Sales Order Processing with Business Process Monitoring and Analytics for Business Suite Pro....
Now that the system is up and running, after the Setup of Component Business Process Monitoring and Analytics for Business Suite Processes (POB), let’s move on to the heart of matters:
Creating a Process Definition
This blog is based on a hands-on TechEd session. If you missed it, here is a short version based on the assumption that you have some basic knowledge from the previous posts.
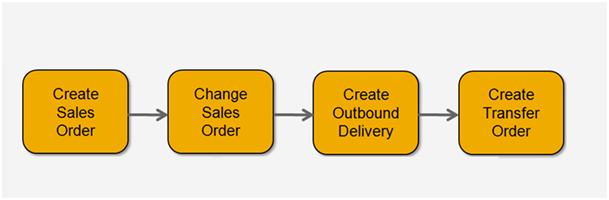
The process we want to create a definition for is – for the sake of argument - this short order to delivery process:
If you are not familiar with the process, you can probably set it up in your system, but you may have some problems executing it in the system. I can’t help you with that, as the set-up of your sales order (materials etc.) will be very specific to your customizing.
In the following, I’ll go through the steps of creating the process definition in some detail.
Create the Process Definition Header
The process definitions are maintained using a standard view cluster that is enhanced with some functions. To start, execute transaction Maintain Process Definition (POC_MODEL). The transaction is part of the standard user role (SAP_POC_BPX).
All data you enter is standard customizing data. SAP delivers some template data that may be available in your client. As for all customizing data, you may need a transport request to save data.
To start, choose the New Entries button to create a process definition header and enter an ID and a description, let’s say PMC264_SalesOrderProcess00 and “Sales Order Process”. (We don’t want to enter a current version or set the log-level yet as we’re still in process of setting up the process definition. We’ll come back to these steps later.)
Create the Version
As always when navigating through view clusters – and I won’t repeat this every time we navigate down – be sure to select your process definition table row and then double click Process Version in the navigation tree.
Choose the New Entries button to create a process version. Enter a numeric value “1” for the version and activate this process definition version by clicking the checkbox in the Active column.
A word about versions: for a Process Definition you can create multiple versions; the current version is used for new process instances, but for existing process instances, the version in which they were started is used. That way you can consistently change the process definition. This is a technical function that you can use to manage the life cycle of your process definitions – and one reason to do process monitoring is process optimization, i.e. “change” – but there are other things to consider.
Now you can go back to the process definition header and enter the version number as the “current version”.
Add Activities to the Process Definition
From the versions tables, you can create the activities. “Activities” is the term we use and it is based on BPMN terminology. What we call “activities” is often also referred to as “steps”.
Choose the New Entries button to create activities. Enter the following activities (the IDs don’t have to start with a number, but it is convenient for putting them in the correct order):
- 10CREASO Create Sales Order as a Start activity
- 20CHNGSO Update Sales Order
- 30CREAOD Create Outbound Delivery
- 40CREATO Create Transfer Order as an End activity
The start indicator is very important. Without a start activity, the logging of a process instance will not be started. The status of a process where a start activity was executed is “Started”. The end indicator is used for the status of the process: if an end activity is reached, the status of the process instance will be “Finished”; a process may be “Restarted” though, by any activity that follows an end activity. Any other activity will change the status to the status “Running”. This already covers the simple default status handling: Started, Running, Finished, and Restarted.
You can have multiple start and end activities. Multiple start activities can be used if your process either starts with the creation of a quote of a sales order; then both activities, create quote and create sales order, can be marked as start activities. When a sales order is created and no predecessor – in this case a quote – is found, a new process instances is created. If a predecessor is found, the activity will be linked to the existing process instance and no new process instance is created.
The result should look like this:

Assign the Tasks to the Activities
You now have a process definition. The definition is at this point not linked to any runtime object. So the next step is to link the definition, or “model”, to the runtime. To do that, you have to assign (at least) one task (event) to each activity. At runtime, the events are mapped to the activities. The tasks themselves are linked to BOR events, which are actual runtime objects: BOR events actually occur at runtime, the can be stored and processed. You can create new tasks in the PMA façade layer. This will be explained in a separate blog.
For each activity definition navigate down to the task assignment.
Activity Create Sales Order (10CREASO) should be assigned to Task Create Sales Order (Business Object Type 114 Task Type ID 21); that would look something like this:

Activity Create Sales Order assigned to Task Create Sales Order
You have to go back to the activities and repeat the steps of assigning tasks for the remaining three activities:
Activity Update Sales Order (20CHNGSO) should be assigned to Task Update Sales Order (Business Object Type 114 Task Type ID 88).
Activity Create Outbound Delivery (30CREAOD) should be assigned to Task Create Outbound Delivery (Business Object Type 73 Task Type ID 21).
Activity Create Transfer Order (40CREATO) should be assigned to Task Update Outbound Delivery (Business Object Type 73 Task Type ID 88). This last assignment is probably not the best way of doing it, but for this rather simple example, it is good enough.
When you actually look at the view in your system, you will find here - and in some of the other views - a reference to Business Rule Framework plus rules. These rules add a lot of flexibility; in this view they allow you to do the "binding" between task and activity based on a condition that is put in the rule e.g. you want the create event to bind to your activity only for certain customers; you can then add a rule to do that.
Set up Callable Business Entity Assignment [Optional]
Sometimes the easiest way to describe a process is the sequence of screens you go through, or in SAP terms, the sequence of transactions. The Callable Business Entity is “the transaction”, but it can also be an automatic task that is described as a web service call.
You can add here the appropriate transactions for each activity, in our case the transactions VA01 to create a sales order, VA02 to update it, VL01N to create the outbound delivery and finally VL02N to create the transfer order.
Sometimes it is a valid approach to create a process definition by starting with the order of transactions being carried out.
Set up Activity Sequence [Optional]
By setting up the sequence, you can make sure that the presentation, e.g. in the process definition viewer (POC_VIEWER), is in the order defined here. This is for your convenience and does not affect the runtime.
Navigate to the Activity Sequence Flow in the navigation tree and create New Entries and enter a true sequence flow going from 10CREAS to 40CREATO.
The result, the Activity Sequence Flow for the sample process definition, should look like this:
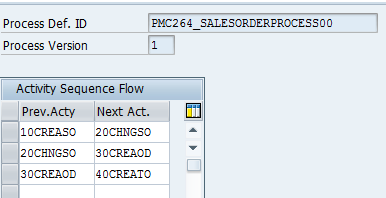
Note that you may have multiple “next“ or „previous“ activities for a given activity, so parallel flows, for example, are possible. You are not protected from setting up random sequences, but since this is used for presentation purposes only, it wouldn’t do much except disrupt the presentation.
You are now finished with setting up the process definition. We can now have a look at the process definition using the Process Definition Viewer (POC_VIEWER), which displays the definition in a much more comprehensive way than the view cluster can. In higher releases, the viewer is available as a web dynpro screen as well.
Topics we have not covered here are KPIs, setting up a complex process status handling, the rules in the various places and the extension concept, and federation (setting up process chains across multiple systems). We will look at those in separate blog posts.
Check the Definition
After setting up your process definition, you need to check the model to see if you have any errors in your definition. Transaction Process Definition Checks (POC_MODEL_CHECK) is helpful for finding issues. Start it with your process definition ID, which in this example is PMC264_SALESORDERPROCESS00.
You should receive as a result of the process definition check something similar to this:

If you have a red X in the consistency column, you’ll need to look into the issues reported.
The following common errors are reported:
- Process definitions without an active version
- Activities with inactive Business Object Repository (BOR) events
- No start activity assignment
- No task assigned to activity
- No BOR event or class assignments
If you encounter any errors, such as a missing start activity, you can navigate back to your process definition by choosing View-cluster button to make your corrections.
For this example, your process definition should to be consistent (error-free) before proceeding. In practice and with more complex examples there may be reasons why you want to do things that lead to warnings, e.g. insert activities that are not assigned to any task for documentation purposes.
Switch on Logging
Finally, you want to switch on the logging. To do that, on Process Definition Header level set the log level to “Standard logging”. You can now run the process: using transaction VA01, you create a sales order (do that only in your test system and when you know that you are not affecting anybody else), call the process monitor (POC_MONITOR) and you should see something like this (this is actually after having executed the first three steps of the process):

Again, in higher releases there is a web dynpro version of the monitor available.
Now that you understand how to set up a process definition, we’ll look into KPI functionality and definition in Create KPI Definitions for Business Process Monitoring & Analytics for Business Suite Processes (PMA....
- SAP Managed Tags:
- SAP Business Process Management
17 Comments
You must be a registered user to add a comment. If you've already registered, sign in. Otherwise, register and sign in.
Labels in this area
-
ABAP CDS Views - CDC (Change Data Capture)
2 -
AI
1 -
Analyze Workload Data
1 -
BTP
1 -
Business and IT Integration
2 -
Business application stu
1 -
Business Technology Platform
1 -
Business Trends
1,661 -
Business Trends
88 -
CAP
1 -
cf
1 -
Cloud Foundry
1 -
Confluent
1 -
Customer COE Basics and Fundamentals
1 -
Customer COE Latest and Greatest
3 -
Customer Data Browser app
1 -
Data Analysis Tool
1 -
data migration
1 -
data transfer
1 -
Datasphere
2 -
Event Information
1,400 -
Event Information
65 -
Expert
1 -
Expert Insights
178 -
Expert Insights
280 -
General
1 -
Google cloud
1 -
Google Next'24
1 -
Kafka
1 -
Life at SAP
784 -
Life at SAP
11 -
Migrate your Data App
1 -
MTA
1 -
Network Performance Analysis
1 -
NodeJS
1 -
PDF
1 -
POC
1 -
Product Updates
4,577 -
Product Updates
330 -
Replication Flow
1 -
RisewithSAP
1 -
SAP BTP
1 -
SAP BTP Cloud Foundry
1 -
SAP Cloud ALM
1 -
SAP Cloud Application Programming Model
1 -
SAP Datasphere
2 -
SAP S4HANA Cloud
1 -
SAP S4HANA Migration Cockpit
1 -
Technology Updates
6,886 -
Technology Updates
408 -
Workload Fluctuations
1
Related Content
- Hack2Build on Business AI – Highlighted Use Cases in Technology Blogs by SAP
- Analyze Expensive ABAP Workload in the Cloud with Work Process Sampling in Technology Blogs by SAP
- Capture Your Own Workload Statistics in the ABAP Environment in the Cloud in Technology Blogs by SAP
- 10+ ways to reshape your SAP landscape with SAP Business Technology Platform - Blog 7 in Technology Blogs by SAP
- 10+ ways to reshape your SAP landscape with SAP Business Technology Platform – Blog 4 in Technology Blogs by SAP
Top kudoed authors
| User | Count |
|---|---|
| 13 | |
| 11 | |
| 10 | |
| 9 | |
| 9 | |
| 7 | |
| 6 | |
| 5 | |
| 5 | |
| 5 |